Kyocera TASKalfa 2550ci 2550ci Printer Driver User Guide - Page 90
Black & White, Define Custom Colors
 |
View all Kyocera TASKalfa 2550ci manuals
Add to My Manuals
Save this manual to your list of manuals |
Page 90 highlights
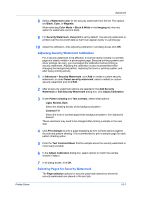
Advanced 2 In the Watermark dialog box, click Add to create a user defined watermark; or under Select watermark, select a default or custom watermark and click Edit. 3 Under Watermark name, type a name, to a maximum of 39 characters. A default watermark cannot be renamed. 4 Under Watermark text, type your preferred text. This option is not available when editing a default watermark. 5 Select the font, style, size, and count of the text. 6 Select the color of the watermark from the list of colors. For custom colors, select Custom, and click the right button to open the Color dialog box. Click one of the Basic colors and click OK, or click Define Custom Colors to open the color spectrum panel. When selecting Color Mode > Black & White in the Imaging tab, the list of colors are levels of gray and black. 7 Select the Position of the watermark with one of the following options. Centered [default] This option places the center of the watermark text in the center of the page. User defined This option lets you manipulate the x and y coordinate boxes to move the text around the page. You can also change the position by clicking the position button at the bottom of the preview area. Click and hold as you drag the pointer to move the watermark image. 8 Select the Angle of the watermark with one of the following options. Diagonal [default] This option places the watermark text at the default angle on the page. User defined This option lets you type a degree value for the angle. An angle is measured in degrees, from 0 to 360. You can also change the angle by clicking the angle button at the bottom of the preview area. Click and hold as you drag the pointer to move the watermark image. 9 The Rotate around center check box at the bottom far right of the dialog box determines the method of rotation for the watermark. You must select User defined in both Position and Angle to enable this option. Select Rotate around center to position the watermark text with the center of the text as its axis, and clear it to position the watermark text with the left end of the text as its axis. 10 In all dialog boxes, click OK. 10-4 User Guide
-
 1
1 -
2
-
3
-
4
-
5
-
6
-
7
-
8
-
9
-
10
-
11
-
12
-
13
-
14
-
15
-
16
-
17
-
18
-
19
-
20
-
21
-
22
-
23
-
24
-
25
-
26
-
27
-
28
-
29
-
30
-
31
-
32
-
33
-
34
-
35
-
36
-
37
-
38
-
39
-
40
-
41
-
42
-
43
-
44
-
45
-
46
-
47
-
48
-
49
-
50
-
51
-
52
-
53
-
54
-
55
-
56
-
57
-
58
-
59
-
60
-
61
-
62
-
63
-
64
-
65
-
66
-
67
-
68
-
69
-
70
-
71
-
72
-
73
-
74
-
75
-
76
-
77
-
78
-
79
-
80
-
81
-
82
-
83
-
84
-
 85
85 -
 86
86 -
 87
87 -
 88
88 -
 89
89 -
 90
90 -
 91
91 -
 92
92 -
 93
93 -
 94
94 -
 95
95 -
96
-
97
-
98
-
99
-
100
-
101
-
102
-
103
-
104
-
105
-
106
 |
 |