Kyocera TASKalfa 420i 420i/520i Operation Guide - Page 366
Obtain Network User Property, Description, Enabling/Disabling User Login Administration - default password encrypted
 |
View all Kyocera TASKalfa 420i manuals
Add to My Manuals
Save this manual to your list of manuals |
Page 366 highlights
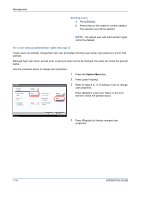
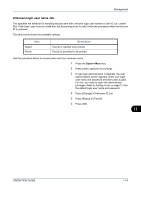
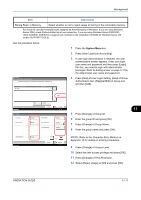
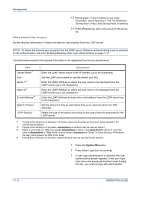
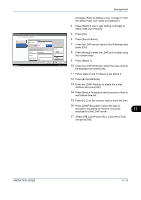
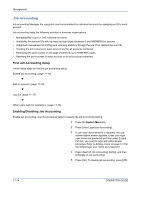
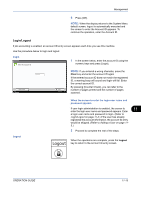
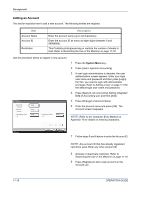
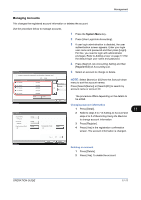
Management 13 Follow steps 11 and 12 above to set Copy Restriction, Send Restriction, FAX TX Restriction, Storing Restr. in Box, and Storing Restr. in Memory. 14 Press [Register] to add a new group on the group list. Obtain Network User Property Set the required information to obtain the network user property from the LDAP server. NOTE: To obtain the network user property from the LDAP server, [Network Authentication] must be selected for the authentication method in Enabling/Disabling User Login Administration on page 11-2. The table below explains the required information to be registered.Use the procedure below. Item Server Name*1 Port Name 1*2 Name 2*3 E-mail Address*4 Search Timeout LDAP Security Description Enter the LDAP server name or the IP address (up to 64 characters). Set the LDAP port number or use the default port 389. Enter the LDAP Attribute to obtain the user name to be displayed from the LDAP server (up to 32 characters). Enter the LDAP Attribute to obtain the user name to be displayed from the LDAP server (up to 32 characters). Enter the LDAP Attribute to obtain the e-mail address from the LDAP server (up to 32 characters). Set the amount of time to wait before time-out in seconds (from 5 to 255 seconds). Select the type of encryption according to the type of security employed by the LDAP server. *1 If using Active Directory of Windows, the server name may be same as the server name entered in the network authentication. *2 If using Active Directory of Windows, displayName of Attribute may be used as Name 1. *3 Name 2 can be left out. When you assign displayName in Name 1 and department in Name 2, and if the value of displayName is "Mike Smith" and the value of department is "Sales" in Active Directory of Windows, the user name appears as Mike Smith Sales. *4 If using Active Directory of Windows, mail of Attribute may be used as E-mail Address. 1 Press the System Menu key. 2 Press [User Login/Job Accounting]. 3 If user login administration is disabled, the user authentication screen appears. Enter your login user name and password and then press [Login]. For this, you need to login with administrator 11-12 OPERATION GUIDE
-
 1
1 -
2
-
3
-
4
-
5
-
6
-
7
-
8
-
9
-
10
-
11
-
12
-
13
-
14
-
15
-
16
-
17
-
18
-
19
-
20
-
21
-
22
-
23
-
24
-
25
-
26
-
27
-
28
-
29
-
30
-
31
-
32
-
33
-
34
-
35
-
36
-
37
-
38
-
39
-
40
-
41
-
42
-
43
-
44
-
45
-
46
-
47
-
48
-
49
-
50
-
51
-
52
-
53
-
54
-
55
-
56
-
57
-
58
-
59
-
60
-
61
-
62
-
63
-
64
-
65
-
66
-
67
-
68
-
69
-
70
-
71
-
72
-
73
-
74
-
75
-
76
-
77
-
78
-
79
-
80
-
81
-
82
-
83
-
84
-
85
-
86
-
87
-
88
-
89
-
90
-
91
-
92
-
93
-
94
-
95
-
96
-
97
-
98
-
99
-
100
-
101
-
102
-
103
-
104
-
105
-
106
-
107
-
108
-
109
-
110
-
111
-
112
-
113
-
114
-
115
-
116
-
117
-
118
-
119
-
120
-
121
-
122
-
123
-
124
-
125
-
126
-
127
-
128
-
129
-
130
-
131
-
132
-
133
-
134
-
135
-
136
-
137
-
138
-
139
-
140
-
141
-
142
-
143
-
144
-
145
-
146
-
147
-
148
-
149
-
150
-
151
-
152
-
153
-
154
-
155
-
156
-
157
-
158
-
159
-
160
-
161
-
162
-
163
-
164
-
165
-
166
-
167
-
168
-
169
-
170
-
171
-
172
-
173
-
174
-
175
-
176
-
177
-
178
-
179
-
180
-
181
-
182
-
183
-
184
-
185
-
186
-
187
-
188
-
189
-
190
-
191
-
192
-
193
-
194
-
195
-
196
-
197
-
198
-
199
-
200
-
201
-
202
-
203
-
204
-
205
-
206
-
207
-
208
-
209
-
210
-
211
-
212
-
213
-
214
-
215
-
216
-
217
-
218
-
219
-
220
-
221
-
222
-
223
-
224
-
225
-
226
-
227
-
228
-
229
-
230
-
231
-
232
-
233
-
234
-
235
-
236
-
237
-
238
-
239
-
240
-
241
-
242
-
243
-
244
-
245
-
246
-
247
-
248
-
249
-
250
-
251
-
252
-
253
-
254
-
255
-
256
-
257
-
258
-
259
-
260
-
261
-
262
-
263
-
264
-
265
-
266
-
267
-
268
-
269
-
270
-
271
-
272
-
273
-
274
-
275
-
276
-
277
-
278
-
279
-
280
-
281
-
282
-
283
-
284
-
285
-
286
-
287
-
288
-
289
-
290
-
291
-
292
-
293
-
294
-
295
-
296
-
297
-
298
-
299
-
300
-
301
-
302
-
303
-
304
-
305
-
306
-
307
-
308
-
309
-
310
-
311
-
312
-
313
-
314
-
315
-
316
-
317
-
318
-
319
-
320
-
321
-
322
-
323
-
324
-
325
-
326
-
327
-
328
-
329
-
330
-
331
-
332
-
333
-
334
-
335
-
336
-
337
-
338
-
339
-
340
-
341
-
342
-
343
-
344
-
345
-
346
-
347
-
348
-
349
-
350
-
351
-
352
-
353
-
354
-
355
-
356
-
357
-
358
-
359
-
360
-
 361
361 -
 362
362 -
 363
363 -
 364
364 -
 365
365 -
 366
366 -
 367
367 -
 368
368 -
 369
369 -
 370
370 -
 371
371 -
372
-
373
-
374
-
375
-
376
-
377
-
378
-
379
-
380
-
381
-
382
-
383
-
384
-
385
-
386
-
387
-
388
-
389
-
390
-
391
-
392
-
393
-
394
-
395
-
396
-
397
-
398
-
399
-
400
-
401
-
402
-
403
-
404
-
405
-
406
-
407
-
408
-
409
-
410
-
411
-
412
-
413
-
414
-
415
-
416
-
417
-
418
-
419
-
420
-
421
-
422
-
423
-
424
-
425
-
426
-
427
-
428
 |
 |