Kyocera TASKalfa 500ci KPRINT Installation Instructions
Kyocera TASKalfa 500ci Manual
 |
View all Kyocera TASKalfa 500ci manuals
Add to My Manuals
Save this manual to your list of manuals |
Kyocera TASKalfa 500ci manual content summary:
- Kyocera TASKalfa 500ci | KPRINT Installation Instructions - Page 1
a new KPrint port KPrint Installation KPrint installs a client port monitor that enables Windows TCP/IP printing to any network card connected to a printing system. KPrint supports Raw mode, LPR, IPP, Email, and Network FAX printing. KPrint Setup It is strongly recommended that you exit all - Kyocera TASKalfa 500ci | KPRINT Installation Instructions - Page 2
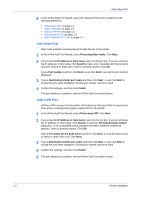
Port on page 1-2 • Add an IPP Port on page 1-3 • Add an Email Port on page 1-3 • Add a Network FAX Port on page 1-4 Add a Raw Port Raw mode transfers unprocessed print data directly to the printer. 1 In the KPrint Add Port Wizard, select Print using Raw mode. Click Next. 1 2 If you know the IP - Kyocera TASKalfa 500ci | KPRINT Installation Instructions - Page 3
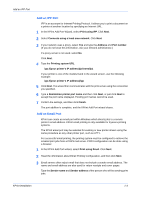
wizard closes. 8 Add an Email Port KPrint can create an email port within Windows which directs jobs to a remote printer's email address. KPrint email printing is only available for Kyocera printing systems. The KPrint email port may be selected for existing or new printer drivers using the same - Kyocera TASKalfa 500ci | KPRINT Installation Instructions - Page 4
successfully created. The port may be selected for printer drivers using the Windows Add Printer wizard. Click OK. The port addition is complete, and the KPrint Add Port wizard closes. Add a Network FAX Port 1 In the KPrint Add Port wizard, select Network FAX. Click Next. 1 2 If you know the IP
-
 1
1 -
 2
2 -
 3
3 -
 4
4
 |
 |

KPrint Installation
1-1
KPrint Installation
KPrint installs a client port monitor that enables Windows TCP/IP printing to any
network card connected to a printing system. KPrint supports Raw mode, LPR, IPP,
Email, and Network FAX printing.
KPrint Setup
It is strongly recommended that you exit all Windows programs before running this
setup program.
1
In Windows, click
Start > Run
. Type the file path:
1
<
CD drive letter
>:\Network\KPrint\KPInst.exe
Click
OK
.
2
In the
Welcome to KPrint Setup
page, click
Next
to continue with the Setup
program, or click
Cancel
to quit setup.
2
3
The
KPrint Setup
page displays a default
Destination Folder
. Click
Next
to accept
the folder and continue the setup, or Browse to select another location for the
KPrint
utility files.
3
4
The next
KPrint Setup
page displays a default
Program Folder
name where the
setup program will add program icons. (You can type a new folder name, or one from
the
Existing Folders
list.) Click
Next
.
4
5
The last
KPrint Setup
page displays a
KPrint is successfully installed
message. You
can:
5
•
Select
Yes
to add a new KPrint port using the KPrint Add Port Wizard. Click
Finish
. (The selections for adding a new port appear in
step 6
on page 1-2.)
•
Select
No
to close the KPrint Setup Wizard without adding a new port. Click
Finish
.
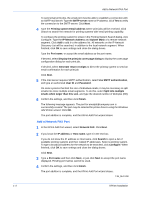
Create a new KPrint port
More commonly, KPrint ports will be created using the Add Printer Wizard.
1
Click
Start
in the Windows taskbar, and click
Printers and Faxes
to open the
Printers and Faxes
window.
1
2
Click
Add a printer
in the
Printer Tasks
group box on the left.
2
Note:
The
Add Printer Wizard
can also be launched by clicking
Add printer
in the
File menu of the
Printers and Faxes
window.
3
The
Add Printer Wizard
page appears. In the
Welcome
page, click
Next
and follow
the instructions.
3
4
Select
Local printer attached to this computer
. Click
Next
.
4
5
Select
Create a new port
, scroll down to
KPrint Port
. Click
Next
.
5