Kyocera TASKalfa 500ci Kyocera Command Center Operation Guide Rev 6.3 - Page 17
Basic > Defaults > Address Book > Groups, Adding a New Group, Editing a Group - default admin password
 |
View all Kyocera TASKalfa 500ci manuals
Add to My Manuals
Save this manual to your list of manuals |
Page 17 highlights
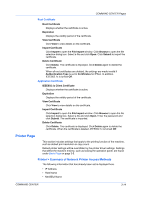
COMMAND CENTER Pages Basic > Defaults > Address Book > Groups This page allows you to add, edit or delete Groups. Adding a New Group 1 Open the Address Book Groups page. 2 Click Add Group. The Address Book Groups - Add page opens. 3 Enter the number and name of the group. 4 Click Submit. The Address Book Groups - Add Members page opens. 5 Select the members to be added to the created group. Check the members you want to add. The members must be registered before added. 6 After you have selected the members, click Submit. The Address Book Groups - Edit page opens. Click Submit. You can continue editing groups, such as changing group names and adding or deleting members. Editing a Group 1 Open the Address Book Groups page. 2 Click the number or name of the group to edit. The Address Book Groups - Edit page opens. 3 You can change the number or name of the group and add or delete members. To add members, click Add Members and select the addresses to add. Click Submit. The members must be registered before added. 4 After you have finished editing, click Submit. Deleting a Group 1 Open the Address Book Groups page. 2 Check the desired group. When the check box on the left side of Number is selected, all groups displayed on the page will be checked. 3 Click Delete Group. The Address Book Groups - Delete page appears. You can confirm the group to be deleted. 4 Click Delete when the desired group is selected. Basic > Security > Account Settings The Administrator (Admin) account is the master access account. It controls access to the printer and networking configuration from all setup and management utilities including the HTML web pages. The Admin password set in the following is valid when Authentication is set to Off. For details on COMMAND CENTER 3-10
-
 1
1 -
2
-
3
-
4
-
5
-
6
-
7
-
8
-
9
-
10
-
11
-
 12
12 -
 13
13 -
 14
14 -
 15
15 -
 16
16 -
 17
17 -
 18
18 -
 19
19 -
 20
20 -
 21
21 -
 22
22 -
23
-
24
-
25
-
26
-
27
-
28
-
29
-
30
-
31
-
32
-
33
-
34
-
35
-
36
-
37
-
38
-
39
-
40
-
41
-
42
-
43
-
44
-
45
-
46
-
47
-
48
-
49
-
50
-
51
-
52
-
53
-
54
-
55
-
56
-
57
-
58
-
59
-
60
-
61
-
62
-
63
-
64
-
65
-
66
 |
 |