Kyocera TASKalfa 520i 420i/520i Operation Guide - Page 140
Border Erase to Back Copying Functions, OPERATION GUIDE, Paper, Selection on Border
 |
View all Kyocera TASKalfa 520i manuals
Add to My Manuals
Save this manual to your list of manuals |
Page 140 highlights
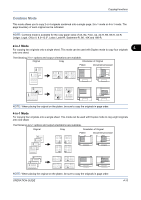
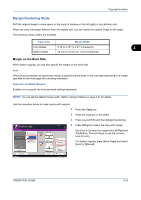
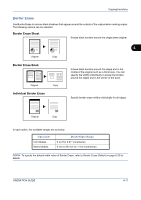
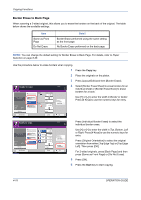
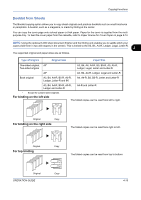
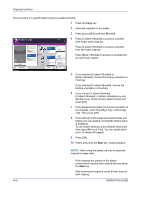
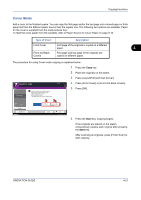
Copying Functions Border Erase to Back Page When scanning a 2-sided original, this allows you to erase the borders on the back of the original. The table below shows the available settings. Item Same as Front Page Do Not Erase Detail Border Erase performed using the same setting as the front page No Border Erase performed on the back page NOTE: You can change the default setting for Border Erase to Back Page. For details, refer to Paper Selection on page 8-26. Use the procedure below to erase borders when copying. 1 Press the Copy key. 2 Place the originals on the platen. 3 Press [Layout/Edit] and then [Border Erase]. Ready to copy. Border Erase Off Border Place original. Original Zoom Paper : --- : 100% : --- Preview Border Erase Sheet Border Erase Book Individual Border Erase Gutter (-0.75 - +0.75) 0.25 " # Keys (-0.75 - +0.75) 0.25 " # Keys Copies Same as Front Page Back Page 4 Select [Border Erase Sheet] to erase borders for an individual sheet or [Border Erase Book] to erase borders for a book. Use [+] or [-] to enter the width in Border or Gutter. Press [# Keys] to use the numeric keys for entry. Status Add Shortcut Cancel OK 08/08/2009 10:10 Ready to copy. Border Erase Off Place original. Original Zoom Paper : --: 100% : --- Preview Status Add Shortcut Border Erase Sheet Border Erase Book Individual Border Erase Copies (0.00 - 2.00) Top 0.25 " Bottom 0.25 " Left 0.25 " Right 0.25 " # Keys Cancel Same as Front Page Back Page Top Edge Top Original Orientation OK 08/08/2009 10:10 Press [Individual Border Erase] to select the individual border erase. Use [+] or [-] to enter the width in Top, Bottom, Left or Right. Press [# Keys] to use the numeric keys for entry. Press [Original Orientation] to select the original orientation from either [Top Edge Top] or [Top Edge Left]. Then press [OK]. For 2-sided originals, press [Back Page] and then press [Same as Front Page] or [Do Not Erase]. 5 Press [OK]. 6 Press the Start key to start copying. 4-18 OPERATION GUIDE
-
 1
1 -
2
-
3
-
4
-
5
-
6
-
7
-
8
-
9
-
10
-
11
-
12
-
13
-
14
-
15
-
16
-
17
-
18
-
19
-
20
-
21
-
22
-
23
-
24
-
25
-
26
-
27
-
28
-
29
-
30
-
31
-
32
-
33
-
34
-
35
-
36
-
37
-
38
-
39
-
40
-
41
-
42
-
43
-
44
-
45
-
46
-
47
-
48
-
49
-
50
-
51
-
52
-
53
-
54
-
55
-
56
-
57
-
58
-
59
-
60
-
61
-
62
-
63
-
64
-
65
-
66
-
67
-
68
-
69
-
70
-
71
-
72
-
73
-
74
-
75
-
76
-
77
-
78
-
79
-
80
-
81
-
82
-
83
-
84
-
85
-
86
-
87
-
88
-
89
-
90
-
91
-
92
-
93
-
94
-
95
-
96
-
97
-
98
-
99
-
100
-
101
-
102
-
103
-
104
-
105
-
106
-
107
-
108
-
109
-
110
-
111
-
112
-
113
-
114
-
115
-
116
-
117
-
118
-
119
-
120
-
121
-
122
-
123
-
124
-
125
-
126
-
127
-
128
-
129
-
130
-
131
-
132
-
133
-
134
-
 135
135 -
 136
136 -
 137
137 -
 138
138 -
 139
139 -
 140
140 -
 141
141 -
 142
142 -
 143
143 -
 144
144 -
 145
145 -
146
-
147
-
148
-
149
-
150
-
151
-
152
-
153
-
154
-
155
-
156
-
157
-
158
-
159
-
160
-
161
-
162
-
163
-
164
-
165
-
166
-
167
-
168
-
169
-
170
-
171
-
172
-
173
-
174
-
175
-
176
-
177
-
178
-
179
-
180
-
181
-
182
-
183
-
184
-
185
-
186
-
187
-
188
-
189
-
190
-
191
-
192
-
193
-
194
-
195
-
196
-
197
-
198
-
199
-
200
-
201
-
202
-
203
-
204
-
205
-
206
-
207
-
208
-
209
-
210
-
211
-
212
-
213
-
214
-
215
-
216
-
217
-
218
-
219
-
220
-
221
-
222
-
223
-
224
-
225
-
226
-
227
-
228
-
229
-
230
-
231
-
232
-
233
-
234
-
235
-
236
-
237
-
238
-
239
-
240
-
241
-
242
-
243
-
244
-
245
-
246
-
247
-
248
-
249
-
250
-
251
-
252
-
253
-
254
-
255
-
256
-
257
-
258
-
259
-
260
-
261
-
262
-
263
-
264
-
265
-
266
-
267
-
268
-
269
-
270
-
271
-
272
-
273
-
274
-
275
-
276
-
277
-
278
-
279
-
280
-
281
-
282
-
283
-
284
-
285
-
286
-
287
-
288
-
289
-
290
-
291
-
292
-
293
-
294
-
295
-
296
-
297
-
298
-
299
-
300
-
301
-
302
-
303
-
304
-
305
-
306
-
307
-
308
-
309
-
310
-
311
-
312
-
313
-
314
-
315
-
316
-
317
-
318
-
319
-
320
-
321
-
322
-
323
-
324
-
325
-
326
-
327
-
328
-
329
-
330
-
331
-
332
-
333
-
334
-
335
-
336
-
337
-
338
-
339
-
340
-
341
-
342
-
343
-
344
-
345
-
346
-
347
-
348
-
349
-
350
-
351
-
352
-
353
-
354
-
355
-
356
-
357
-
358
-
359
-
360
-
361
-
362
-
363
-
364
-
365
-
366
-
367
-
368
-
369
-
370
-
371
-
372
-
373
-
374
-
375
-
376
-
377
-
378
-
379
-
380
-
381
-
382
-
383
-
384
-
385
-
386
-
387
-
388
-
389
-
390
-
391
-
392
-
393
-
394
-
395
-
396
-
397
-
398
-
399
-
400
-
401
-
402
-
403
-
404
-
405
-
406
-
407
-
408
-
409
-
410
-
411
-
412
-
413
-
414
-
415
-
416
-
417
-
418
-
419
-
420
-
421
-
422
-
423
-
424
-
425
-
426
-
427
-
428
 |
 |