Kyocera TASKalfa 520i 420i/520i Operation Guide - Page 163
Sending Size Selection, Detail
 |
View all Kyocera TASKalfa 520i manuals
Add to My Manuals
Save this manual to your list of manuals |
Page 163 highlights
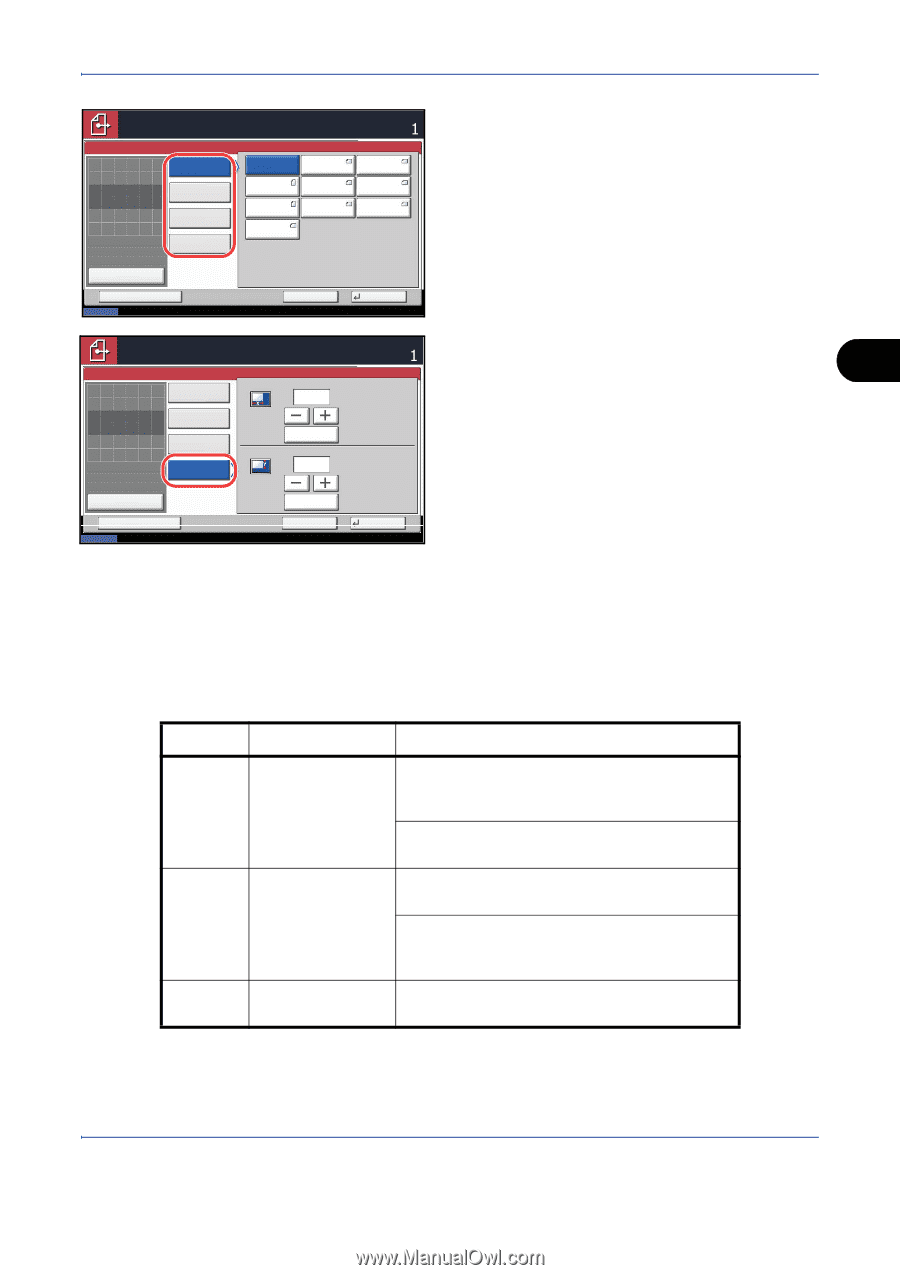
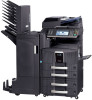
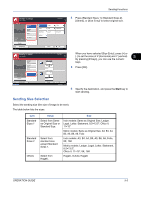
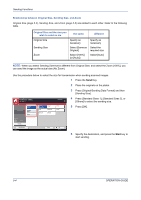
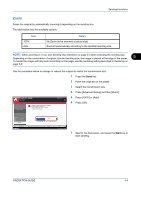
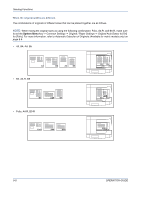
Sending Functions Ready to send. Place original. Original Size Standard Sizes 1 Place original. Standard Sizes 2 Others Original Zoom Paper : --: 100% : --- Preview Size Entry Destination Auto Letter Statement OficioII Ledger Legal 11x15" Letter Statement 8.5x13.5" 4 Press [Standard Sizes 1], [Standard Sizes 2], [Others], or [Size Entry] to select original size. Status Add Shortcut Cancel OK 08/08/2009 10:10 Ready to send. Place original. Original Size X Standard Sizes 1 Place original. Standard Sizes 2 Others Y Original Zoom Paper : --: 100% : --- Size Entry Preview Destination (2.00 - 17.00) 17 " # Keys (2.00 - 11.69) 11 " # Keys When you have selected [Size Entry], press [+] or [-] to set the sizes of X (horizontal) and Y (vertical). 5 By pressing [# Keys], you can use the numeric keys. 5 Press [OK]. Status Add Shortcut Cancel OK 08/08/2009 10:10 6 Specify the destination, and press the Start key to start sending. Sending Size Selection Select the sending size (the size of image to be sent). The table below lists the sizes. Item Standard Sizes 1 Standard Sizes 2 Others Detail Select from Same as Original Size or Standard Size. Select from standard size except Standard Sizes 1. Select from Hagaki. Size Inch models: Same as Original Size, Ledger, Legal, Letter, Statement, 8.5×13.5", Oficio II, 11×15" Metric models: Same as Original Size, A3, B4, A4, B5, A5, B6, A6, Folio Inch models: A3, B4, A4, B5, A5, B6, A6, Folio, 8K, 16K Metric models: Ledger, Legal, Letter, Statement, 8.5×13.5", Oficio II, 11×15", 8K, 16K Hagaki, Oufuku Hagaki OPERATION GUIDE 5-3
-
 1
1 -
2
-
3
-
4
-
5
-
6
-
7
-
8
-
9
-
10
-
11
-
12
-
13
-
14
-
15
-
16
-
17
-
18
-
19
-
20
-
21
-
22
-
23
-
24
-
25
-
26
-
27
-
28
-
29
-
30
-
31
-
32
-
33
-
34
-
35
-
36
-
37
-
38
-
39
-
40
-
41
-
42
-
43
-
44
-
45
-
46
-
47
-
48
-
49
-
50
-
51
-
52
-
53
-
54
-
55
-
56
-
57
-
58
-
59
-
60
-
61
-
62
-
63
-
64
-
65
-
66
-
67
-
68
-
69
-
70
-
71
-
72
-
73
-
74
-
75
-
76
-
77
-
78
-
79
-
80
-
81
-
82
-
83
-
84
-
85
-
86
-
87
-
88
-
89
-
90
-
91
-
92
-
93
-
94
-
95
-
96
-
97
-
98
-
99
-
100
-
101
-
102
-
103
-
104
-
105
-
106
-
107
-
108
-
109
-
110
-
111
-
112
-
113
-
114
-
115
-
116
-
117
-
118
-
119
-
120
-
121
-
122
-
123
-
124
-
125
-
126
-
127
-
128
-
129
-
130
-
131
-
132
-
133
-
134
-
135
-
136
-
137
-
138
-
139
-
140
-
141
-
142
-
143
-
144
-
145
-
146
-
147
-
148
-
149
-
150
-
151
-
152
-
153
-
154
-
155
-
156
-
157
-
 158
158 -
 159
159 -
 160
160 -
 161
161 -
 162
162 -
 163
163 -
 164
164 -
 165
165 -
 166
166 -
 167
167 -
 168
168 -
169
-
170
-
171
-
172
-
173
-
174
-
175
-
176
-
177
-
178
-
179
-
180
-
181
-
182
-
183
-
184
-
185
-
186
-
187
-
188
-
189
-
190
-
191
-
192
-
193
-
194
-
195
-
196
-
197
-
198
-
199
-
200
-
201
-
202
-
203
-
204
-
205
-
206
-
207
-
208
-
209
-
210
-
211
-
212
-
213
-
214
-
215
-
216
-
217
-
218
-
219
-
220
-
221
-
222
-
223
-
224
-
225
-
226
-
227
-
228
-
229
-
230
-
231
-
232
-
233
-
234
-
235
-
236
-
237
-
238
-
239
-
240
-
241
-
242
-
243
-
244
-
245
-
246
-
247
-
248
-
249
-
250
-
251
-
252
-
253
-
254
-
255
-
256
-
257
-
258
-
259
-
260
-
261
-
262
-
263
-
264
-
265
-
266
-
267
-
268
-
269
-
270
-
271
-
272
-
273
-
274
-
275
-
276
-
277
-
278
-
279
-
280
-
281
-
282
-
283
-
284
-
285
-
286
-
287
-
288
-
289
-
290
-
291
-
292
-
293
-
294
-
295
-
296
-
297
-
298
-
299
-
300
-
301
-
302
-
303
-
304
-
305
-
306
-
307
-
308
-
309
-
310
-
311
-
312
-
313
-
314
-
315
-
316
-
317
-
318
-
319
-
320
-
321
-
322
-
323
-
324
-
325
-
326
-
327
-
328
-
329
-
330
-
331
-
332
-
333
-
334
-
335
-
336
-
337
-
338
-
339
-
340
-
341
-
342
-
343
-
344
-
345
-
346
-
347
-
348
-
349
-
350
-
351
-
352
-
353
-
354
-
355
-
356
-
357
-
358
-
359
-
360
-
361
-
362
-
363
-
364
-
365
-
366
-
367
-
368
-
369
-
370
-
371
-
372
-
373
-
374
-
375
-
376
-
377
-
378
-
379
-
380
-
381
-
382
-
383
-
384
-
385
-
386
-
387
-
388
-
389
-
390
-
391
-
392
-
393
-
394
-
395
-
396
-
397
-
398
-
399
-
400
-
401
-
402
-
403
-
404
-
405
-
406
-
407
-
408
-
409
-
410
-
411
-
412
-
413
-
414
-
415
-
416
-
417
-
418
-
419
-
420
-
421
-
422
-
423
-
424
-
425
-
426
-
427
-
428
 |
 |