LG 42LK550 Owner's Manual - Page 113
Connecting to an Audio System, Digital Optical Audio Connection
 |
View all LG 42LK550 manuals
Add to My Manuals
Save this manual to your list of manuals |
Page 113 highlights
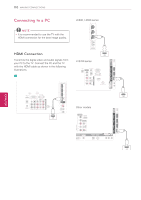
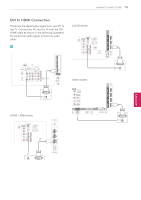
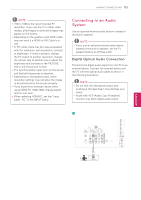
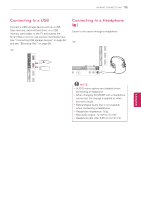
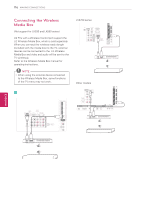
MAKING CONNECTIONS 113 NOTE yy1920 x 1080 is the recommended PC resolution. If you use the TV in other video modes, afterimages or distorted images may appear on the screen. yyDepending on the graphics card, DOS mode may not work if a HDMI to DVI Cable is in use. yyIn PC mode, there may be noise associated with the resolution, vertical pattern, contrast or brightness. If noise is present, change the PC output to another resolution, change the refresh rate to another rate or adjust the brightness and contrast on the PICTURE menu until the picture is clear. yyThe synchronization input form for Horizontal and Vertical frequencies is separate. yyDepending on the graphics card, some resolution settings may not allow the image to be positioned on the screen properly. yyIf you experience overscan issues when using HDMI-PC 1920x1080, change aspect ratio to Just scan. yyWhen selecting HDMI-PC, set the "Input Label - PC" in the INPUT menu. Connecting to an Audio System Use an optional external audio system instead of the built-in speaker. NOTE yyIf you use an optional external audio device instead of the built-in speaker, set the TV speaker feature to off (See p.94). Digital Optical Audio Connection Transmits the digital audio signal from the TV to an external device. Connect the external device and the TV with the optical audio cable as shown in the following illustration. NOTE yyDo not look into the optical output port. Looking at the laser beam may damage your vision. yyAudio with ACP (Audio Copy Protection) function may block digital audio output. USB IN 1 USB IN 2/USB Apps Plasma 4 3 OPTICAL AUDIO IN DIGITAL (RGB/DVI) AUDIO OUT RS-232C IN WIRELESS RGB IN (PC) (CONTROL&SERVICE) CONTROL LAN VIDEO L/MONO AUDIO R 2 Y REMOTE CONTROL IN 1 PB VIDEO PR L R AUDIO COMPON ENT IN AV IN1 ANTENNA /CABLE IN 1 (ARC) 2 /DVI IN AV IN2 ENEGNLGISH VIDEO L/MONO AUDIO R OPTICAL AUDIO IN
-
 1
1 -
2
-
3
-
4
-
5
-
6
-
7
-
8
-
9
-
10
-
11
-
12
-
13
-
14
-
15
-
16
-
17
-
18
-
19
-
20
-
21
-
22
-
23
-
24
-
25
-
26
-
27
-
28
-
29
-
30
-
31
-
32
-
33
-
34
-
35
-
36
-
37
-
38
-
39
-
40
-
41
-
42
-
43
-
44
-
45
-
46
-
47
-
48
-
49
-
50
-
51
-
52
-
53
-
54
-
55
-
56
-
57
-
58
-
59
-
60
-
61
-
62
-
63
-
64
-
65
-
66
-
67
-
68
-
69
-
70
-
71
-
72
-
73
-
74
-
75
-
76
-
77
-
78
-
79
-
80
-
81
-
82
-
83
-
84
-
85
-
86
-
87
-
88
-
89
-
90
-
91
-
92
-
93
-
94
-
95
-
96
-
97
-
98
-
99
-
100
-
101
-
102
-
103
-
104
-
105
-
106
-
107
-
 108
108 -
 109
109 -
 110
110 -
 111
111 -
 112
112 -
 113
113 -
 114
114 -
 115
115 -
 116
116 -
 117
117 -
 118
118 -
119
-
120
-
121
-
122
-
123
-
124
-
125
-
126
-
127
-
128
-
129
-
130
-
131
-
132
-
133
-
134
-
135
-
136
-
137
-
138
-
139
-
140
-
141
-
142
-
143
-
144
-
145
-
146
-
147
-
148
-
149
-
150
-
151
-
152
-
153
-
154
-
155
-
156
-
157
-
158
-
159
-
160
-
161
-
162
-
163
-
164
-
165
-
166
-
167
-
168
-
169
-
170
-
171
-
172
 |
 |