LG A908VMR Owners Manual
LG A908VMR Manual
 |
View all LG A908VMR manuals
Add to My Manuals
Save this manual to your list of manuals |
LG A908VMR manual content summary:
- LG A908VMR | Owners Manual - Page 1
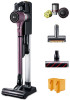
.05.02 LG LG Electronics Inc. mm SCALE 1 1 T CHECKED APPROVED I T L 18.05.02 18.05.03 E RELATED DWG. DWG. No. PDF ILLUSTRATOR DR COMPLETED 도면 DR 완료 완료일 : MANUAL,OWNER'S A9 북미향 1/1 MFL69883611 - LG A908VMR | Owners Manual - Page 2
A9 • Charge the battery fully before first use. • Read the Safety Instructions before using the product. • After reading this manual, keep it in an easily accessible location. COVERED BY ONE OR MORE OF THE FOLLOWING US PATENTS : US10,342,404, US10,314,453, US10,194, - LG A908VMR | Owners Manual - Page 3
- LG A908VMR | Owners Manual - Page 4
Table of Contents Safety Instructions 04 Product Overview 09 Installation 10 Freestanding Installation 10 Wall Installation 11 Uninstalling Power Floor/Carpet Nozzle 18 Cleaning the Power Punch Nozzle 18 Before Calling for Service 19 Product Specifications 20 Warranty 21 Rev.06_061820 03 - LG A908VMR | Owners Manual - Page 5
Instructions Your safety and the safety of others are very important. We have provided many important safety messages in this manual and on the appliance. Always read and follow all safety messages. Basic Safety Precautions After reading this manual by an LG Electronics Service Agent in order to - LG A908VMR | Owners Manual - Page 6
, pull, pinch or heat the power cord. •• Call an authorized service technician to repair or immediately replace all power cords that have become damaged experience and knowledge, unless they have been given supervision or instruction concerning the use of the appliance by a person responsible for - LG A908VMR | Owners Manual - Page 7
included with the product. Do not use the provided adapter with any other products or for other than its intended use. Read and follow instructions in this manual to charge the battery properly. Failure to follow these warnings may result in damage to the battery or fire. •• If liquid leaks from the - LG A908VMR | Owners Manual - Page 8
the wall or to the charging station support. •• If the earth leakage breaker children. •• Use only as described in this manual. Use only manufacturer's recommended attachments. •• Do outdoors, or dropped into water, return it to a service center. •• Do not pull or carry by cord, use INSTRUCTIONS 07 - LG A908VMR | Owners Manual - Page 9
CAUTION To reduce the risk of injury to persons, malfunction, or damage to the product or property when using the appliance, follow basic safety precautions, including the following: •• Do not subject the product to shocks or drop it. •• Secure the product in the charging station when not in use, - LG A908VMR | Owners Manual - Page 10
Product Overview Freestanding Installation Wall-Mounted Installation 4 1 10 6 7 2 5 9 8 3 1 10 4 6 2 9 3 1 Product body 2 Extending wand 3 Power Carpet Nozzle 4 Charging station 5 Charging station stand 6 Attachment storage 7 Detachable nozzle storage (optional) 8 Charging station - LG A908VMR | Owners Manual - Page 11
1 Assemble the charging station stand by inserting the support pipe into the base. Slide the detachable nozzle storage • Keep the cord tidy by threading it through the anchoring ring on the back of the support pipe. 4 Put the anchoring block on the back of the charging station and anchor the - LG A908VMR | Owners Manual - Page 12
hole and insert the wall anchor first. Note: • Once assembled, the charging station support and base cannot be disassembled. • The charging station can be removed as needed. product. Note: • The cost of a service call to properly install the charging station is not covered under the warranty. 11 - LG A908VMR | Owners Manual - Page 13
Attachment Storage When not in use, the crevice and brush attachments can be snapped onto the ports at the bottom of the charging station. 1 Attach the combination tool and crevice tool to the dedicated holders. Nozzle Storage When a nozzle is not in use, store it in the convenient detachable - LG A908VMR | Owners Manual - Page 14
the suction strength will deteriorate and cleaning will not be satisfactory. • Support the bottom of the product when cleaning an elevated surface. • Store specifications for battery run time details. • These times are a guide only and may be shorter for some surfaces. • Follow manufacturer's - LG A908VMR | Owners Manual - Page 15
Charging the Battery 1 Put the product on the charging station. • The battery indicator has 3 bars to indicate the charge level. The bars will flash during charging. 2 Insert the battery into the auxiliary charging station. 2 An auxiliary battery can be charged in the base of the charging station. - LG A908VMR | Owners Manual - Page 16
Using the Nozzles • The nozzles included may vary by product. • The nozzle can be attached to the product body or extension pipe. • Adjust the suction lower if the inlet gets stuck on the floor, carpet, or power punch or higher if you need more power. CAUTION • Do not use the product for anything - LG A908VMR | Owners Manual - Page 17
Maintenance Emptying the Dust Bin 1 Remove the battery from the unit before cleaning the dustbin. 2 Hold the dust bin over a wastebasket or trash can. 3 Press the release button at the bottom front of the dust bin to open the bin and shake to empty it. • Be careful as dust/foreign matter may spill - LG A908VMR | Owners Manual - Page 18
often the filters are cleaned, the more optimal the suction power will be. • Filters are consumables. Please purchase more filters from an authorized service center. WARNING • Never wash the product body with water. Water may reach the motor and cause electric shock or fire. • Keep foreign objects - LG A908VMR | Owners Manual - Page 19
Cleaning the Power Floor/Carpet Nozzle Check the brush and roller heads before using and clean as needed. 1 Remove the nozzle from the product. Press the release button to remove the head from the wand or product body. 2 Turn the head upside down and insert a flatblade screwdriver in the cover lock - LG A908VMR | Owners Manual - Page 20
is likely just from the motor running at high speed. • Fully charge the battery before using the vacuum. If the problem persists even with a fully charged battery, call for service. • Remove the foreign objects from the product body, Extension wand, or Inlet port. • Remove the brush and reattach it - LG A908VMR | Owners Manual - Page 21
Product Specifications Item/Model Exterior dimensions Weight Power consumption: Battery A90**** 10.2 in. (W) x 10.6 in. (D) x 44.1 in. (H) 260 mm (W) x 270 mm (D) x 1120 mm (H) 5.7 lb / 2.7 kg 400 W (Maximum power: 450 W)/250 W/ 80 W (Turbo/Power/Standard) DC 25.2 or 25.55 V Battery run time1 ( - LG A908VMR | Owners Manual - Page 22
for: 1. Expendable items that can wear out, including, but not limited to, filters and belts. 2. A service technician to instruct the user in correct product assembly, operation or maintenance. 3. A service technician to clean or maintain this product. 4. Damage to or failure of this product if it - LG A908VMR | Owners Manual - Page 23
date of purchase. A copy of your Sales Receipt must be submitted at the time warranty service is provided. To Obtain Nearest Authorized Service Center or Sales Dealer, or to Obtain Product, Customer, or Service Assistance Call 1-800-243-0000 (Phone answered 24 hours - 365 days a year) and choose - LG A908VMR | Owners Manual - Page 24
; and (d) the serial number (the serial number can be found (i) on the product; or (ii) online by accessing https://www.lg.com/us/support/repair-service/schedule-repaircontinued and clicking on "Find My Model & Serial Number"). You may only opt out of the dispute resolution procedure in the manner - LG A908VMR | Owners Manual - Page 25
-
 1
1 -
 2
2 -
 3
3 -
 4
4 -
 5
5 -
 6
6 -
 7
7 -
8
-
9
-
10
-
11
-
12
-
13
-
14
-
15
-
16
-
17
-
18
-
19
-
20
-
21
-
22
-
23
-
24
-
25
 |
 |
DWG.
No.
TRIG.
DR COMPLETED
도면 DR 완료
완료일 :
LG 전자
(주)
LG Electronics Inc.
UNIT
SCALE
1
1
mm
REVIEWED
DESIGNED
RELATED DWG.
CHECKED
APPROVED
이 다 정
김 남 철
18.05.02
송 상 영
18.05.02
18.05.03
MODELING
I
T
L
E
T
APPROVED
승인자
PREPARED
시방자
DATE
년/월/일
REF. NO.
시방 번호
REV. NO.
기호
REVISION DESCRIPTION
변경 사항
8
9
10
11
RELEASING THIS DRAWING
WITHOUT PERMISSION LG
Electronics SHOULD BE
ACCUSED ACCORDING TO THE
LAWS AND COMPANY RULES.
이 도면은 LG전자의 자산으로 불법
유출시 관계법과 회사규정에 의해 처벌됨.
PDF
ILLUSTRATOR
148
210
MFL69883611
MANUAL,OWNER’S
A9 북미향
1/1
MFL69883611
<< 주기 >>
1. 재질, 인쇄방법, 인쇄도수, 외곽치수등은 작업표에 준한다.
2. 인쇄내용, 문자크기 및 형상, 선의 굵기 등은 설계에서 제시된 도면에 준함.
3. 외곽치수는 절단후 치수임.
4. 양산전에 설계 한도를 득할 것.
5. 본 부품에 금지물질이 포함되지 않도록 하고, 상세내용은 LG(63)-A-5501-34
를 만족할 것.
<< NOTES >>
1. Material, printing and exterier size are refer to work tables.
2. Printing, text size and line are based on LG design drawing.
3. Exterier size on the drawing is cutting line.
4. Before product controlled by criteria sample.
5. The part should not contain prohibited substances(Pb,Cd,Hg,C
r+6,PBB,
PBDE) and details should comply with LG standard of LG(63)-
A-5501-34.
WORK
적용모델
11
재
질
인쇄방법
인 쇄 도 수
표 지
내 지
4
도
3도
1도
OFFSET 인쇄
24, A5
PAGE
REMARK
SEC.
A9****
7
6
5
4
3
2
1
표지 : 아트지 150g 무광 Laminating
내지 : 모조지 80g OFFSET 인쇄
북미향
English
A9 S 배터리 장착 모델 개발로 인한 수정 및 도수 변경
EKFK700238
20.07.21
조수정
이창훈
06