LG BD640 Owner's Manual - Page 15
Connecting to Your TV - owners manual
 |
UPC - 719192580336
View all LG BD640 manuals
Add to My Manuals
Save this manual to your list of manuals |
Page 15 highlights
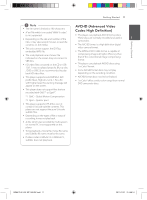
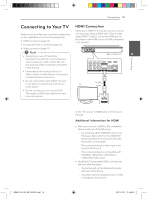
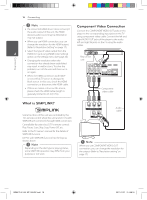
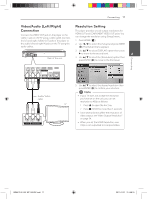
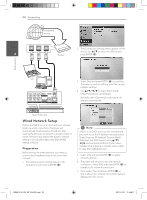
2 Connecting Connecting 15 Connecting to Your TV HDMI Connection Make one of the following connections, depending on the capabilities of your existing equipment. yy HDMI connection (page 15) yy Component Video connection (page 16) If you have a HDMI TV or monitor, you can connect it to this player using a HDMI cable (Type A, High Speed HDMITM Cable). Connect the HDMI jack on the player to the HDMI jack on a HDMI compatible TV or monitor. yy Video connection (page 17) Connecting ,,Note yy Depending on your TV and other equipment you wish to connect, there are various ways you could connect the unit. Use only one of the connections described in this manual. Rear of the unit 2 yy Please refer to the manuals of your TV, Stereo System or other devices as necessary to make the best connections. yy Do not connect the unit's AUDIO OUT jack to the phono in jack (record unit) of your TV audio system. HDMI cable yy Do not connect your unit via your VCR. The image could be distorted by the copy protection system. BD651D-N_US_MP_BALCK.indd 15 Set the TV's source to HDMI (refer to TV's Owner's manual). Additional Information for HDMI yy When you connect a HDMI or DVI compatible device make sure of the following: -- Try switching off the HDMI/DVI device and this player. Next, switch on the HDMI/DVI device and leave it for around 30 seconds, then switch on this player. -- The connected device's video input is set correctly for this unit. -- The connected device is compatible with 720x480p, 1280x720p, 1920x1080i or 1920x1080p video input. yy Not all HDCP-compatible HDMI or DVI devices will work with this player. -- The picture will not be displayed properly with non-HDCP device. -- This player does not playback and TV screen is changed to black screen. 2011-01-21 �� 4:58:15
-
 1
1 -
2
-
3
-
4
-
5
-
6
-
7
-
8
-
9
-
 10
10 -
 11
11 -
 12
12 -
 13
13 -
 14
14 -
 15
15 -
 16
16 -
 17
17 -
 18
18 -
 19
19 -
 20
20 -
21
-
22
-
23
-
24
-
25
-
26
-
27
-
28
-
29
-
30
-
31
-
32
-
33
-
34
-
35
-
36
-
37
-
38
-
39
-
40
-
41
-
42
-
43
-
44
-
45
-
46
-
47
-
48
-
49
-
50
-
51
-
52
-
53
-
54
-
55
-
56
-
57
-
58
-
59
-
60
 |
 |