LG DLE2515S Owner's Manual
LG DLE2515S Manual
 |
View all LG DLE2515S manuals
Add to My Manuals
Save this manual to your list of manuals |
LG DLE2515S manual content summary:
- LG DLE2515S | Owner's Manual - Page 1
1-800-243-0000 para el Servicio LG (Atención al Cliente) 24 horas al día, 7 días a la semana DLE2512W/DLG2522W DLE2514W/DLG2524W DLE2515S/DLG2525S - LG DLE2515S | Owner's Manual - Page 2
1-800-243-0000 24 HOURS A DAY, 7 DAYS A WEEK FOR LG CUSTOMER SERVICE DLE2512W/DLG2522W DLE2514W/DLG2524W DLE2515S/DLG2525S P/No.: 3828EL3004B - LG DLE2515S | Owner's Manual - Page 3
. ELECTRICAL REQUIREMENTS FOR ELECTRIC DRYER 15-18 PART6. ELECTRICAL REQUIREMENTS FOR GAS DRYERS 19 PART7. GAS REQUIREMENTS AND INSTRUCTIONS 20 PART8. EXHAUST REQUIREMENTS AND MAINTENANCE 21-22 PART9. OPERATING YOUR DRYER...23-28 PART10. TROUBLESHOOTING GUIDE ...29-31 LG DRYER LIMITED WARRANTY - LG DLE2515S | Owner's Manual - Page 4
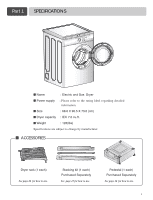
Part 1 SPECIFICATIONS I Name : Electric and Gas Dryer I Power supply : Please refer to the rating label regarding detailed information. I Size : 68.6 X 96.5 X 73.0 (cm) I Dryer capacity : IEC 7.0 cu.ft. I Weight : 126(Ibs) Specifications are subject to change by manufacturer. I ACCESSORIES - LG DLE2515S | Owner's Manual - Page 5
of this manual. Warranty service is available by contacting your nearest LG Service Center and, for warranty period from the date of purchase, if this dryer is installed and operated according to the instructions in this manual, LG will repair or replace any of its mechanical or electrical parts if - LG DLE2515S | Owner's Manual - Page 6
controls. 8) Do not repair or replace any part of the appliance or attempt any servicing unless specifically recommended in the user-maintenance instructions. 9) Do not use heat can result in a risk of electric shock. Check with a qualified electrician or service person if you are in doubt as - LG DLE2515S | Owner's Manual - Page 7
Part 2 IMPORTANT WARRANTY AND SAFETY INSTRUCTIONS ! WHAT TO DO IF YOU SMELL GAS: • Do not try to light a match or cigarette, or turn on any gas or electrical appliance. • Do not touch any electrical on it, even after washing. • No washer can completely remove oil. Do not dry adjusted dryers will minimize - LG DLE2515S | Owner's Manual - Page 8
it is important that you review this entire manual before proceeding with any installation or use. More detailed instructions concerning electrical connections, gas connections, and exhaust requirements are provided at other parts of this manual. STEP 1 Positioning the Dryer. Choose a location with - LG DLE2515S | Owner's Manual - Page 9
), a load may not tumble properly and internal sensors may malfunction. Note: Other sections of this manual also provide important information concerning the placement of and clearances for your dryer. Please review this entire manual before proceeding with any installation. SSTTEEPP 22: Procedure - LG DLE2515S | Owner's Manual - Page 10
Please follow the instructions (and all others in this manual) very carefully. ■ ALTERNATE EXHAUST DIRECTIONS 1. Remove a screw and exhaust duct. 2-1. Detach and remove a knockout at the button, left or right side as desired. (Right Side Vent not available on Gas dryer the order of work. • Do not - LG DLE2515S | Owner's Manual - Page 11
provided inside the dryer control hood. Label all wires prior to disconnection when servicing the dryer, because wiring errors can cause serious injury to you and your dryer. 4. For additional instruction on connecting the dryer to an electrical power source, please refer to this manual's section on - LG DLE2515S | Owner's Manual - Page 12
of the dryer. Plug-in your dryer after reviewing the following parts on your dryer's Electrical Requirements. STEP 7 Confirming Heat Source Operation. Confirming Heat Source in Gas Dryers Close the door to the dryer drum/drying compartment and, after completing all steps in this manual for proper - LG DLE2515S | Owner's Manual - Page 13
, please contact a service and installation professional for assistance. The following instructions apply to any installation of the dryer in a manufactured or mobile home: 1) The gas dryer must be permanently attached to the floor. 2) The electrical connection for an electric dryer must be a 4-wire - LG DLE2515S | Owner's Manual - Page 14
- be careful not to pinch fingers between the washer and dryer. Slide washer slowly backwards to the stopper of kit. 1 Stacking kit Place washer firmly on a stable, even and solid floor as product installation instructions describes in owner's manual. 2 Peel protective paper off the tape from the - LG DLE2515S | Owner's Manual - Page 15
Part 4 ACESSORIES INSTALLATION Pedestal Installation Instructions 1 4 2 5 6 3 7 14 - LG DLE2515S | Owner's Manual - Page 16
to check your home's wiring and fuses to ensure that your home has adequate electrical power to operate the dryer. 120V/ 240V, 60 Hertz, 3-Wire Installation Instructions for Grounding of your Electric Electric Dryer: a) Please note that the wiring diagram is provided inside the dryer control hood - LG DLE2515S | Owner's Manual - Page 17
Part 5 ELECTRICAL REQUIREMENTS FOR ELECTRIC DRYERS Review the following options to determine the appropriate electrical connection for your home: 4-wire receptacle (NEMA type14-30R) Use the instructions at this section if your home has a 4-wire receptacle (NEMA type 14-30R) and you will be using a - LG DLE2515S | Owner's Manual - Page 18
Part 5 ELECTRICAL REQUIREMENTS FOR ELECTRIC DRYERS 3-wire connection : Direct wire Important : Grounding through the codes or ordinances do not allow the use of a 3 wire connection, or you are installing your dryer in a mobile home, you must use a 4wire connection. Then, put the hooked shape end of - LG DLE2515S | Owner's Manual - Page 19
Part 5 ELECTRICAL REQUIREMENTS FOR ELECTRIC DRYERS Option 2: 3-Wire Connection with a Power Supply Cord lf your local codes or ordinances permit the connection of a frame-grounding conductor to the neutral wire, use these instructions. If your local codes or ordinances do not allow the connection - LG DLE2515S | Owner's Manual - Page 20
check your home's wiring and fuses to ensure that your home has adequate electrical power to operate the dryer. Electrical Requirements for Your Dryer: a) Please note that the wiring diagram is provided inside the dryer control hood. Label all wires prior to disconnection when servicing the dryer - LG DLE2515S | Owner's Manual - Page 21
Part 7 GAS REQUIREMENTS AND INSTRUCTIONS Following are important instructions and information concerning the requirements for the gas supply and service for gas dryers. ! Important Warning: The gas supply and service for a gas dryer must comply with all local codes and ordinances. In the absence of - LG DLE2515S | Owner's Manual - Page 22
Part 8 EXHAUST REQUIREMENTS AND MAINTENANCE Following are important instructions and information concerning the exhaust requirements for your dryer. ! Important Warning: To reduce the risk of fire, combustion, or accumulation of combustible gases, DO NOT exhaust dryer air into an enclosed and - LG DLE2515S | Owner's Manual - Page 23
a clogged lint filter may increase drying times. 11. Annually remove the lint filter and attach it to the vacuum duct. See item #2 above. 12. Please note that the wiring diagram is provided inside the dryer control hood. Label all wires prior to disconnection when servicing the dryer, because wiring - LG DLE2515S | Owner's Manual - Page 24
Part 9 OPERATING YOUR DRYER Following are instructions for starting and using your new dryer. Please refer to specific sections of this manual for more detailed information. Important Warning: To reduce the risk of fire, electric shock, or injury to person, read this entire manual, including the - LG DLE2515S | Owner's Manual - Page 25
Part 9 OPERATING YOUR DRYER 2. To use a Sensor Dry Cycle • Select an Sensor Dry Cycle. • Select DRY LEVEL to adjust how dry you want the load. As the cycle runs, the control senses the dryness of the load and adjusts the time automatically for the selected dryness level. • Select the desired - LG DLE2515S | Owner's Manual - Page 26
synthetic fabrics, washable knit fabrics, and no-iron finishes (low heat) Sensor Dry Preset Cycle Settings Sensor Dry Cycles Load Type Temp. Time* (Minutes) COTTON/TOWELS Towel, denim pants Medium 55 High NORMAL Work clothes,corduroys Medium 41 DELICATES Lingerie, sheets, blouses Low 32 - LG DLE2515S | Owner's Manual - Page 27
Part 9 OPERATING YOUR DRYER Manual Preset Cycle Settings Manual Dry Temp. Cycles Load Type Default Time* (Minutes) SPEED DRY SMALL LOADS AIR DRY High 25 Air Dry 30 8. Modifiers Use Modifiers to select temperatures for the Manual Cycles. Press TEMP. CONTROL until the desired temperature - LG DLE2515S | Owner's Manual - Page 28
50 Athletic shoes Air Dry 20 * Reset time as needed to complete drying. • Select MORE TIME or LESS TIME. Reset time as needed to complete drying. Refer the dryer. 10. Beeper The BEEPER controls the volume of the beep that is made when you press any of the buttons on the control panel and the - LG DLE2515S | Owner's Manual - Page 29
Part 9 OPERATING YOUR DRYER Maintenance Clean lint filter Clean the lint filter after each use and check it before use. Not cleaning or emptying the filter will increase drying time and energy consumption, therefore dryer life expectancy could be shortened after all. I Clean the door and its - LG DLE2515S | Owner's Manual - Page 30
Part 10 TROUBLESHOOTING GUIDE Troubleshooting Tips Save time and money! Review the charts on the following pages first and you may not need to call for service. 1.Problem:My Dryer Won 't Start Question What to Do • Is the dryer plugged in? • Is the fuse blown, or is the circuit breaker tripped? - LG DLE2515S | Owner's Manual - Page 31
Part 10 TROUBLESHOOTING GUIDE 4.Problem:There is Lint on my Clothes Question What to Do • Is your lint filter full? Please refer to the manual section on cleaning the lint filter, and please confirm that the lint filter is clean. It is important that the lint filter is clean before each new load - LG DLE2515S | Owner's Manual - Page 32
Part 10 TROUBLESHOOTING GUIDE 7.Problem:It takes too long for my clothes to dry Question What to Do • Did you properly sort your loads of laundry? Separate heavy weight items from light weight items when creating loads. • Are you drying large loads of heavy fabrics? Heavy fabrics take longer - LG DLE2515S | Owner's Manual - Page 33
LG DRYER LIMITED WARRANTY - USA 1-800-243-0000 1-800-243-0000 32 - LG DLE2515S | Owner's Manual - Page 34
El moderno Diseño del Panel Frontal y su gran puerta PARTE 7. REQUERIMIENTOS E INSTRUCCIONES SOBRE EL GAS 20 PARTE 8. REQUERIMIENTOS Y MANTENIMIENTO SOBRE EL ESCAPE 21-22 PARTE 9. USANDO SU SECADORA ...23-28 PARTE 10. GUÍA PARA LA SOLUCIÓN DE PROBLEMAS 29-31 GARANTÍA LIMITADA DE LA SECADORA LG - LG DLE2515S | Owner's Manual - Page 35
Parte 1 ESPECIFICACIONES I Nombre : Secadora Eléctrica y de Gas I Suministro de Energìa : Favor de consultar la etiqueta de medición referente a su uso Kit para Apilar (1) comprado separadamente Vea la página 13 para su uso Pedestal (1) comprado separadamente Vea la página 14 para su uso 3 - LG DLE2515S | Owner's Manual - Page 36
garantía desde la fecha de compra, si esta secadora es instalada y operada de acuerdo con las instrucciones en este manual, LG reparará o remplazará cualquiera de sus partes mecánicas o eléctricas si están defectuosas en el material o en la fabricación. ! ADVERTENCIA! Para su seguridad, debe seguir - LG DLE2515S | Owner's Manual - Page 37
Parte 2 GARANTÍA E INSTRUCCIONES DE SEGURIDAD IMPORTANTES INSTRUCCIONES DE SEGURIDAD IMPORTANTES ! ADVERTENCIA! instale o almacene este artefacto donde esté expuesto a la intemperie. 7) No fuerce los controles. 8) No repare o reemplace ninguna pieza del artefacto ni intente darle servicio a menos - LG DLE2515S | Owner's Manual - Page 38
Parte 2 GARANTÍA E INSTRUCCIONES DE SEGURIDAD IMPORTANTES ! QUE HACER EN CASO DE OLER GAS: • No este artefacto, por favor siga todas las instrucciones e información, incluyendo las de este manual y las instrucciones e información suministradas por su proveedor de gas, incluyendo las siguientes - LG DLE2515S | Owner's Manual - Page 39
detalladas adicionales concernientes a las conexiones eléctricas, conexiones del gas, y los requerimientos sobre el escape son suministrados en otras partes de este manual. PASO 1 Colocación de la Secadora Escoja una ubicación para su secadora donde el piso sea sólido. Coloque la secadora - LG DLE2515S | Owner's Manual - Page 40
Parte 3 PASOS INICIALES PARA LA INSTALACIÓN DE SU SECADORA Una vez en (1 pulgada), la carga puede que no gire adecuadamente y los sensores internos pueden no funcionar correctamente. Nota: Otras secciones de este manual también proveen información importante sobre la ubicación y los espacios - LG DLE2515S | Owner's Manual - Page 41
Parte 3 PASOS INICIALES PARA LA INSTALACIÓN DE SU SECADORA PASO 3 Conexión del Sistema de Escape y Ventilación Además de las siguientes advertencias, por favor refiérase a la sección del manual sobre Requerimientos y Mantenimientodel Escape. IMPORTANTE: Para reducir el riesgo de incendio, combusti - LG DLE2515S | Owner's Manual - Page 42
Parte 3 PASOS INICIALES PARA LA INSTALACIÓN DE SU SECADORA PASO 4 Conexión del Suministro de Gas (Secadora a Gas solamente). Además de lo siguiente, por favor refiérase a la sección del manual de cableado es provisto dentro de la cubierta de control de la secadora. Etiquete todos los alambres antes - LG DLE2515S | Owner's Manual - Page 43
ón de detergente y agua, con un paño húmedo para remover de la parte interior del tambor de la secadora /compartimiento de secado cualquier polvo o sucio que secadora y después de haber completado todos los pasos en este manual para una instalación correcta de esta secadora, encienda la secadora en - LG DLE2515S | Owner's Manual - Page 44
ctrica es suministrada en la sección del manual Requerimientos Eléctricos para la Secadora Eléctrica panel trasero, izquierdo o inferior. Las secadoras a gas no pueden ser ventiladas al exterior usando el panel de 1 pulgada a los lados y en la parte posterior de la secadora. 10) Favor notar que los - LG DLE2515S | Owner's Manual - Page 45
la lavadora firmemente en una superficie estable y sòlida como las instrucciones del Manual de Usuario indican. 2 Quite el papel protector del kit en el soporte lateral. 6 Inserte la parte frontal del kit. Empuje la parte frontal hasta el final de los soportes laterales. 3 Encaje el soporte - LG DLE2515S | Owner's Manual - Page 46
Parte 5 REQUERIMIENTOS ELÉCTRICOS PARA SECADORAS ELÉCTRICAS Las siguientes son instrucciones Eléctrica: a) Por favor note que el diagrama de cableado está localizado dentro de la cubierta del control de la secadora. b) Esta secadora debe ser conectada a un metal con conexión a tierra, sistema de - LG DLE2515S | Owner's Manual - Page 47
Parte 5 REQUERIMIENTOS ELÉCTRICOS PARA SECADORAS ELÉCTRICAS Las siguientes son instrucciones Eléctrica: a) Por favor note que el diagrama de cableado está localizado dentro de la cubierta del control de la secadora. b) Esta secadora debe ser conectada a un metal con conexión a tierra, sistema de - LG DLE2515S | Owner's Manual - Page 48
Parte 5 REQUERIMIENTOS ELÉCTRICOS PARA SECADORAS ELÉCTRICAS Revise las siguientes 30 amp. 4-cables directos Luego, ponga el final de esas puntas debajo del tornillo de la terminal (la parte de la punta con forma de gancho mostrandose derecho) y una el cable con el tornillo fuertemente. Si este - LG DLE2515S | Owner's Manual - Page 49
secadora en una casa móvil, debe usar una conexión de 4-alambres. Luego, ponga el final de esas puntas debajo del tornillo de la terminal (la parte de la punta con forma de gancho mostrandose derecho) y una el cable con el tornillo fuertemente. 1. Conecte un cable neutral (blanco) al cordón de - LG DLE2515S | Owner's Manual - Page 50
Parte 5 REQUERIMIENTOS ELÉCTRICOS PARA SECADORAS ELÉCTRICAS Opción 2 Conexión de 3-alambres con un Cordón de Alimentación. Si los códigos y ordenanzas locales permiten la conexión de - LG DLE2515S | Owner's Manual - Page 51
Parte 6 REQUERIMIENTOS EL de cableado está localizado dentro de la cubierta de los controles. Etiquete todos los alambres antes de desconectarlos para el mantenimiento su cuarto de lavado no cumple con las especificaciones requeridas por este manual, o si no está seguro de que su cuarto de lavado - LG DLE2515S | Owner's Manual - Page 52
Parte 7 REQUERIMIENTOS E INSTRUCCIONES SOBRE EL GAS Las siguientes son instrucciones e información importante línea rígida de suministro de gas hasta la secadora. En USA, una válvula individual de cierre manual DEBE ser instalada a no más de 6 pies (1.8 m) de la secadora de acuerdo con Código Nacional - LG DLE2515S | Owner's Manual - Page 53
Parte 8 REQUERIMIENTOS Y MANTENIMIENTO SOBRE EL ESCAPE Las siguientes son instrucciones e información importante concernientes a los requerimientos del escape para su secadora. ! Advertencia Importante: Para reducir el riesgo - LG DLE2515S | Owner's Manual - Page 54
Parte 8 REQUERIMIENTOS Y MANTENIMIENTO SOBRE EL ESCAPE Mantenimiento del Escape y la Secadora ! productos pueden causar daños permanentes al acabado exterior de la secadora. 8. Limpie el panel de control con un paño húmedo cuando sea necesario. Advertencia: los productos de pre-lavados en - LG DLE2515S | Owner's Manual - Page 55
Parte 9 USANDO SU SECADORA Las siguientes son las instrucciones para encender y utilizar su nueva secadora. Por favor refiérase a las secciones especificas de este manual sticas predeterminadas para los ciclos de SENSOR DRY(Sensor de secado) y MANUAL DRY(Secado Manual) brillarán. El tiempo estimado o - LG DLE2515S | Owner's Manual - Page 56
Parte 9 USANDO SU SECADORA 2. Para Usar un Ciclo de Sensor Dry[sensor de secado] • Seleccione un Ciclo de Sensor Dry[sensor de secado] • Seleccione el DRY LEVEL [Nivel de Secado] para ajustar que tan seca quiere la carga. Al correr el ciclo, el control Súper Capacidad: Heavy Work Clothes [Ropas de - LG DLE2515S | Owner's Manual - Page 57
Parte 9 USANDO SU SECADORA CHILD LOCK [Seguro de Niños] Esta caracterí carga que desea secar. (Vea la tabla de Características Preestablecidas de los Ciclos Sensor Dry[sensor de secado] y Manual Los Ciclos de Sensor Dry[sensor de secado] le permiten ajustar el ciclo con la carga que está secando. - LG DLE2515S | Owner's Manual - Page 58
Parte 9 USANDO SU SECADORA • Time Dry [Tempo de Secado] Use este ciclo para secar por completo prendas que aún estén húmedas después de un Ciclo de SENSOR DRY[sensor de secado]. El TIME seleccionar las temperaturas para los Ciclos manuales. Presione TEMP. CONTROL hasta que la temperatura deseada se - LG DLE2515S | Owner's Manual - Page 59
Parte 9 . • Seleccione RACK DRY[Secado en Parrilla] y MORE TIME[Más Tiempo.] o LESS TIME[Menos Tiempo.] Si es necesario, reinicie el tiempo para completar señal que se emite cuando se presiona algún botón en el panel de control y cuando la conclusión de algún ciclo es indicado. Presione BEEPER[Alarma] para - LG DLE2515S | Owner's Manual - Page 60
Parte 9 USANDO SU SECADORA Mantenimiento No es muy difìcil mantener cuidada su secadora. Todo lo que tiene que hacer es seguir los siguientes pasos. Limpie - LG DLE2515S | Owner's Manual - Page 61
Parte 10 GUÍA PARA LA SOLUCIÓN DE PROBLEMAS Consejos para la solución de problemas Ahorre tiempo y dinero! Primero revise las tablas en las siguientes p áginas y quizás no necesite llamar a servicio. 29 - LG DLE2515S | Owner's Manual - Page 62
Parte 10 GUÍA PARA LA SOLUCIÓN DE PROBLEMAS 30 - LG DLE2515S | Owner's Manual - Page 63
Parte 10 GUÍA PARA LA SOLUCIÓN DE PROBLEMAS 31 - LG DLE2515S | Owner's Manual - Page 64
GARANTÍA LIMITADA DE LA SECADORA LG-USA 1-800-243-0000 1-800-243-0000 32
-
 1
1 -
 2
2 -
 3
3 -
 4
4 -
 5
5 -
 6
6 -
 7
7 -
8
-
9
-
10
-
11
-
12
-
13
-
14
-
15
-
16
-
17
-
18
-
19
-
20
-
21
-
22
-
23
-
24
-
25
-
26
-
27
-
28
-
29
-
30
-
31
-
32
-
33
-
34
-
35
-
36
-
37
-
38
-
39
-
40
-
41
-
42
-
43
-
44
-
45
-
46
-
47
-
48
-
49
-
50
-
51
-
52
-
53
-
54
-
55
-
56
-
57
-
58
-
59
-
60
-
61
-
62
-
63
-
64
 |
 |
DLE2512W/DLG2522W
DLE2514W/DLG2524W
DLE2515S/DLG2525S
☎
1-800-243-0000
para el Servicio LG (Atención al Cliente) 24 horas al día, 7 días a la semana