LG DLE2532W Owners Manual
LG DLE2532W Manual
 |
View all LG DLE2532W manuals
Add to My Manuals
Save this manual to your list of manuals |
LG DLE2532W manual content summary:
- LG DLE2532W | Owners Manual - Page 1
andGasD Thank you for buying an LG dryer. Please read your owner's manual carefully, as it provides instructions on safe installation, use, and maintenance. Retain it for fialure reference and record the model and serial Jm_rs of your dryer. L _mpletamente AuIomAti_ _. cuidado_mente, ya que bre - LG DLE2532W | Owners Manual - Page 2
DRYER 12 ELECTRICAL REQUIREMENTS - GAS DRYER ...1..6 GAS REQUIREMENT ... 18 EXHAUST REQUIREMENTS ...1..9 OPERATION INSTRUCTIONS ... 22-28 USER • MAiN • TENANCE ...2..2 FEATURES AND BENEFITS ... 23 TROUBLESHOOTING TIPS ... _-_ BEFORE YOU CALL FOR SERVICE ... 28 CUSTOMER SERVICE - LG DLE2532W | Owners Manual - Page 3
other JI Installation and _rvice must be performed by a qualified installer or service agency. WHAT TO DO IF YOU SMELL GAS: m Do not try to light a match, or cigarette, or turn on any gas or electrical JI Do not touch any electrical switches. Do not use any phone in your building. JI Clear the - LG DLE2532W | Owners Manual - Page 4
. 8) Do not rcpair or replace any part of the appliance or attempt any servicing unless st'_cifically recommend_ in the user-maintenance instructions. 9) Do not use heat to dry articles containing tkmm mbl_r or similarly textured rnb_cr-like mate:rials. 10) Clean lint s_:reen _l_orc or alter each - LG DLE2532W | Owners Manual - Page 5
all warranty coverage is effective for only 90 days. For one year from the date of purchase, if this dryer is installed and operated according to the instructions in this manual LG will repair or replace any of its mechanical or electrical parts if they are defective in material or workmanship. NO_ - LG DLE2532W | Owners Manual - Page 6
minimum 5_/= in. (14 cm) clearance behind the dryer for the exhaust vent with elbow. Minimum installation spacing servicing. [] Additional clearances might be required for wall, door and floor moldings, [] Additional spacing of 1 in, (2,5 cm) on all sides of the dryer is recommended to reduce noise - LG DLE2532W | Owners Manual - Page 7
Exhaust System For t!urther assistance refer to _ctions {m Ix)cation Requirements and Dryer Exhaust Requirements. A clothes dryer produces combustible lint. To reduce the risk of fire and combustion gas accumulation the dryer MUST be exhausted to the outdoors, • DO NOT use plastic or thin foil - LG DLE2532W | Owners Manual - Page 8
connection at ihe rear of the dryer. Make sure you do not damage the pipe i:h:madwhen removing the cap. i 3. (onnect to gas supply pipe using a new flexible stainless sled connector. 4. Tighten all conneclious _:curely. 'l'um on gas and check all pipe couneclions (internal & external) for g_s leaks - LG DLE2532W | Owners Manual - Page 9
, the exhaust air or exhaust pipe should bc warm. Gas Dryers Close the loading door, start the dryer in a heat _tting (rct;cr to the Operating Instructions supplied with the dryer); the dryer will start, the igniter will glow red and the main burner will ignite. IMPORTANT : If all air is not purged - LG DLE2532W | Owners Manual - Page 10
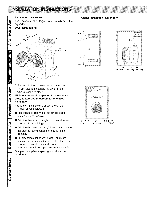
The door on this dryer is completely reve_ible. To reverse d(×>rpr(meed as IMlows: _ _ii__i_i!_i __iili t_ I 1. Remove screw & exhaust duct. joint. DUCT TAPE 5. Insert duct assembly, elbow first, through the side opening and connect the elbow to the dryer internal duct. DUCT TAPE .....i...... - LG DLE2532W | Owners Manual - Page 11
Part 32-80 or Standa_ CAN/CSA-Z240 MH. The dryer can _ installed in a manuthctured (moNle) home by lollowing these instructions: 1. IMPORTANT : Gas dryer (obtain locally). To reduce the risk of fire, the exhaust duct and weather hood MUST be fabricated of a material that will not support combustion - LG DLE2532W | Owners Manual - Page 12
be fused on N)th sides of the liue). ELECTRICAL SERVICE FOR THE DRYER SIIOI?LD BE OF MAXIMUM RATE VOLTAGE LISTED ON THE NAMEPLATE. DO NOT CONNECT DRYER TO 110, 115, OR 120 VOLT CIRCI!IT. Heating elements are available for :field ins{allation in dryers which are to be conected m electrical service of - LG DLE2532W | Owners Manual - Page 13
Electrical Connection Options if your home has: And you will _ connecting to Go to Section 4-wire receptacle A UL listed, 120/240 4-wire connection: (NEMATypei4°30R) volt minimum, 30 amp, dryer power supply cord* Power supply cord 4-wire direct x_ A fused 4-wire connection: disconnect or - LG DLE2532W | Owners Manual - Page 14
3-wire plug 3. Neutral prong 4. Spade terminals with up turned ends 5, 3/4 in. (1.9 cm) UL approved strain retie wire) 5. 3/4 in. (1.9 cm) UL-listed strain relief 3. Connect the other wires to outer Insert tab of terminal block cover into slot of dryer rear panel. Secure cover with hold-down screw - LG DLE2532W | Owners Manual - Page 15
: Direct wire U_ where I_al c_es permit connecting cabinet-ground conductor to neutral wire, Direct wire cable must have 5 ft (1.52 m) of extra length so dryer can be moved if needed. Strip 3V2 in, (8.9 cm) of outer covering from end of cable. Strip insulation back 1 in. (2.5 cm). If using 3-wire - LG DLE2532W | Owners Manual - Page 16
apply. It is the customer's responsibility to have the wiring and fuses checked by a qualified electrician to make sure the laundry room has ad_uate electrical power to operate the dryer. i O The dryer is designed m _ operated on a scparate branch, pd_u_ized, lhrcc-wirc, effectively grounded - LG DLE2532W | Owners Manual - Page 17
of the equipmentgrounding conductor can result in a risk of electric shock, Check with a qualified electrician or service person if you are in doubt as to whether the dryer is properly @ Do not m{uJil} ' the plug provided with file dryer unitif it will not fit the outlet, have a prop:_r o,udel - LG DLE2532W | Owners Manual - Page 18
[ NOTE : DO NOT connect the dryer tu L.P. Gas gvOl Service without converting the gas valve. LP. gas conversion: - Conversion must _e made by a qualified technician. See gas valve burner base for gas conversion kit part nuul_& Ill NOTE : When connecting to a gas line, an cquipment shutoff valve - LG DLE2532W | Owners Manual - Page 19
instructions in this manual. To reduce the risk of fire and the accumulation of combustion gases, DO NOT exhaust dryer air into a window well, gas : Be certain old ducts are cleaned before installing your new dryer. For _st drying rcsults, recommended maximum length of exh_mst system is shown in - LG DLE2532W | Owners Manual - Page 20
Number of 90 ° Elbows Recommended Weather Hood Type Use Only for Short Run Installations KL-£.. 4" (10.2 cm) 4" (i 0.2 cm) 2-1/2" (6.35 cm) Maximum length of 4" (i0.2 cm)diameter rigid metal duct 0 65 ftx_l:(19.8 m) 55 feet (16.8 m) 1 55 l_e| (16.8 m) 47 feet (14.3 m) 2 il 3 47 lee| ( - LG DLE2532W | Owners Manual - Page 21
_ checked frequently to make sure the dampers move :freely, they are not pushed in and that nothing lms _en set _gainst them This maintenance work should be done by"a qualified service persxm To reduce the risk of electric shock, disconnect the electrical power to the dryer before cleaning. Dryer - LG DLE2532W | Owners Manual - Page 22
screen with your fingers. 2. Wet both sides of lint screen with hot water. 3. Wet a nylon brush with hot water and liquid detergent. Scrub lint screen with the brush to remove residue build up. 4. Rinse screen with hot water. 5. Completely dry lint screen with a clean towel Replace screen in dryer - LG DLE2532W | Owners Manual - Page 23
_WARNING [] D_911W - To reduce the risk of fire, electric shock, or injury to person, read the IMPORTANT SAFETY INSTRUCTIONS before operating this appliance. D_5911W [] D_51 lW / D_251 lW [] D_932W / D_5932W / D_932S/ D_5932S [] DI..EZ532W / D_2532W 23 - LG DLE2532W | Owners Manual - Page 24
guide to starting your dryer Please refer to specific sections of this manual for more detailed information. 1. Clean lint screen before or after each cycle. 2. Place laundry into dryer and shut door. See "Loading." 3. Press the selected cycle pad The preset settings for Sensor Dry' Cycles or Manual - LG DLE2532W | Owners Manual - Page 25
made while using Sensor Dry Cycles. Selecting MORE Dry or LESS Dry automatically adjusts the sensed time needed. O _Y !, _E DRY DRY 0 DAMP_ @ _E DRY _DRY @_ DLE_11W/G_11W DLESg32W/5G932W DLESg32&_G_ DLE_11W/G2511W DLE_32W/G_2W To use a Manua Dry Cycle [] Select a Manual Dry Cycle. [] Press - LG DLE2532W | Owners Manual - Page 26
Exercise wear, sheer curtains, lace Extra Low 34 * Estimated Time with SENSOR DRY LEVEL (Normal) setting Manual Cycles Use Manual Cycles to select a specific amount of drying time and a drying temperature. When a Manual Cycle is selected, the ESTIMATED TIME REMAINING display shows the actual time - LG DLE2532W | Owners Manual - Page 27
Sensor Dry Cycles. WRINKLE CARE WRINKLE CARE prevents wrinkles that form when you cannot unload the dryer promptly at the end of a cycle. During this option, the dryer will periodically tumble. [] Press WRINKLE CARE to get up to 3 hours of heat cycle to complete drying, if needed. [] Check to see - LG DLE2532W | Owners Manual - Page 28
recall, To store a CUSTOM PROGRAM. 1. Select a cycle 2. Change DRY LEVEL Dry temperature settings. Refer to the following table, 7. Start the dryer. To remove the dryer rack, lift it straight up and out of the dryer. NOTE: Check the lint screen and remove any lint accumulated from items dried - LG DLE2532W | Owners Manual - Page 29
tmnbie but not l_eat Gas _zrvice is off Some shaking/noise is normal. Dryer may be sitting unevenly Improper _se of fabric _)fiener Drying dirty items with clean on_ Clothes were not completely clean Lint filter is full Improper _)rting Static electricity can attract lint Overloading Paper, tissue - LG DLE2532W | Owners Manual - Page 30
when washed. Others can be safely washed, but will shrink in the dryer. . If you are drying only one or two items, add a few items to ensnre proper rambling. . Selec_ a shorter drying time. , Remove items while they still hold a slight amom_t of moisture. * Remove items when cycle ends and fold or - LG DLE2532W | Owners Manual - Page 31
Dryer), model number, serial number, and ZiP code reac_y. The warranted !_-year of laber cove_ the cost of In-Home Service on all parts [_[uding the Drum Tub and Motor , instruct, or replace house fu_ or correct wiring, or correct.on of unaLffhoflzed repairs; and Damages or o_rating problems that - LG DLE2532W | Owners Manual - Page 32
P/No.: _28EL4001A
-
 1
1 -
 2
2 -
 3
3 -
 4
4 -
 5
5 -
 6
6 -
 7
7 -
8
-
9
-
10
-
11
-
12
-
13
-
14
-
15
-
16
-
17
-
18
-
19
-
20
-
21
-
22
-
23
-
24
-
25
-
26
-
27
-
28
-
29
-
30
-
31
-
32
 |
 |

DLE5911W
DLE2511W
andGasD
DLG5911W
DLG2511W
Thank you for buying an LG dryer.
Please read your owner's manual carefully,
as
it provides
instructions on safe installation,
use, and maintenance.
Retain it for fialure reference and record the model and serial
Jm_rs
of your dryer.
L
_mpletamente
AuIomAti_
_.
cuidado_mente,
ya que
bre la _ura
instalaci6n,
manejo
futuras refe4_encias,archive
secadora.