LG DLG8388NM Owners Manual
LG DLG8388NM Manual
 |
View all LG DLG8388NM manuals
Add to My Manuals
Save this manual to your list of manuals |
LG DLG8388NM manual content summary:
- LG DLG8388NM | Owners Manual - Page 1
SERVICE ,_J_, _ll__ I_r_ I' x! r,L_r _ "_ r,L_r r,L!' d'r'J,'_l_, ElectricandGasDryer DLE8377WM / DLG8388WIVl DLE8377NM / DLG8388NM Thank you for buying a LG Dryer. Please read your manual carefully, as it provides instructions on safe Installation, Use and Maintenance. Record the Model - LG DLG8388NM | Owners Manual - Page 2
PART4 ACCESSORIES INSTALLATION ...PART5. ELECTRICAL REQUIREMENTS FOR ELECTRIC DRYER ...PART& ELECTRICAL REQUIREMENTS FOR GAS DRYERS ...PART7. GAS REQUIREMENTS AND INSTRUCTIONS ...PART8. EXHAUST REQUIREMENTS AND MAINTENANCE ...PART9. OPERATING YOUR DRYER ...PART10. TROUBLESHOOTING GUIDE ...LG DRYER - LG DLG8388NM | Owners Manual - Page 3
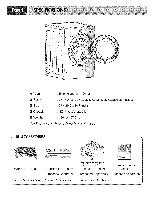
Specifications are subject to change by manufacturer. --m ACCESSORIES Dryer rack (1 each) Stacking kit (1 each) Purchased Separately _': Design of pedestals are subject to ehange without manafaturers notice. Pedestal (1 each) Purchased Separately Remote Laundry Monitor Purchased Separately - LG DLG8388NM | Owners Manual - Page 4
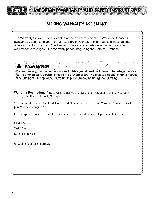
WARRANTY ASSISTANCE The Warranty for your Dryer is located at the end of this manual. Warranty Service is available by contacting your nearest LG Service Center. If this product is installed and operated per this manual, LG will repair or replace any parts defective in material or workmanship - LG DLG8388NM | Owners Manual - Page 5
dryer, please exercise care and follow basic safety 1) Read all instructions repair or replace any part of the appliance or attempt any servicing unless specifically recommended in the user-maintenance instructions. 9) Do not use heat shock. Check with a qualified electrician or service person if - LG DLG8388NM | Owners Manual - Page 6
in this manual and instructions provided by your gas supplier. • Do not store or use any gasoline, dry-cleaning solvents any other flammable vapors or liquids in the area surrounding this appliance. • Do not dry anything that has ever had anything flammable on it, even after washing. • No washer can - LG DLG8388NM | Owners Manual - Page 7
you review this entire manual before proceeding with any installation or use. More detailed instructions concerning electrical connections, gas connections, and exhaust requirements are provided in other parts of this manual. Choose a location with a solid floor for your dryer. Place the dryer at - LG DLG8388NM | Owners Manual - Page 8
concerning the placement of and clearances for your dryei: Please review this entire manual before proceeding with any installation. The door on your dryer can be installed to open either to the left or the right. Follow these instructions to reverse the direction in which your door opens: - LG DLG8388NM | Owners Manual - Page 9
, combustion, and gas accumulation, the dryer must be vented to the outdoors. Please follow the instructions (and all others in this manual) very carefully. to the blower housing and attach the duct to the base.(Duct is a SVC part) DUCT TAPE f \ 3-1. Pre-assemble 4" elbow with 4" duct. Wrap duct - LG DLG8388NM | Owners Manual - Page 10
fluid. Refer to Part 7(page 20) 5. For LP (Liquefied Petroleum) gas connection, refer to this manual's section entitled Gas Requirements and Instructions. 10 Following are several warnings and instructions concerning making the electrical connection l_r electric dryers. More detailed information - LG DLG8388NM | Owners Manual - Page 11
). The dryer should be checked while the dryer is running with no load. Measuring Static pressure Confirming Heat Source in Gas Dryers Close the door to the dryer drum/drying compartment and, after completing all steps in this manual for proper installation of this dryer, start the dryer on a heat - LG DLG8388NM | Owners Manual - Page 12
installation will comply with these standards, please contact a service and installation professional for assistance. The following instructions apply to any installation of the dryer in a manufactured or mobile home: 1) The gas dryer must be permanently attached to the floor. 2) The electrical - LG DLG8388NM | Owners Manual - Page 13
the instructions below. WARNING! Incorrect Installation can cause serious accidents. The weight of the dryer and the height of installation makes the stacking procedure too risky for one person. This procedure should be performed by 2 or more experienced service personnel. Stackin9kit Place washer - LG DLG8388NM | Owners Manual - Page 14
side first. I Be sure to press the adhesive parts of the brackets firmly to the appliance. Install the eight (8) screws(supplied) to attach the brackets to the pedestal. for dryer washer/ combo Remove the paper from the bracket. /4 Move the dryer to the desired place. NOTE : The appliance and - LG DLG8388NM | Owners Manual - Page 15
. Please contact a qualified electrician to check your home's wiring and fuses to ensure that your home has adequate electrical power to operate the dryer. 120V/240M 60 Hertz, 3-Wire Installation Instructions for Grounding of your Electric Dryer: a) This dryer must be connected to a grounded metal - LG DLG8388NM | Owners Manual - Page 16
Review the following options to determine the appropriate electrical connection for your home: Use the instructions in this section if your home has a 4-wire receptacle (NEMA type 14-30R) and you will be using a UL listed, 120/240 volt minimum, 30 amp, dryer power supply cord. Use the instructions - LG DLG8388NM | Owners Manual - Page 17
(3) recreational vehicles, and (4) areas where local codes prohibit grounding through the neutral conductor. Prepare minimum 5ft(l.52m) of length in order for dryer to be replaced. First, strip 3 72 inches (8.9cm) of outer sheath from end and strip 1 inch of insulation from each conductor. *t Then - LG DLG8388NM | Owners Manual - Page 18
under Section 3: Optional 3-wire connection. • If your local codes or ordinances connection of a frame-grounding neutral wire, use the instructions section. do not allow the conductor to the under this _( 3-wire receptacle NEMA type I0-30R) 3-Wire plug _ S_)ade terminals with ron_ - LG DLG8388NM | Owners Manual - Page 19
additional instructions regarding electrical connections and requirements for gas dryers. manual, or if you are uncertain whether or not your laundry room meets these specifications, please have a qualified service person or company. Review your laundry room's electrical supply for any problems - LG DLG8388NM | Owners Manual - Page 20
. 2. Do not attempt to connect Dryer to Liquified Petroleum (LP Gas) Gas service without a qualified professional. 3. Isolate the dryer from the gas supply piping system by closing its individual manual shut-off valve, during any pressure testing of the gas supply system at test pressure equal to - LG DLG8388NM | Owners Manual - Page 21
, DO NOT exhaust dryer air into an enclosed and unventilated area, such as an attic, wall, ceiling, crawl space, chimney, gas vent, or concealed 4 90 ° elbows. Exhaust Requirements and Instructions: 1. Venting materials are not provided with the dryer and you should obtain the necessary venting - LG DLG8388NM | Owners Manual - Page 22
the wiring diagram is provided inside the dryer control hood. Label all wires prior to disconnection when servicing the dryer, because wiring errors can cause serious injury to you and your dryer. 22 Cleaning the Lint Screen 1. Clean the lint filter either before drying each load or after drying - LG DLG8388NM | Owners Manual - Page 23
electric shock, or injury to person, read this entire manual, including the Important Safety lnstr.ctions, before operating this dryer. DLE8377WM/DLG8388WM/DLE8377NM/DLG8388NM CYCLESELECTOR TIME CHANGE BUTTON STATUS. CHECK FINER WRINKLE CARE INDICATOR EST.TIME REMAINING CHILD LOCK POWERBUTTON - LG DLG8388NM | Owners Manual - Page 24
Selection • By dialing the knob, select the desired cycle based on laundry types and conditions. 1. Sensor Dry Cycles Sensor Dry Cycles allow you to match the cycle to the load you are drying. Each cycle dries certain fabrics at the recommended temperature. A sensor detects the moisture in the - LG DLG8388NM | Owners Manual - Page 25
. In addition to this, if the dryer has some problem, it displays error messages. Status/ChecFkilter/WrinkCleareIndicator • It shows status of drying operation. When Wrinkle Care is selected, this option light will glow. When power is on, Check Filter is displayed until start/pause is selected - LG DLG8388NM | Owners Manual - Page 26
evenly spaced right onto the drum inside and door rim. | Don t use Rack for normal tumble drying, Rack Dry is shipped in place in your dryer so remove rack for normal laundry, Rack Dry is designed for use with items which are not designed for tumble drying such as sweaters, silk - LG DLG8388NM | Owners Manual - Page 27
your laundry. When you select the wrinkle free option, the dryer will periodically tumble for up to three hours after the cycle fabrics. 5. Damp Dry Beep Select 6. SeRing a Language Language change is available at Check Filter after Power On When you Press and hold DAMP DRY BEEP for 3 seconds, - LG DLG8388NM | Owners Manual - Page 28
change Drying Time on your own. You can select the desired operation time manually by pressing Time Dry button which ranges from 20 to 60 minutes. DRY shear nylon 10' 20 Reset cycle to complete drying, if needed. • Check to see that coverings are securely stitched. • Shake and fluff pillows by - LG DLG8388NM | Owners Manual - Page 29
the d@ng cycle you want. The preset setting for Sensor Dry Cycles or Manual Cycles will glow. The estimated or actual cycle time (in minutes) will show than the weight of the load. • Avoid overloading the dryer. Following these instructions can help reduce your utility bill, prolong the life of - LG DLG8388NM | Owners Manual - Page 30
MORE TIME or LESS TIME feature canbe used with Manual Dry, Time Dry and Rack Dry Cyc!es, of selecting the cycle, the dryer automatically shuts off. • If you wish to filter straight up 2.Clean the filter using one of the following methods. Run the fingers across the filter (_ Vacuum the lint filter - LG DLG8388NM | Owners Manual - Page 31
use two fuses or breakers.) 2.Problem:My Dryer Doesn't Heat m • Is the fuse blown, or is the Circuit breaker tripped'? • Is the gas supply or service blocked or off'? m _ If the fuse is b!0wu or the circuit breaker tripped, the dryer might tumble but not heat• Check your home's or laundry room - LG DLG8388NM | Owners Manual - Page 32
'? • Did you overload your dryer? • Did you place any Problem:The drying time is not consistent _stJ_ • Are you using consistent heat settings trod consistent load sizes'? The drying time for a load will vary depending on the heat setting, the type of heat used (electric, natural or LP gas - LG DLG8388NM | Owners Manual - Page 33
the care instructions for your garment? • PLM problem To avoid shrinkage, please carefully follow the care and use instructions for your garment, because some fabrics will naturally shrink when washed. Other fabrics can be washed but will shrink when dried in a dryer. See the Owner's Manual of RLM - LG DLG8388NM | Owners Manual - Page 34
800-243-0000 and choose the appropriate prompt. Please have product type (Dryer), model number, serial number, and ZiP code ready. The warranted 1-year of labor covers the cost of In-Home Service on all parts including the Drum Tub and Motor. THiSWARRANTY IS iN LiEUOF ANY OTHERWARRANTIES,EXPRESSOR
-
 1
1 -
 2
2 -
 3
3 -
 4
4 -
 5
5 -
 6
6 -
 7
7 -
8
-
9
-
10
-
11
-
12
-
13
-
14
-
15
-
16
-
17
-
18
-
19
-
20
-
21
-
22
-
23
-
24
-
25
-
26
-
27
-
28
-
29
-
30
-
31
-
32
-
33
-
34
 |
 |
1-800-243-0000
24 HOURS A DAY,
7
DAYS A WEEK FOR LG CUSTOMER SERVICE
,_J_,
_ll__
I_
r_
I'
x!
r,L_r
_ "_
r,L_r r,L!'
d'r'J,'_l_,
ElectricandGasDryer
DLE8377WM
/
DLG8388WIVl
DLE8377NM
/
DLG8388NM
Thank
you
for buying a LG Dryer.
Pleaseread
your
manual carefully, as it provides instructions
on safe Installation, Use and Maintenance.
Record the Model and Serial Numbers, and retain the
manual for future reference.
For more information, visit our website at http://us.lge.com
P/No.:
3828EL3010B