LG KG6000R Owners Manual
LG KG6000R Manual
 |
View all LG KG6000R manuals
Add to My Manuals
Save this manual to your list of manuals |
LG KG6000R manual content summary:
- LG KG6000R | Owners Manual - Page 1
" faro lea./sS i[]S I )cio'185_ (e ........ c . _. de sei:i_sidad ::uiidaS!os8 y t}taih's- ente 'a __1;:==(!_9. !issta!a y o I)_,-, ,i, S., de ;::s,l..,.a....de v@Iitl:Iiqil, MODELS, MODELES,MODELOS:M5404R,M6004R, KG5200ER, KG6000R, WG500ER,WG5200R,WG6000R, - LG KG6000R | Owners Manual - Page 2
Staple your receipt here for proof of pJr cha_. READ THIS MANUAL inside you will find many helpful hints on how to use and problems in the chart of troubleshooting tips If you review our cha_ of Troubleshooting Tips first, you may not need to call for service at all. ° Contact the authorized Service - LG KG6000R | Owners Manual - Page 3
and property damage, the following these instructions. m _n_rrect operation due to ignoring instructions will cause harm or damage, The \ properties on!y _.) I Meanings of symbols used in this manual are as shown below, Ill _ _.,_, Be surBeetosufroellonwot tthoedionstthriusc. problems. ® - LG KG6000R | Owners Manual - Page 4
c io.l • They are sharp and may cause an injury, * Water may enter the unit and degrade the insulation, _tmay cause an e_ectricshock, • Since the f_ rotates at high s_ed during o_ration, it may cause an injury. • _tcould cause dust to accumulate on the heat exchanger. • This could injure the - LG KG6000R | Owners Manual - Page 5
About the ntro, ls on the air conditioner The controls will look like the following. V" Temp TEMPERATURE SETTING • This button can automatically control the temperature of the room, The temperature _n be set wi_in a range of 60°F to 86°F by I°F Select the lower number for lowertemperature of the - LG KG6000R | Owners Manual - Page 6
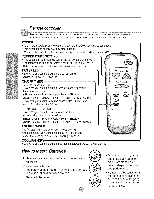
Remote controfler Precaution: The RemoteController wirl not function properly Jfstror_g_ightstnkes the sensor wir_ow of the air conditioner or if there are obstacJesbetweenthe RemoteController and the air condRioner. • To turn the Set ON, push the button. To turn the Set OFF, push the button again - LG KG6000R | Owners Manual - Page 7
detergent solution. (Fig. 2) The cabinet may be washed with mild soap or detergent and lukewarm water, then polished with Liquid Wax for Appliances. Fig. 1 Fig, 2 To ensure continued peak efficiency, the condenser coils(outside of: unit) should be checked periodically and cleaned if clogged with - LG KG6000R | Owners Manual - Page 8
Features and InMallation Learning the key components will help you properly install the unit. 1 9 1, CABINET 2. HORIZONTAL AiR DEFLECTOR 3. COOL AiR DISCHARGE 4. FRONT GRILLE 5, INLET GRILLE 6 AIR FILTER 7. CONTROL BOARD 8. AiR iNTAKE 9. UPPER GUIDE 10, REMOTE CONTROLLER - LG KG6000R | Owners Manual - Page 9
WindowRequirements NOTE: All supporting parts should be secured to firm wood, masonry, or ) _ (WOOD SCREW) _ .E _ E TYPE D: lEA (SEAL STRIP) (Adhesive backed) TYPE E: lEA (SASH SEAL} (Notadhesivebacked) TYPE F: 2EA (GUIDE PANEL} TYPE C: 3EA (L BRACKET) TYPE G: lEA (SUPPORT BRACKET) - LG KG6000R | Owners Manual - Page 10
See Fig. 9. & INSTALL THE AIR IN THE WINDOW a. Carefully lift the air conditioner and slide it into the open window. Make sure the bottom guide of the air conditioner drops into the notches of the L bracket. See Fig. 9. During the following step, hold unit firmly until window sash is lowered - LG KG6000R | Owners Manual - Page 11
off, disconnect the power cord, remove the L bracket and the screws installed through the top and bottom of the guide panels, and save for reinstallation later. Close the guide panels. Keeping a firm grip on the air conditioner, raise the sash, and carefully tilt the air conditioner backward - LG KG6000R | Owners Manual - Page 12
fore you for servia... Troubleshooting TiPs save time and money! Review the chart below first and you may not need to call for service. Normal Operation • You may hear a pinging noise caused by water being picked up and thrown against the condenser on rainy days or when the humidity - LG KG6000R | Owners Manual - Page 13
- LG KG6000R | Owners Manual - Page 14
Reportezici les numerodse modeleet de serierespectifs desunitesinterieuret exterieur:e Unit_int_ieure N° de serie Ces numeros sont inscrits sur i'etiquette apposee sur le flanc de chaque unite. Raison sociale du vendeur Date d'achat L'agrafe votre re_:u ici pour la preuve d'achat. LISEZ CE MANUEL • - LG KG6000R | Owners Manual - Page 15
observ6es dans ie but de pr6venir tout risque de dommages corpore]s ou mat6fiels. I L'utilisation non conforme, r6sultant de [a n6g]igence des instructions, est su_epflble de prov_uer des dommages _rpore[s ou materiels dont la gravite est signalee par les indications suivantes : II A cause du poids - LG KG6000R | Owners Manual - Page 16
ATTENTION i] , Vousdsquedzevousblesser. • Ueau peut s'infiltrer dans appareil et affecter I isolement. Cela peut 6galernent provoquer un choc electrique. • Le ventiEateurde refroidissement toumant & grande vitesse darts Fappareil, cela peut provoquer un accident. • De _a_ussiere pourrait s' - LG KG6000R | Owners Manual - Page 17
Instructions de Fon ionnement Les commandes ressembleron,t rune des suivantes. Les Commandes R#GLAGE DE LA TEMPERATURE f • Ce _uton peut contr61er automatiquement la temperature de la pie_, - LG KG6000R | Owners Manual - Page 18
i • Pour mettre I'appareil en marche (ON), pressez _ bouton. Pour eteindre Fappareil (OFF), pressez de nouveau sur le bouton. • C:e bouton a priorite sur tous les autres. • Quand vous mettez I'appareil en marche Ilapremiere lois, il est regle au mode High cool eta ia temperature de 72 F REGLAGE DE - LG KG6000R | Owners Manual - Page 19
Commanides supplentaires et renseignements importants. La Direction de L'air . POUR AJUSTER LA DIRECTION DE L'AIR A L'AIDE DE LA COMMAiNDE DE DIRECTION HORIZONTALE DE L "AIR Envous servant des langue_es de contr61e, vous pouvez diriger la circulation d'air vers la gauche, la droite, droit devant ou - LG KG6000R | Owners Manual - Page 20
a mieux comprendre le processus d'installation 1 9 1. BO]TIER 2. DEFLECTEUR D'AIR HORIZONTAL 3. De:CHARGE D'AIR FROiD 4, GRILLAGE FRONTAL 5. GRILLAGE D'ADMISSION 6. FILTRE A AiR 7. TABLERO DE CONTROL 8. PRISE D'ADMISSION 9. GUIDE SUPERIEUR 10. TELECOMMANDE - LG KG6000R | Owners Manual - Page 21
Instructions d'installation REMARQUE: Toutes les pieces pieces de support dovient 6tre ancr6es solidement dans du bois rebord interieur de la fen6tre, de maniere & ce que le climatiseur puisse etre installe sans probleme. Voir le Schema 5-2. Le dessus de la caie de bois doit depasser le cadre de - LG KG6000R | Owners Manual - Page 22
LA FENETRE a. Levez doucement le climatiseur et glissez-le dans la fenetre ouverte. Assurez-vous que le guide sous le climatiseur tombe dans les coches du support en L Voir le Schema 9. ]FYPEA Schema 6 TYPE A Schema 7 REBORD DEINTERIEUR REBORD DE EXTERIEUR TYPE A |NT_RIEU R CENTRALE Durant - LG KG6000R | Owners Manual - Page 23
b. Pendant que vous stabilisez le climatiseur. descendez tranquilement la glissiere de la fenetre en arriere du guide superieur du climatiseur, te_ qu1I_ustre au Schema 11. 4. A TTACHEZ LES PANNEAUX COULISSANTS Ethez _espanneaux coulissants de fa£:on & ce qu'ils occupent toute _'ouverture de - LG KG6000R | Owners Manual - Page 24
appel de Quelques conseits pour vous depunner: Epargnez temps et argent! Revisez le tableau d-dessous et vous eviterez peut-#tre un appel de service coOteux. Fonctionnement normal • II se peut que vous entendiez un cliquettement cause par I'eau qui est soulevee et pr_etee contre le condensateur lots - LG KG6000R | Owners Manual - Page 25
- LG KG6000R | Owners Manual - Page 26
lateral de cada unidad. Distribuidor Fecha de comma Cosa con una grapa su r_ibo aqui para prue_ de la compra, LEA ESTE MANUAL • Aqui encontrara numerosas sugerencias sobre como utilizar y mantener adecuadamente su acondicionador de aire. Con unos cuantos cuidados preventivos se puede ahorrar mucho - LG KG6000R | Owners Manual - Page 27
o grave& | / L Emsatteerisailmesb+olo indica la posibilidad de lesiones o da_os |J I El significado de los sim_los utiliza_s en este manual se indica a continuaci6n. Asegt_rese de no hacerlo. -') €_ r Asegurese de seguir las instrucciones. ,,,J [ _ ADVERTENO1jIA • De otra forma, ello - LG KG6000R | Owners Manual - Page 28
I PRECAUClON ] • Esto _dda causar heridas • El agua podrla entrar en la unidad y degradar el aislamiento. Tambien podria causar una sacudida ei_ctricm • Puesto que el ventilador gira a alta ve_ocidad durante la operaci6n, podrla ocasionar heridas. • Podria causar acumulamiento de _lvo en el - LG KG6000R | Owners Manual - Page 29
In ruccionnes de Funcionamiento La apariencia de los controles sera como uno de los siguientes. ' I" Temp AJUSTE DE LA TEMPERATURA • Este _t6n puede _ntro]ar ]a tem_ratura del cuarto automaticamente. La tem_ratda se puede ajustar de grado en grade, desde 60°F hasta 86°F cada! °R Se]eccione el - LG KG6000R | Owners Manual - Page 30
Control Remoto ENECNDIDO!APAGADO • Para ENCENDER el sistema presione el boton, y para APAGARLO presione el bot6n otra vez. • Este boton tiene priofidad _bre todos los otros botone& • Cuando Ud. Io enciende pot primera vez, el sistema esta en el y la temperatura es de 72°R AJUSTE DE LA TEMPERATU - LG KG6000R | Owners Manual - Page 31
Controles adicionales e,informacion importante. La dreccidn del aire . PARA AJUSTAR LA DIRECCION DEL AIRE USANDO CONTROL DE LA DIRECCION DEL AIRE Las dos lengOetas hodzontales para el control de tas rejillas le permiten descargar el aire hacia la izquJerda, o algo de aire a la izquierda y otro - LG KG6000R | Owners Manual - Page 32
Requerimientos de la Aprender el nombre de las partes antes de la instalaci6n le ayudara a ente,nder el proceso de instalaci6n. 1 9 1. GABINETE 2. DEFLECTOR HORIZONTAL DE AIRE (VENTANI LLAS VERTICAKLES) 3. SALIDA DE AIRE 4. REJILLA FRONTAL 5. RECOLECTOR DE AIRE (BANDEJA DE ENTRADA) 6. FILTRO DE - LG KG6000R | Owners Manual - Page 33
Requerimientos de la ventana NOTA: Todas las partes que soportan la ventana deben de estar bien fijas a madera, metal, o cemento+ 1+ La unidad esta diseMada para ser instalada en una ventana doble con anchos entre 22" y 36"+ El borde superior e inferior deben de estar Io suficientemente abierto para - LG KG6000R | Owners Manual - Page 34
de los paneles corredizo& Puede haber lesiones o daSos si la unidad se cae de la ventana. IMPORTANTE : Cuando el aire acondicionado sea fijado en el support en L, el aire acondicionado ser& centrado como pueden observar en la Fig. 10. EXTERIOR MENSULAEN L Fig. 9 UNEA DEL CENTRO Fig. 10 - LG KG6000R | Owners Manual - Page 35
b.Mientrasmantieneel aire acondicionadoen posici6n,cuidadosamentebaje el bordede la ventanasuperiorhastala guia superiordel aire acondicionadcoo,moenlaFig.11. 4. ASEGURE LOS PANELES Exfienda los paneles para rellenar tos orificios de la ventana usando los 4 torniiios (TIPO B) como en la Fig. 12. 5, - LG KG6000R | Owners Manual - Page 36
Antes de avi r al rvicio Tips para solucionar probtemas (Ahorre temopo y dinero) Cuando tenga algtJn problema primero consulte el cuadro que se encuentra abajo y tal vez no he, site llamar para solicitar servicio tecnico. Operacidn normal • Durar te dias Iluviosos o cuando ta humedad es alta usted - LG KG6000R | Owners Manual - Page 37
- LG KG6000R | Owners Manual - Page 38
- LG KG6000R | Owners Manual - Page 39
as it is in the ILS includingAlaska, Hawaii, and IJ.S. li_rritork_. Pr.o.d.u._!... Aii Parts Compressor LG Room Air Conditioner Warranty Period 1 Year 5 Years 1 Year (In-Home Service) 1 Year (h>Home Service) No other exppess wamnty is @plicable to this product+ THE DIJR;gFR)N OF ANY IMPI,IED
-
 1
1 -
 2
2 -
 3
3 -
 4
4 -
 5
5 -
 6
6 -
 7
7 -
8
-
9
-
10
-
11
-
12
-
13
-
14
-
15
-
16
-
17
-
18
-
19
-
20
-
21
-
22
-
23
-
24
-
25
-
26
-
27
-
28
-
29
-
30
-
31
-
32
-
33
-
34
-
35
-
36
-
37
-
38
-
39
 |
 |

websitehttp://www.lgservice.com
ER
M£NLEL
eLI
T
D°_TILIS£TION
EU
FE lET
V(?uiii®z
iiile -'
.....
"_;_
i-,,
e,-_s _
....
_:'=
e: :,_
.........
..c_i;
{_.,::_s
_,>tOS
'l,,c,_,A'_:8
d(?
.....
[]i
......
I
=ip
.......
'¢_
=
='
QI
:'_Q
pFOOl_CJ
@I
oc
............
C,-L
I_,A£:,::
,_,
@V'tilll
CIO
_]
J itISiS, lli8 iOl
@i
t,i
iotIcliiotIilorrilrl
de
voiFI-) 31iii/fis!isouI,
AC.©ND
OIONADOP
DEA:R,E
D:
UL
P
PIET
PO" faro
lea./sS
i[]S I
)cio'185_ (e
....
:_
..........
' :,_
........
c . _.
'
_
(!9
I),-, ,
de sei:i_sidad
::uiidaS!os8
y t}taih's- ente
a _1;:==_. !issta!a
yo
_, i,
S.,
de
;:, ,a
:sl
.......
de
v@Iitl:Iiqil,
E
MODELS,MODELES,MODELOS:M5404R,M6004R,KG5200ER,
KG6000R,
WG500ER,WG5200R,WG6000R,