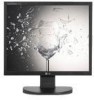
LG L1952TX User Guide
LG L1952TX - LG - 19" LCD Monitor Manual
 |
UPC - 719192182271
View all LG L1952TX manuals
Add to My Manuals
Save this manual to your list of manuals |
LG L1952TX manual content summary:
- LG L1952TX | User Guide - Page 1
L1952T L1752TX L1952TX L1752TQ L1952TQ L1752TR L1952TR Make sure to read the Important Precautions before using the product. Keep the User's Guide(CD) in an accessible place for furture reference. See the label attached on the product and give the information to your dealer when you ask for service. - LG L1952TX | User Guide - Page 2
nearest authorized repair service provider for a replacement. The power supply cord is used as the main disconnection device. Ensure that the socket-outlet is easily accessible after installation. Operate the display only from a power source indicated in the specifications of this manual or listed - LG L1952TX | User Guide - Page 3
not allow anything to rest upon or roll over the power cord, and do not place the display where the power cord is subject to damage. Do not use this display on the screen. However, this is characteristic of the fixed-resolution LCD panel. On Cleaning Unplug the display before cleaning the face of - LG L1952TX | User Guide - Page 4
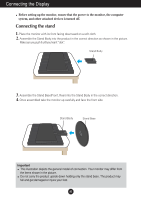
up carefully and face the front side Important This illustration depicts the general model of connection. Your monitor may differ from the items shown in the picture. Do not carry the product upside down holding only the stand base. The product may fall and get damaged or injure your foot. A3 - LG L1952TX | User Guide - Page 5
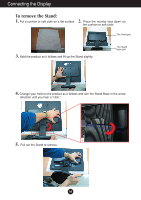
Connecting the Display To remove the Stand: 1. 2. Put a cushion or soft cloth on a flat surface. Place the monitor face down on the cushion or soft cloth. The Head part 3. Hold the product as it follows and lift up the Stand slightly. The Stand base part 4. Change your hold on the product as - LG L1952TX | User Guide - Page 6
body of the Stand as it follows. 3. Press the two latches at the same time as it follows. 4. Keep pressing the two latches and use the other hand to hold the body of the Stand to push the Stand Base in the arrow direction to remove. 5. The body of the Stand and the Stand Base are - LG L1952TX | User Guide - Page 7
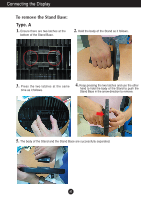
the Stand Base. 2.Hold the body of the Stand as it follows. 3. Press the four latches individually toward each end. 4. Put the Stand Base on a flat surface and pull up the body of the Stand while holding the Stand Base with the other hand. to remove. 5. The body of the Stand and the Stand Base - LG L1952TX | User Guide - Page 8
Connecting the Display Before setting up the monitor, ensure that the power to the monitor, the computer system, and other angle of the screen, do not put your finger in between the head of the monitor and the stand body . You can hurt your finger(s). Ergonomic It is recommended that in order to - LG L1952TX | User Guide - Page 9
all countries.) MAC Mac adapter For Apple Macintosh use, a separate plug adapter is needed to change the 15 pin high density (3 row) D-sub VGA connector on the supplied cable to a 15 pin 2 row connector. 4. Press button on the side switch panel to turn the power on. When monitor power is turned on - LG L1952TX | User Guide - Page 10
Control Panel Functions Front Panel Controls Side Control MENU Button Function Use this button to enter or exit the On Screen Display. OSD LOCKED/UNLOCKED This function allows you to lock the current control settings, so that they cannot be inadvertently changed. Press and hold the MENU button - LG L1952TX | User Guide - Page 11
display image to the ideal settings for the current screen resolution size (display mode). The best display mode is 17 inch monitor : 1280 x 1024 19 inch monitor : 1280 x 1024 Power Button Use this button to turn the display on or off. Power Indicator This Indicator lights up green or blue when - LG L1952TX | User Guide - Page 12
On Screen Display (OSD) Control Adjustment Screen Adjustment Making adjustments to the image size, position and operating parameters of the display is quick and easy with the On Screen Display Control system. A short example is given below to familiarize you with the use of the controls. The - LG L1952TX | User Guide - Page 13
of the screen SETUP LANGUAGE OSD HORIZONTAL POSITION VERTICAL To customize the screen status for a user's operating environment FLATRON F-ENGINE WHITE BALANCE POWER INDICATOR FACTORY RESET MOVIE / TEXT USER NORMAL To select or customize desired image settings : Adjustable A : Analog Input - LG L1952TX | User Guide - Page 14
Icons Sub-menus Button Tip MENU : Exit : Adjust (Decrease/Increase) SET : Enter : Select another sub-menu NOTE OSD (On Screen Display) menu languages on the monitor may differ from the manual. A13 - LG L1952TX | User Guide - Page 15
sub-menu To adjust the brightness of the screen. To adjust the contrast of the screen. Set your own gamma value. : -50/0/50 On the monitor, high gamma values display whitish images and low gamma values display high contrast images. COLOR COLOR PRESET RED GREEN MENU : Exit BLUE : Decrease - LG L1952TX | User Guide - Page 16
display. This item allows you to remove any horizontal noise and clear or sharpen adjust position of the OSD window POSITION on the screen. POWER INDICATOR MENU : Exit : Adjust : Adjust SET : Select another sub-menu Use this function to set the power indicator on the front side of the monitor - LG L1952TX | User Guide - Page 17
appear when you touch the right side of the monitor. Menu Name Icons Sub-menu Name button on the FLATRON F-ENGINE When you execute F-ENGINE, two tones movies TEXT: For text images (Word processing etc.) USER User You can manually adjust brightness, ACE or RCM. You can save or restore the adjusted - LG L1952TX | User Guide - Page 18
Troubleshooting Check the following before calling for service. No image appears ● Is the power cord of the • Check and see if the power cord is connected display connected? properly to the power outlet. ● Is the power indicator • Press the Power button. light on? ● Is the power this manual - LG L1952TX | User Guide - Page 19
Troubleshooting Display image is incorrect ● Display Position is incorrect. • Press the AUTO/SET button to Check if the screen is set to interlace mode and if yes, change it to the recommend resolution. • Make sure the power voltage is high enough, It has to be higher than AC100-240V 50/60Hz. A18 - LG L1952TX | User Guide - Page 20
from the display driver CD (or diskette) that comes with your display. Or, you can also download the driver from our web site: http://www.lge.com. ● Do you see an "Unrecognized monitor, Plug&Play (VESA DDC) monitor found" message? • Make sure to check if the video card supports Plug&Play function - LG L1952TX | User Guide - Page 21
Display Sync Input Video Input Resolution Plug&Play Power Consumption Dimensions &Weight Tilt Range Power Input Environmental Conditions Stand Base Signal cable Power cord 17 inches (43.2 cm) Flat Panel Active matrix-TFT LCD Anti-Glare coating 17 inches viewable 0.264 mm pixel pitch Horizontal - LG L1952TX | User Guide - Page 22
Display Sync Input Video Input Resolution Plug&Play Power Consumption Dimensions &Weight Tilt Range Power Input Environmental Conditions Stand Base Signal cable Power cord 19 inches (48.19 cm) Flat Panel Active matrix-TFT LCD Anti-Glare coating 19 inches viewable 0.294 mm pixel pitch Horizontal - LG L1952TX | User Guide - Page 23
Specifications Preset Modes (Resolution) Display Modes (Resolution) 1 VGA 640 x 350 2 VGA 720 x 400 3 VGA 640 x 480 4 VESA 640 x 480 5 VESA 800 x 600 6 VESA 800 x 600 7 MAC 832 x 624 8 VESA 1024 x 768 9 VESA 1024 x 768 10 MAC 1152 x 870 11 VESA 1152 x 900 *12 VESA 1280 x 1024 **13 VESA 1280 x 1024 - LG L1952TX | User Guide - Page 24
3 T. M. D. S. Data2/4 Shield 18 T. M. D. S. Data0+ 4 T. M. D. S. Data4- 19 T. M. D. S. Data0/5 Shield 5 T. M. D. S. Data4+ 20 T. M. D. S. Data5- 6 Data1/3 Shield 12 T. M. D. S. Data3- 13 T. M. D. S. Data3+ 14 +5V Power 15 Ground (return for +5V, H. Sync. and V. Sync.) T. M. D. S. ( - LG L1952TX | User Guide - Page 25
the interchange device. 1. 2. Put a cushion or soft cloth on a flat surface. Place the monitor face down on the cushion or soft cloth. The Head part 3. Hold the product as it follows and lift up the Stand slightly. The Stand base part 4. Change your hold on the product as it follows and turn - LG L1952TX | User Guide - Page 26
mount plate(Separate purchase) This is stnad-type or will mount type and is connectable with Wall mount plate. Please refer to the installation guide for more details, which is provided when Wall mount plate is purchased. Kensington Security Slot Connected to a locking cable that can be purchased - LG L1952TX | User Guide - Page 27
Digitally yours
-
 1
1 -
 2
2 -
 3
3 -
 4
4 -
 5
5 -
 6
6 -
 7
7 -
8
-
9
-
10
-
11
-
12
-
13
-
14
-
15
-
16
-
17
-
18
-
19
-
20
-
21
-
22
-
23
-
24
-
25
-
26
-
27
 |
 |

M
ake sure to read the
Important Precautions
before using the product.
Keep the User's Guide(CD) in an accessible place for furture reference.
S
ee the label attached on the product and give the information to your
dealer when you ask for service.
L1752T
L1952T
L1752TX
L1952TX
L1752TQ
L1952TQ
L1752TR
L1952TR
User’s Guide