LG L246WH-BN Owner's Manual
LG L246WH-BN Manual
 |
View all LG L246WH-BN manuals
Add to My Manuals
Save this manual to your list of manuals |
LG L246WH-BN manual content summary:
- LG L246WH-BN | Owner's Manual - Page 1
User's Guide L246WH Make sure to read the Important Precautions before using the product. Keep the User's Guide(CD) in an accessible place for furture reference. See the label attached on the product and give the information to your dealer when you ask for service. - LG L246WH-BN | Owner's Manual - Page 2
nearest authorized repair service provider for a replacement. The power supply cord is used as the main disconnection device. Ensure that the socket-outlet is easily accessible after installation. Operate the display only from a power source indicated in the specifications of this manual or listed - LG L246WH-BN | Owner's Manual - Page 3
heat source. Main power breaker is the power cord and this breaking Blue spots on the screen. However, this will have no impact or effect on the display performance. If possible, use the recommended resolution to obtain the best image quality for your LCD the fixed-resolution LCD panel. On Cleaning - LG L246WH-BN | Owner's Manual - Page 4
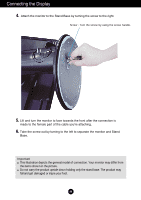
Connecting the Display Before setting up the monitor, ensure that the power to the monitor, the computer system, and other attached devices is turned off. Connecting the stand base or Removing the stand base 1. Place the monitor with its front facing downward on a cushion or soft cloth. 2. Align the - LG L246WH-BN | Owner's Manual - Page 5
to the female part of the cable you're attaching. 6. Take the screw out by turning to the left to separate the monitor and Stand Base. Important This illustration depicts the general model of connection. Your monitor may differ from the items shown in the picture. Do not carry the product upside - LG L246WH-BN | Owner's Manual - Page 6
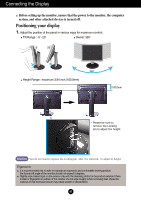
up the monitor, ensure that the power to the monitor, the computer system, and other attached devices is turned off. Positioning your display 1. Adjust the position of the panel in various ways for maximum comfort. Tilt Range : -5˚~20˚ Swivel :350˚ Height Range : maximum 3.94 inch (100.0mm - LG L246WH-BN | Owner's Manual - Page 7
DC-OUT HDMI/DVI Y PB PR D-SUB 7 6 1 23 4 5 1 AC-IN Connector : Connect the Power Cord 2 DC-OUT Jack 3 HDMI/DVI Signal Connector 4 COMPONENT Input Terminal 5 D-SUB Analogue Signal Connector 6 SUB or any other component.) The Left Rear of the Monitor OUT AUDIO 2 1 AUDIO OUT UB A6 - LG L246WH-BN | Owner's Manual - Page 8
the 15 pin high density (3 row) D-sub VGA connector on the supplied cable to a 15 pin 2 row MAC connector. 4. Press button on the front switch panel to turn the power on. 5. Press the INPUT button at the front side of the monitor. INPUT OK/AUTO A When connecting with a HDMI/DVI signal input - LG L246WH-BN | Owner's Manual - Page 9
Stereo cables properly. Connect the terminals to the sockets of the same color. 2. Connect the power cord. Speaker AUDIO IN DC-OUT HDMI/DVI COMPONENT Y PB PR D-SUB 1 2 AUDIO OUT PB PR PB PR Monitor RCA-Stereo cable (not included) Component Cable (not included) DVD/VIDEO/HDTV PB PR - LG L246WH-BN | Owner's Manual - Page 10
AUDIO 2 1 HDMI/DVI cable RCA-Stereo cable (not included) Speaker (not included) DVD/VIDEO/HDTV 2. Press the INPUT button at the front side of the monitor. INPUT OK/AUTO When connecting with a HDMI/DVI cable. • Select HDMI. A9 INPUT RGB HDMI Component - LG L246WH-BN | Owner's Manual - Page 11
PB PR D-SUB USB upstream Port To USB downstream port of the USB compliant PC or another hub cable 3. The monitor's USB terminal supports USB 2.0 and High Speed cables. Data Rate Power Consumption High Speed 480Mbps 2.5W (Max,each Port) Full Speed 12Mbps 2.5W (Max,each Port) Low Speed 1.5Mbps - LG L246WH-BN | Owner's Manual - Page 12
HDMI, make sure that the audio cables are plugged in as show in the diagram. Cable Holder *The length of the cable which connects the monitor's AUDIO-OUT and the speaker's AUDIO-IN can be too long. It is used to connect the components at the appropriate distance when the AUDIO - LG L246WH-BN | Owner's Manual - Page 13
Control Panel Functions Front Panel Controls INPUT Button Select the input signal. INPUT OK/AUTO RGB HDMI Component : 15-pin D-SUB analogue signal : HDMI/DVI digital signal DTV SET-TOP - LG L246WH-BN | Owner's Manual - Page 14
Control Panel Functions Button Use this button to select an icon or adjust the screen resolution size (display mode). The best display mode is - 24 inch monitor : 1920 x 1200@60Hz Power Button Use this button to turn the display on or off. Power Indicator This Indicator lights up blue when - LG L246WH-BN | Owner's Manual - Page 15
On Screen Display (OSD) Control Adjustment Screen Adjustment Making adjustments to the image size, position and operating parameters of the display is quick and easy with the On Screen Display Control system. A short example is given below to familiarize you with the use of the controls. The - LG L246WH-BN | Owner's Manual - Page 16
On Screen Display(OSD) Selection and Adjustment OSD (On Screen Display) menu Icon Function Description PICTURE Adjusting Screen Colour. SPECIAL SCREEN Selecting the options. Screen Adjustment. Adjusting PIP Mode (Multiple Screen) Functions. PIP NOTE OSD(On Screen Display) The OSD function - LG L246WH-BN | Owner's Manual - Page 17
On Screen Display(OSD) Selection and Adjustment Adjusting Screen Colour EZ Video HDMI(Video), Component input ACC The EZ Video function automatically adjusts the screen image quality depending on the AV usage environment. • Dynamic : Select this option to display with a sharp image. • Standard - LG L246WH-BN | Owner's Manual - Page 18
the screen color to fit the SRGB standard color • User : Select this option to use the user-defined settings. EZ Video Contrast Brightness Red Green Blue 50 50 User 50 50 50 Contrast To adjust the contrast of the screen. Brightness To adjust the brightness of the screen. Red / Green - LG L246WH-BN | Owner's Manual - Page 19
Select the signal type you want using the button. Child lock Language Power indicator This feature monitor OSD. Monitor can be adjusted with PC by connecting communication between PC and monitor when DDC/CI is ON, and monitor cannot be adjusted with PC because communication between PC and monitor - LG L246WH-BN | Owner's Manual - Page 20
On Screen Display(OSD) Selection and Adjustment Screen Adjustment ARC To select the image size of the screen. Autoconfigure Clock Phase Full Original Full Original 1:1 This function is suitable for analogue signal input only. - LG L246WH-BN | Owner's Manual - Page 21
is connected with PC through HDMI. * If you want to connect PC, select PC in this menu. Otherwise, the screen may be too large to support PC sub screen NOTE When the Interlace Signal is inputted at the RGB source input level, the Auto-Configure, Clock, Phase and Position menu can - LG L246WH-BN | Owner's Manual - Page 22
On Screen Display(OSD) Selection and Adjustment Adjusting PIP Mode (Multiple Screen) Functions (To adjust the sub screen) On/Off Off PIP Input PIP Position On/Off PIP After selecting PIP in the PIP On/Off menu, the following menu items can be adjusted. PIP Input To select an input signal - LG L246WH-BN | Owner's Manual - Page 23
Troubleshooting Check the following before calling for service. No image appears G Is the power cord of the • Check and see if the power cord is connected display connected? properly to the power outlet. G Is the power on and the • Adjust the brightness and the contrast. power indicator blue - LG L246WH-BN | Owner's Manual - Page 24
10 (for instance, 16:9, 5:4, 4:3), you might encounter problems such as blurred letters, blurry screen, cut-off screen display or tilted screen. The setting method can differ by computer and O/S (Operation System), and resolution mentioned above may not be supported by the video card performance. In - LG L246WH-BN | Owner's Manual - Page 25
) that comes with your display. Or, you can also download the driver from our web site: http://www.lge.com. G Do you see an "Unrecognized monitor, Plug&Play (VESA DDC) monitor found" message? • Make sure to check if the video card supports Plug&Play function. The audio function does not work - LG L246WH-BN | Owner's Manual - Page 26
Specifications Display Sync Input Video Input 24 inches (61.3 cm) Flat Panel Active matrix-TFT LCD Anti-glare coating 24 inches viewable 0.270 mm pixel pitch Horizontal Freq. Vertical Freq. Input Form Analog : 30 - 83 kHz (Automatic) Digital : 30 - 83 kHz (Automatic) 56 - 75 Hz (Automatic) - LG L246WH-BN | Owner's Manual - Page 27
Specifications Stand Base Power cord USB Attached ( ), Detached ( O ) Wall-outlet type or PC-outlet type Standard USB 2.0, Self-Power Data Rate Max 480 Mbps Power Consumption Max 2.5W x 2 NOTE Information in this document is subject to change without notice. A26 - LG L246WH-BN | Owner's Manual - Page 28
Specifications PC INPUT Preset Modes (Resolution) Display Modes Horizontal Vertical (Resolution) Freq. (kHz) Freq. (Hz) Display Modes Horizontal Vertical (Resolution) Freq. (kHz) Freq. (Hz) 1 640 x 480 2 640 x 480 3 720 x 480 4 720 x Mode Sleep Mode Off Mode LED Color Blue Amber Off A27 - LG L246WH-BN | Owner's Manual - Page 29
Specifications HDMI Type Pin Assignment No.1 No.19 No.2 No.18 Type A pin Signal Name 1 T. M. D. S. Data2+ 2 T. M. D. S. Data2 Shield 3 T. M. +5V Power 19 Hot Plug Detect Wire A B A A B A A B A A B A C C C C D 5V C T. M. D. S. (Transition Minimized Differential Signaling) Type A pin - LG L246WH-BN | Owner's Manual - Page 30
Installing the Wall mount plate This monitor satisfies the specifications of the Wall mount plate or the interchange plate(Separate purchase) This is stand-type or wall mount type and is connectable with Wall mount plate. Please refer to the installation guide for more details, which is provided - LG L246WH-BN | Owner's Manual - Page 31
Digitally yours
-
 1
1 -
 2
2 -
 3
3 -
 4
4 -
 5
5 -
 6
6 -
 7
7 -
8
-
9
-
10
-
11
-
12
-
13
-
14
-
15
-
16
-
17
-
18
-
19
-
20
-
21
-
22
-
23
-
24
-
25
-
26
-
27
-
28
-
29
-
30
-
31
 |
 |

M
ake sure to read the
Important Precautions
before using the product.
Keep the User's Guide(CD) in an accessible place for furture reference.
S
ee the label attached on the product and give the information to your
dealer when you ask for service.
L246WH
User’s Guide