LG LMHM2017ST Installation Instructions
LG LMHM2017ST Manual
 |
View all LG LMHM2017ST manuals
Add to My Manuals
Save this manual to your list of manuals |
LG LMHM2017ST manual content summary:
- LG LMHM2017ST | Installation Instructions - Page 1
http://us.lgservice.com ! EE INSTALLATION INSTRUCTIONS PLEASE READ AND SAVETHESE INSTALLATIONINSTRUCTIONS. P/NO.: M FL06208704 - LG LMHM2017ST | Installation Instructions - Page 2
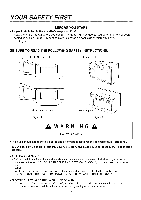
side of microwave oven. See Figure 2. BE SURE TO READ THE FOLLOWING SAFETY iNSTRUCTiONS: Model Number Plate Mounting Plate Model Number Plate Figure 1 Mounting Plate Figure 2 AWARNINGA For Your Safety • This oven should not be installed or located by anyone except properly qualified service - LG LMHM2017ST | Installation Instructions - Page 3
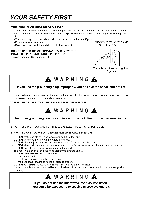
or glass is broken. - DO NOT ATTEMPT TO ADJUST OR REPAIR THE OVEN YOURSELF! It should be adjusted and repaired by a qualified technician who can check for microwave leakage after repairing the oven. AWARNINGA If you do not use the microwave oven as instructed, you could be exposed to excessive - LG LMHM2017ST | Installation Instructions - Page 4
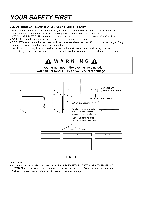
(inside upper cabinet) 1 Power Suf 3lyCord Hole 30"rain.cabineotpening width > 30"rain.clearancferombottom ofcabinetto cooking surface or countertop beforeinstallation. (Use templates included with installation instructions) Figure 4 CAUTION • Before you begin installing the oven, PLACE A PIECE OF - LG LMHM2017ST | Installation Instructions - Page 5
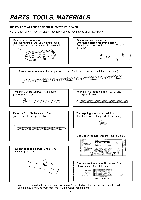
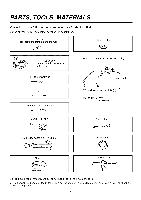
, MATERIALS THE FOLLOWING PARTS ARE SUPPLIED WITH THE OVEN: NOTE: Depending on your ventilation requirements, you may not use all of these parts. Damper/duct connector (for roof venting or wall venting installation) Not Actual Size (2 pieces must be assembled as shown) One power cord clamp and - LG LMHM2017ST | Installation Instructions - Page 6
for the installation: Carton or other heaw material for covering the counter top. Clear Tape (for taping the templates to the wall) Stud Finder Saber Saw (for cutting vent holes for roof or wall venting) Phillips Screwdriver I Pencil I Flat Blade Screwdriver Keyhole Saw (for the power cord - LG LMHM2017ST | Installation Instructions - Page 7
should be on a circuit dedicated to the microwave oven (120V, 60 Hz., AC only) with a 15 or 20A fused electrical supply. IMPORTANT: If you do not have the proper wall outlet, you MUST have one installed by a qualified electrician. 2. You will cut the power-supply-cord hole (shown in Figure 5) later - LG LMHM2017ST | Installation Instructions - Page 8
within the wall for the exhaust duct. cabinet Wall Venting _. Wail venting /, 3 1/4"x10" duct through-the-wall Figure 6 Roof Venting 3 1/4"x10" duct roof cap _._ oven Roof _, venting through-the-roof Figure 7 REMEMBER AS YOU INSTALL THE VENTING: • Keep the length of the ductwork and the - LG LMHM2017ST | Installation Instructions - Page 9
wall or roof caps must not exceed the equivalent of 140 feet. For best performance, do not use more than three 90 degree elbows, and keep = 25ft. 1-Wall Cap 8 feet straight duct TOTAL LENGTH = 40 ft. = 8 ft. = 73 ft. transi_ _/ 1-transition 2-90 ° elbows 1-Wall Cap 8 feet straight TOTAL LENGTH - LG LMHM2017ST | Installation Instructions - Page 10
exhaust adapter, the grease filters and the power supply cord. Room-Vented (recirculating)Installation: This oven is shipped assembled for room-vented. Wall-Vented Installation: 1. Remove one blower unit mounting screw and one or two blower plate screw(s). Remove the blower plate from cabinet. See - LG LMHM2017ST | Installation Instructions - Page 11
plate )late 7. Reattach blower plate to microwave oven. Attach with the one blower unit mounting screw and then the one or two blower plate mounting screw(s). See Figure 22. 8. Attach the exhaust adapter to the blower plate by sliding it into the Guide. See Figure 23. parts "B" Figure 19 blower - LG LMHM2017ST | Installation Instructions - Page 12
, do not attempt to install this microwave oven if you cannot find a wall stud. Measure And Track/Tape Up The Templates 1. Using a plumb line mounting plate is located a minimum of 30 inches above the cooking surface. See Figure 25. NOTE: If the cabinets are not plumb, adjust the mounting plate to - LG LMHM2017ST | Installation Instructions - Page 13
with the holes previously drilled for holes A and B in the plate. Cut out the shaded area marked F on the REAR WALL TEMPLATE. , Room-Vented: go to STEP 5, INSTALL THE MOUNTING PLATE, located on page 14. 5. Complete whichever venting system you have chosen. Use caulking compound to seat the exterior - LG LMHM2017ST | Installation Instructions - Page 14
STEP 5: INSTALL THE MOUNTING PLATE The Oven Must Be Connected To At Least One Wall Stud. 1. Draw a vertical line on the wall at the center of the 30 wide space. Use the mounting plate as the template for the rear wall. Place the mounting plate on the wall, making sure that the tabs are against the - LG LMHM2017ST | Installation Instructions - Page 15
the box cutout for the rear wall duct. (Figure 30) - 3 pieces mounting plate: Use the wall template to determine the location and size of the box cutout for the rear wall duct. • Attach the exhaust adapter to the rear mounting plate (back plate) wall side. Push in securely until it is past the top - LG LMHM2017ST | Installation Instructions - Page 16
property damage, use will need two people to install this microwave oven. 1. Carefully lift microwave oven and hang it on support tabs (See Figure 28) at the bottom of the mounting plate.Reaching through upper cabinet, thread power supply cord through the power supply cord hole in the bottom of the - LG LMHM2017ST | Installation Instructions - Page 17
creeins secureilnypositionR.epeafot rothefrilterscreenS.ee Figur3e6. 8.Pluginthepowesrupplcyord. 9.ReadyouOr wner'Ms anuathl,enchectkheoperatioonf yourmicrowaoveven. [ Figure 34 duct i __,I\_) / I /j __\-I Jlcl_ ,_f_ II \power supply l_J) I cord clamp Figure 35 Figure 36 -17- - LG LMHM2017ST | Installation Instructions - Page 18
MEMO - LG LMHM2017ST | Installation Instructions - Page 19
MEMO - LG LMHM2017ST | Installation Instructions - Page 20
Printed in China
-
 1
1 -
 2
2 -
 3
3 -
 4
4 -
 5
5 -
 6
6 -
 7
7 -
8
-
9
-
10
-
11
-
12
-
13
-
14
-
15
-
16
-
17
-
18
-
19
-
20
 |
 |
!
E
E
INSTALLATION INSTRUCTIONS
PLEASE READ AND SAVETHESE INSTALLATIONINSTRUCTIONS.
P/NO.: M FL06208704