LG LMU240HE Service Manual
LG LMU240HE Manual
 |
View all LG LMU240HE manuals
Add to My Manuals
Save this manual to your list of manuals |
LG LMU240HE manual content summary:
- LG LMU240HE | Service Manual - Page 1
website http://www.lgservice.com LG Multi Type Air Conditioner SERVICE MANUAL MODEL • Indoor Unit: Room Type AMNH093D4A0(LMN090HE) AMNH123DEA0 (LMN120HE) AMNC093D4A0(LMN090CE) AMNC123DEA0 (LMN120CE) Art Cool Type AMNH093APM0(LMAN090HNS) AMNH123APM0(LMAN120HNS) AMNC093APM0(LMAN090CNS) - LG LMU240HE | Service Manual - Page 2
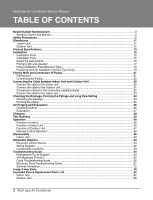
Multi type Air Conditioner Service Manual TABLE OF CONTENTS Model Number Nomenclature ...3 Symbols Used in this Manual ...4 Safety Precautions...5 Dimensions...11 Indoor Unit...11 Outdoor Unit ...12 Product Specifications ...13 Installation ...15 Installation Parts...15 Installation Tools...15 - LG LMU240HE | Service Manual - Page 3
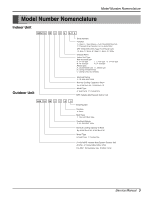
Electrical Ratings 3: 1Ø, 208~230V, 60Hz Nominal Cooling Capacity in Btu/h Ex) 24,000 Btu/h '24', 36,000 Btu/h '36' Model Type H: Heat Pump C: Cooling Only R-410A MPS Variable Multi System Outdoor Unit And No. of Connectable Indoor Units Ex) A2U : Connectable max. 2 Indoor Units Service Manual 3 - LG LMU240HE | Service Manual - Page 4
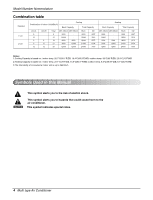
43°F)WB 3.The total ability of connected a indoor unit is up to 24k Btu/h Symbols Used in this Manual This symbol alerts you to the risk of electric shock. NOTICE This symbol alerts you to hazards that could cause harm to the air conditioner. This symbol indicates special notes. 4 Multi type - LG LMU240HE | Service Manual - Page 5
Always install a dedicated cir- Use the correctly rated break- of control box securely. cuit and breaker. er or fuse. • There is risk of fire or electric shock. • Improper wiring or installation may • There is risk of fire or electric cause fire or electric shock shock. Service Manual 5 - LG LMU240HE | Service Manual - Page 6
shock, explosion, or injury. Do not install the product on a Be sure the installation area defective installation stand. does not deteriorate with age. • It may cause injury, accident, or damage to the product. • If the base collapses, the air conditioner could fall with it, causing property - LG LMU240HE | Service Manual - Page 7
the power supply cable. Stop operation and close the window in storm or hurricane. If possible, remove the product from the window before the hurricane arrives. • There is risk of electric shock or fire. • There is risk of property damage, failure of product, or electric shock. Service Manual 7 - LG LMU240HE | Service Manual - Page 8
step on connect the power supply plug or turn off the breaker. or fall onto the outdoor unit. • There is risk of product damage or failure, or unintend- • This could result in personal injury and product dam- ed operation. age. CAUTION I Installation Always check for gas (refrigerant) leak - LG LMU240HE | Service Manual - Page 9
the product where the noise or hot air from the outdoor unit could damage the neighborhoods. • It may cause a problem for your neighbors. Use two or more people to lift and transport the product. Do not install the product where it will be exposed to sea wind (salt spray) directly. • Avoid - LG LMU240HE | Service Manual - Page 10
operated. • There is risk of personal injury and failure of product. • A dirty filter reduces the efficiency of the air conditioner and could cause product malfunction or damage. • There are sharp and moving parts . Replace the all batteries in the remote control with new ones of the same type - LG LMU240HE | Service Manual - Page 11
Type Indoor H D W Dimensions 2. Art Cool Type Indoor Unit W D H Pipe Hole Hanger Hole Installation plate Fix Hole Dimension W H D Model mm mm mm Split Type S4 SE 9 kBtu/h 12 kBtu/h 840 895 270 282 153 165 ARTCOOL Type SP3 9 kBtu/h 12 kBtu/h 570 568 129 Service Manual 11 - LG LMU240HE | Service Manual - Page 12
Dimensions Outdoor Unit W L1 D L2 L3 H L4 L6 L5 DIM W H D L1 L2 L3 L4 L5 L6 L7 MODEL mm mm mm mm mm mm mm mm mm mm L7 UE1 24kBtu/h 870 800 320 370 25 775 25 546 160 160 12 Multi type Air Conditioner - LG LMU240HE | Service Manual - Page 13
516) 12,000 9.4(332) 16~30 15 DL-88430LGIF DC36 0.15 Cross Flow Fan 1/3.74(95) 36 / 32 / 29 Thermistor 0.197(5.0) 18 2R,15C 1.2 35.2*11.1*6.5(895*282*165) 9.5(20.9) 1/4 (6.35) 3/8 (9.52) 20 38.3*9.1*14.6(973*231*372) 353/719 (792) Indoor Unit Type Nominal Cooling Capacity # Model Nominal Heating - LG LMU240HE | Service Manual - Page 14
Piping Length Total of Each Room m For One Room m Max. Installation Indoor Unit~Outdoor Unit m Height Difference Indoor Unit~Indoor Unit m Packing Dimension W*H*D inch(mm) Testing Combinations Stuffing Quantity 20/40ft A2UC243FA0(LMU240CE) 9,000~24,000 2637~7033 2267~6037 1170 - LG LMU240HE | Service Manual - Page 15
Type "A" screw and plastic anchor Remote Control Holder Installation Tools Figure Name Screw driver Electric Drill Measuring Tape, Knife Hole Core Drill Spanner Torque wrench Figure Name Ohmmeter Hexagonal wrench Ammeter Gas Leak Detector Thermometer, Level Flaring Tool Set Service Manual 15 - LG LMU240HE | Service Manual - Page 16
and vibration are minimum. 5. Select a place so that the warm air and sound from the air conditioner do not disturb neighbors. Rooftop Installations: If the outdoor unit is installed on a roof structure, be sure to level the unit. Ensure the roof structure and anchoring method are adequate for the - LG LMU240HE | Service Manual - Page 17
pipe (A/B) indoor unit and out- door unit (h1) Max elevation between indoor units (h2) 24k 30m(100ft) 15m(50ft) 3m(10ft) 7.5m(25ft) 7.5m(25ft) Indoor Capacity (Btu/h) Gas 9K is on the basis of reliability. Oil trap should be installed every 5~7 meters (16.4~23.0ft). Service Manual 17 - LG LMU240HE | Service Manual - Page 18
Mount the installation plate on the wall with type "A" screws. If mounting the unit on a concrete wall, use anchor bolts. • Mount the installation plate 105 59 105 SE 65 110 85 110 D Installation plate B C Ø70mm Left rear piping A Ø70mm Right rear piping 18 Multi type Air Conditioner - LG LMU240HE | Service Manual - Page 19
work for Installation (Artcool Type Only) Open panel front 1. First, push the front panel backward and lift it up to remove the two screws. 2. The moment of lifting the both lower parts of Pipe hole Adhesive Only one desiring direction Connecting part Drain hose rubber cap Service Manual 19 - LG LMU240HE | Service Manual - Page 20
the installation guide map and fixing Indoor unit 1. Put an Installation Guide Map on the desired surface. INSTALLATION GUIDE MAP 7. Drill the piercing part for by adhesive tape. Horizontality INSTALLATION GUIDE MAP Indoor WALL Outdoor 5-7mm (0.2~0.3") 20 Multi type Air Conditioner - LG LMU240HE | Service Manual - Page 21
into the tubing. Pipe Reamer Putting nut on • Remove flare nuts attached to indoor and outdoor unit, then put them on pipe/tube having completed burr removal. (not possible to put them on Copper tube Handle "A" Bar Bar Yoke Cone Copper pipe Clamp handle Red arrow mark Service Manual 21 - LG LMU240HE | Service Manual - Page 22
inside the unit. If the drain hose is routed inside the room, insulate the hose with an insulation material* so that dripping from "sweating"(condensation) will not damage furniture or floors. *Foamed polyethylene or equivalent is recommended. 22 Multi type Air Conditioner Drain hose Drain - LG LMU240HE | Service Manual - Page 23
the indoor unit, install the unit drain hose Adhesive Vinyl tape(narrow) Plastic bands Insulation material Connection pipe Indoor unit pipe Vinyl tape (wide) Wrap with vinyl tape Connecting cable Pipe Vinyl tape(narrow) Pipe Wrap with vinyl tape Drain hose Vinyl tape(wide) Service Manual - LG LMU240HE | Service Manual - Page 24
Torque kg.m 1.8 4.2 3. When extending the drain hose at the indoor unit, install the drain pipe. 24 Multi type Air Conditioner Indoor unit Installation plate 8cm Spacer Indoor unit tubing Flare nut Pipes Wrench Indoor unit tubing Open-end wrench (fixed) Flare nut Connection pipe Drain hose - LG LMU240HE | Service Manual - Page 25
properly seated on the installation plate by moving it left and right. 3. Press the lower left and right sides of the unit against the installation plate until the hooks engage into their slots(clicking sound). Piping for passage through piping hole Connecting cable Drain hose Service Manual 25 - LG LMU240HE | Service Manual - Page 26
the side cover assembly exactly, Fix power cord in the bottom groove of cover side left. 2. Assemble connecting lead wire with controller and first fix the upper part of panel front, then match the lower part of panel front Panel Front Connector 3. Drive two screws. 26 Multi type Air Conditioner - LG LMU240HE | Service Manual - Page 27
Flaring Work and Connection of Piping Installation Information. For left piping. Follow the instruction below. Good case • Press on the upper side of clamp and unfold the tubing to downward slowly. Bad case • Following bending type from right to left may cause damage to the tubing. Service Manual 27 - LG LMU240HE | Service Manual - Page 28
MOUNT ONTO A WALL HOW TO INSERT BATTERIES Remove the battery cover from the remote controller. • Slide the cover according to the arrow direction. Insert the two . • Romove the batteries from the remote controller if the air conditioner is not going to be used for some long time. 28 Multi - LG LMU240HE | Service Manual - Page 29
flare nut with torque wrench, ensure the direction for tightening follows the arrow on the wrench. Outside diameter mm inch Ø6.35 1/4 Ø9.52 3/8 Torque kg.m 1.8 4.2 Outdoor unit A-UNIT Gas side piping B-UNIT Liquid side piping Torque wrench Service Manual 29 - LG LMU240HE | Service Manual - Page 30
installing, refer to the electrical diagram behind the front panel of Indoor Unit. The wiring for the outdoor unit can be found on the inside of the Outdoor Unit control between power source and the outdoor unit as shown below. Main power source Air Conditioner Circuit Breaker Use a circuit - LG LMU240HE | Service Manual - Page 31
cable(Low voltage) Cover control Connecting cable Power supply cable 12 34 Terminal BLOCK Indoor A-UNIT L N Power Source 208/230V AC (High voltage) 12 34 Terminal BLOCK Indoor B-UNIT NOTICE : 1. Separately wire the high and low voltage line. 2. Use heat-proof electrical wiring capable - LG LMU240HE | Service Manual - Page 32
block. (5) Fix the connection cable with cord clamp provided on the unit not to have strain at the terminal when the connection cable is pulled When connecting each power wire to the corresponding terminal, follow instructions "How to connect wiring to the terminals" and fasten the Air Conditioner - LG LMU240HE | Service Manual - Page 33
below. Main power source Air Conditioner Circuit Breaker Use a circuit breaker or time delay fuse. Model 24k Power source Fuse or breaker Capacity 1Ø, 230/208V 25A Connect the cable to the indoor unit 1. Connect the wires to the terminals on the control board individually according to the - LG LMU240HE | Service Manual - Page 34
evaporator. 2. Ensure the water flows through the drain hose of the indoor unit without any leakage and goes out the drain exit. Drain piping 1. The Air Water leakage Water leakage Waving Tip of drain hose dipped in water Water leakage Ditch Less than 50mm gap 34 Multi type Air Conditioner - LG LMU240HE | Service Manual - Page 35
water from entering into electrical parts. In cases where the Outdoor unit is installed above the Indoor unit perform the following. 1. Tape room. 3. Fix the piping onto the wall by saddle or equivalent. Seal a small opening around the pipings with gum type sealer. Trap Trap Service Manual - LG LMU240HE | Service Manual - Page 36
in the system rises. 2. Operating current rises. 3. Cooling(or heating) efficiency drops. 4. Moisture in the refrigerant circuit may freeze and block capillary tubing. 5. Water may lead to corrosion of parts in the refrigeration system. Therefore, the indoor/outdoor unit and connecting tube must be - LG LMU240HE | Service Manual - Page 37
gas and liquid side service valves and fasten them tight. This completes air purging with a vacuum pump. The air conditioner is now ready for test running. NOTICE : Repeat evacuation procedure for each indoor unit. Manifold valve Pressure gauge Lo Hi Open Close Vacuum pump Service Manual 37 - LG LMU240HE | Service Manual - Page 38
X 0.22 ounces per foot= add 1.1 ounces of R-410A Important: If you are ever uncertain of the unit charge, reclaim, evacuate and weigh in the correct charge using the unit nameplate charge adjusting for line sets longer or shorter than 7.5m(25ft) for each indoor unit. 38 Multi type Air Conditioner - LG LMU240HE | Service Manual - Page 39
at least 90% of the rated voltage. Otherwise, the air conditioner should not be operated. I For test run, carry out the cooling operation firstly even during heating season. If heating operation is carried out firstly, it leads to the trouble of compressor. Then attention must be paid. I Carry out - LG LMU240HE | Service Manual - Page 40
with the airflow speed set by the remote control. While compressor is off fan operates at low speed regardless of the setting. I Soft Dry Operation Mode • When the dehumidification operation input by the remote control is received, the intake air temperature is detected and the setting temp - LG LMU240HE | Service Manual - Page 41
pipe temp is below 33°C(91.4°F), when above 35°C(95°F) , it operates with the low airflow speed. • While in defrost control, the indoor is outdoor fans are turned off. I Defrost Control(Heating) • Defrost operation is controlled by timer and sensing temperature of outdoor pipe. • The first defrost - LG LMU240HE | Service Manual - Page 42
according to the temperature. I Off-Timer Operation • When the set time is reached after the time is input by the remote control, the appliance stops operating. • The timer LED is on when the off-timer is input. It is off when the time set by the timer is reached. 42 Multi type Air Conditioner - LG LMU240HE | Service Manual - Page 43
that the air outflow could reach further. I Auto Restarting Operation • When the power is restored after a sudden power failure while in appliance operation, the mode before the power failure is kept on the memory and the appliance automatically operates in the mode on the memory. Service Manual 43 - LG LMU240HE | Service Manual - Page 44
➲ Heating Mode Operation, 24°C(75.2°F), High Speed I Buzzer Sounding Operation • When the appliance-operation key is input by the remote control, the short "beep-beep-" sounds. • When the appliance-pause key is input by the remote control, the long "beep-" sounds. 44 Multi type Air Conditioner - LG LMU240HE | Service Manual - Page 45
Mode : Lights up during Defrost Mode or Hot Start operation (Heat pump model only) Outdoor unit : Lights up during outdoor unit operation.(Cooling model only) operation Desire temperature For cooling,dehumidification,heating modes it display Destired temperature indicator • Cooling : 18°C~30 - LG LMU240HE | Service Manual - Page 46
while it is operating with selecting the function. Defrost(Deice) control (Heating) • Both the indoor and outdoor fan stops during defrosting. Hot-start Control (Heating) • The indoor fan stops until the evaporator pipe temperature will be reached at 28°C(82.4°F). 46 Multi type Air Conditioner - LG LMU240HE | Service Manual - Page 47
room temp,outdoor temp, operating room number,Temp gap between room temp and set temp and so on. LEV Control • LEV pulse is modulated to keep constant superheat or subcooling. Out door Fan Control • Outdoor fan operates at High or Off to respond to the load condition. R/Valve Control(Heating Model - LG LMU240HE | Service Manual - Page 48
Auto operation. 11 AIR CIRCULATION BUTTON Used to circulate the room air without cooling or heating. 12 ROOM TEMPERATURE CHECKING BUTTON Used to check the room temperature. 13 PLASMA(OPTIONAL) Used to start or stop the plasma-purification function. 14 RESET BUTTON Initialize remote controller - LG LMU240HE | Service Manual - Page 49
remove the Grille, pull the lower left and right side of the grille toward you (slightly tilted) and lift it straight upward. 1. Before removing the control box, be sure to take out the wire screwed at the other end. Disassembly Earth Conductor Service Manual 49 - LG LMU240HE | Service Manual - Page 50
Box. • Remove securing screws. • Pull the control box out from the chassis carefully. 3. To remove the Discharge Grille. • Unhook the discharge grille and pull the discharge grille in the Eva Holder, at the right 1EA). • When repair, do not damage the Caution label. 50 Multi type Air Conditioner - LG LMU240HE | Service Manual - Page 51
from the cross-flow fan. • Remove the left end of the cross-flow fan from the self-aligning bearing. Motor cover Bearing Cross-flow fan Service Manual 51 - LG LMU240HE | Service Manual - Page 52
disconnect other wires. - Remove securing screws. - Pull the control box out from the chassis carefully. Panel Front Connector Step Motor Connectors Sensor Connector 4Way/Fan Connector Comp Connector Power Connector Power Connector Comp Connector Motor Connector 52 Multi type Air Conditioner - LG LMU240HE | Service Manual - Page 53
Cover Air Guide 5) To remove the Motor. - Remove the securing bolt from the motor shaft. - Pull the fan out from the motor shaft. - Remove 4 screws securing motor mount from the chassis and lift up the motor mount and the bracket. Pipe Cover Turbo Fan Bracket Bolt Motor Mount Service Manual - LG LMU240HE | Service Manual - Page 54
Schematic Diagram Schematic Diagram Electronic Control Device 1. Indoor Unit 1) Split Type 54 Multi type Air Conditioner - LG LMU240HE | Service Manual - Page 55
Service Manual 55 Schematic Diagram STEPPING MOTOR SUB PCB ASM STEPPING MOTOR STEPPING MOTOR LED2 -D2 11 22 33 44 55 66 77 88 99 10 10 CN-D1 10 10 11 11 12 12 13 13 L3 C03L 220 10V C06D 103 DC5V IC02D O I 7805 + C05D 470uF 25V BL MOTOR L / R 2 HVB ASSY ROOM-TH PIPE-TH 2) Art Cool Type - LG LMU240HE | Service Manual - Page 56
Schematic Diagram 2. Outdoor Unit 56 Multi type Air Conditioner - LG LMU240HE | Service Manual - Page 57
Schematic Diagram Service Manual 57 - LG LMU240HE | Service Manual - Page 58
Schematic Diagram Wiring Diagram 1. Room Type Indoor Unit -S4/SE chassis 2. Art Cool Type Indoor Unit 3. Outdoor Unit 1. A2UH243FA0(LMU240HE) 2. A2UC243FA0(LMU240CE) 58 Multi type Air Conditioner - LG LMU240HE | Service Manual - Page 59
Components Locations 1. Indoor Unit MAIN P.C.B ASM 1) Split Type • TOP VIEW Schematic Diagram PCB :6870A90409B ASSY :6871A20771 6871A20782 • BOTTOM VIEW Service Manual 59 - LG LMU240HE | Service Manual - Page 60
Schematic Diagram 2) Art Cool Type • TOP VIEW • BOTTOM VIEW 60 Multi type Air Conditioner - LG LMU240HE | Service Manual - Page 61
2. Display ASSEMBLY 1) Split Type (6871A20680) 2) Art Cool Type (6871A20462) TOP VIEW BOTTOM VIEW Schematic Diagram Service Manual 61 - LG LMU240HE | Service Manual - Page 62
Schematic Diagram 3. Outdoor Unit 1) Component side 62 Multi type Air Conditioner - LG LMU240HE | Service Manual - Page 63
2) Solder side Schematic Diagram Service Manual 63 - LG LMU240HE | Service Manual - Page 64
Troubleshooting Guide Troubleshooting Guide Refrigeration Cycle Diagram 1. A2UH243FA0(LMU240HE) Ø 9.52 strainer R/Valve 5220AR3228E S/W Eva. Sensor Air Sensor A-Room B-Room Eva. Sensor Ø 6.35 Acc. C/V2 C/V1 Th2 Th1 Cons. Comp (GK094K) Cons. Comp (GK141K) LEV-B LEV-A LEV 15RC strainer - LG LMU240HE | Service Manual - Page 65
Troubleshooting Guide Self-diagnosis Function I Error Indicator • The function is to self-diagnoisis airconditioner and express the troubles identifically if there is any trouble. • Error mark is ON/OFF for the operation LED of evaporator body in the same manner as the following table. • If more - LG LMU240HE | Service Manual - Page 66
Troubleshooting Guide Cycle Troubleshooting Guide Trouble analysis 1. Check temperature difference between intake and discharge air, and operating current. Temp. Difference Operating Current Temp. difference Current : approx. 0°C(32°F) : less than 80% of rated current All amount of refrigerant - LG LMU240HE | Service Manual - Page 67
Parts Troubleshooting Guide ❇ Refer to electronic contorol device drawing & schematic diagram. Trouble 1 The Product doesn't operate at all. Troubleshooting Guide Turn off the main power and wait until LED on outdoor PCB is off. Turn IC01D. 4) Replace IC02D. 5) Replace IC01A. Service Manual 67 - LG LMU240HE | Service Manual - Page 68
Troubleshooting Guide Trouble 2 Product doesn't operate with the remote controller. Turn on main power. While the compressor has been stopped, the compressor does not operate owing to the delaying function for 3 minutes after stopped. When the compressor stopped Indoor Fan is driven by a low - LG LMU240HE | Service Manual - Page 69
Troubleshooting Guide Trouble 3 The Compressor/Outdoor Fan are don't operate Turn on the main power. Operate Cooling Mode by setting the disired temperature of the remote controller is less than one of the Indoor temperature by 1°C at least. When in air circulation mode, compressor/outdoor fan is - LG LMU240HE | Service Manual - Page 70
Troubleshooting Guide Trouble 4 When indoor Fan does not operate. When indoor Fan does not operate. Does the voltage of each terminals of CN-MOTOR CONNECTOR in Indoor unit corresponds to values in the Table of page 69 Does the voltage of terminal of CN-DC/DC CONNECTOR in Indoor unit corresponds to - LG LMU240HE | Service Manual - Page 71
- Between 2 , 3 , 4 and 5 of IC01M - Between 12 , 13 , 14 , 15 of IC01M - Between 1 , 2 , 3 , 4 and 5 of CN-UP/DOWN If there are no problems after above checks • Confirm the assembly conditions that are catching and interfering parts in the rotation radial of the Vertical Louver Service Manual 71 - LG LMU240HE | Service Manual - Page 72
Troubleshooting Guide Error Code I Trouble Shooting Error code Title 01 Indoor air sensor 02 Indoor inlet pipe sensor 06 Indoor outlet pipe sensor Cause of error • Open / Short • Soldered poorly • Internal circuit error • Open / Short • Soldered poorly • - LG LMU240HE | Service Manual - Page 73
Indoor ➔ Outdoor) Troubleshooting Guide Cause of error Check point & Normal condition • Power input AC 230V.(Outdoor, unit is operated normally, outdoor PCB is no problem. ➔ Check the another indoor unit. * CH05 is displayed at indoor unit, CH53 is displayed at outdoor unit. Service Manual - LG LMU240HE | Service Manual - Page 74
condition • Over Capacitor com- • Check the indoor unit capacity. bination • Check the combination table ❑ Check Point 1. Check the indoor unit capacity. 2. Check the combination table. # In the tropical model case ➔ single cycle has no error for over capacity. 74 Multi type Air Conditioner - LG LMU240HE | Service Manual - Page 75
Error code Title 44 Outdoor air sensor 45 Condensor pipe sensor 47 D-Pipe sensor Troubleshooting Guide Cause of error • Open / Short • Soldered poorly • Internal circuit error • Open / Short • Soldered Plugged) 3. If the resistance is 0V or 5Vdc, then sensor is abnormal Service Manual 75 - LG LMU240HE | Service Manual - Page 76
To piping connection Service Service port cap port To outdoor unit Works Shipping Air purging 1. (Installation) Operation Pumping down 2. (Transfering) Evacuation 3. (Servicing) Gas charging 4. (Servicing) Pressure check 5. (Servicing) Gas releasing 6. (Servicing) Shaft position Closed - LG LMU240HE | Service Manual - Page 77
stems. 6. Operate the air conditioner at the cooling cycle and stop it when the gauge indicates 1kg/cm2g. 7. Immediately set the gas side valve to the closed position. - Do this quickly so that the gauge ends up indicating 1kg/ g. 2. Operate the unit for 10 to 15 minutes. 3. Stop operation and - LG LMU240HE | Service Manual - Page 78
does not move(approximately 5 minutes after turning off the vacuum pump). 6. Disconnect the charge hose from the vacuum pump. - Vacuum pump oil. If the vacuum pump oil becomes dirty or depleted,replenish as needed. 7. Mount the valve caps and the service port caps. 78 Multi type Air Conditioner - LG LMU240HE | Service Manual - Page 79
unit pump operating the air conditioner turn off the air conditioner before disconnecting the hose. 5. Mount the valve stem nuts and the service port nut. - Use torque wrench to tighten the service port nut to a torque of 1.8 kg.m.(4.2kg.m/5.5kg.m.) - Be sure to check for gas leakage. Service Manual - LG LMU240HE | Service Manual - Page 80
View & Replacement Parts List Exploded View & Replacement Parts List Indoor Unit S4, SE chassis 135311 152302-1 152302-2 135301 135312 354210 152313 342800 131410 359011 733010 159901 268712 147582 35211B 352150 135500 346810 135516 267110 80 Multi type Air Conditioner 146811 249951 - LG LMU240HE | Service Manual - Page 81
REMOTE CONTROLLER INSTALLATION 3301A20020C 3301A20020C 3301A20020A 3301A20020A R 135500 COVER 3550A30262A 3550A30262A 3550A30315A 3550A30315A R NOTE) *Please ensure GCSC since these parts may be changed depending upon the buyer's request. (GCSC WEBSITE http://biz.LGservice.com) Service Manual - LG LMU240HE | Service Manual - Page 82
Exploded View & Replacement Parts List SP3 Chassis Art Cool Type 82 Multi type Air Conditioner 267110 135312 135314 249951 354210 135515 268717-1 268717-2 146811 268714 330870 135500-3 146811 147581 35211B 352150 263230-2 263230-1 131410 159830 268712 352380 135500-2 359012 349600 - LG LMU240HE | Service Manual - Page 83
AIR ROOM+IN PIPE) 6323A20004N 6323A20004N 6323A20004N 6323A20004N R 263230-1 THERMISTOR,NTC(OUT PIPE) 6323AQ3226T 6323AQ3226T 6323AQ3226T 6323AQ3226T R 267110 REMOTE CONTROLLER parts may be changed depending upon the buyer's request. (GCSC WEBSITE http://biz.LGservice.com) Service Manual - LG LMU240HE | Service Manual - Page 84
Exploded View & Replacement Parts List Outdoor Unit A2UH243FA0(LMU240HE), A2UC243FA0 (LMU240CE) 84 Multi type Air Conditioner 435512 435301 554031 137213-1 435300 137213-2 559010 437210 546810 447910 W0CCZ-1 W0CCZ-2 566000 668711 554160-1 552202 548490 552204-1 552204-2 554160-2 552201 - LG LMU240HE | Service Manual - Page 85
,MAIN 6871A20500B 6871A20500B R 435511 COVER ASSEMBLY,CONTROL(OUTDOOR) 3551A10044E 3551A10044F R WOCZZ-1 CAPACITOR, parts may be changed depending upon the buyer's request. (GCSC WEBSITE http://biz.LGservice.com) Solenoid(Coil Assempy, Reverse) is only for heat pump model. Service Manual - LG LMU240HE | Service Manual - Page 86
P/No.: 3828A20462Z April, 2006 Printed in Korea
-
 1
1 -
 2
2 -
 3
3 -
 4
4 -
 5
5 -
 6
6 -
 7
7 -
8
-
9
-
10
-
11
-
12
-
13
-
14
-
15
-
16
-
17
-
18
-
19
-
20
-
21
-
22
-
23
-
24
-
25
-
26
-
27
-
28
-
29
-
30
-
31
-
32
-
33
-
34
-
35
-
36
-
37
-
38
-
39
-
40
-
41
-
42
-
43
-
44
-
45
-
46
-
47
-
48
-
49
-
50
-
51
-
52
-
53
-
54
-
55
-
56
-
57
-
58
-
59
-
60
-
61
-
62
-
63
-
64
-
65
-
66
-
67
-
68
-
69
-
70
-
71
-
72
-
73
-
74
-
75
-
76
-
77
-
78
-
79
-
80
-
81
-
82
-
83
-
84
-
85
-
86
 |
 |
LG
Multi Type Air Conditioner
SERVICE MANUAL
LG
CAUTION
website http://www.lgservice.com
• BEFORE SERVICING THE UNIT, READ THE SAFETY
PRECAUTIONS IN THIS MANUAL.
• ONLY FOR AUTHORIZED SERVICE PERSONNEL.
MODEL
• Indoor Unit:
• Outdoor Unit:
A2UH243FA0(LMU240HE)
A2UC243FA0 (LMU240CE)
Room Type
AMNH093D4A0(LMN090HE)
AMNH123DEA0 (LMN120HE)
AMNC093D4A0(LMN090CE)
AMNC123DEA0 (LMN120CE)
AMNH093APM0(LMAN090HNS)
AMNH123APM0(LMAN120HNS)
AMNC093APM0(LMAN090CNS)
AMNC123APM0(LMAN120CNS)
Art Cool Type