LG LRFC25750TT User Guide
LG LRFC25750TT Manual
 |
View all LG LRFC25750TT manuals
Add to My Manuals
Save this manual to your list of manuals |
LG LRFC25750TT manual content summary:
- LG LRFC25750TT | User Guide - Page 1
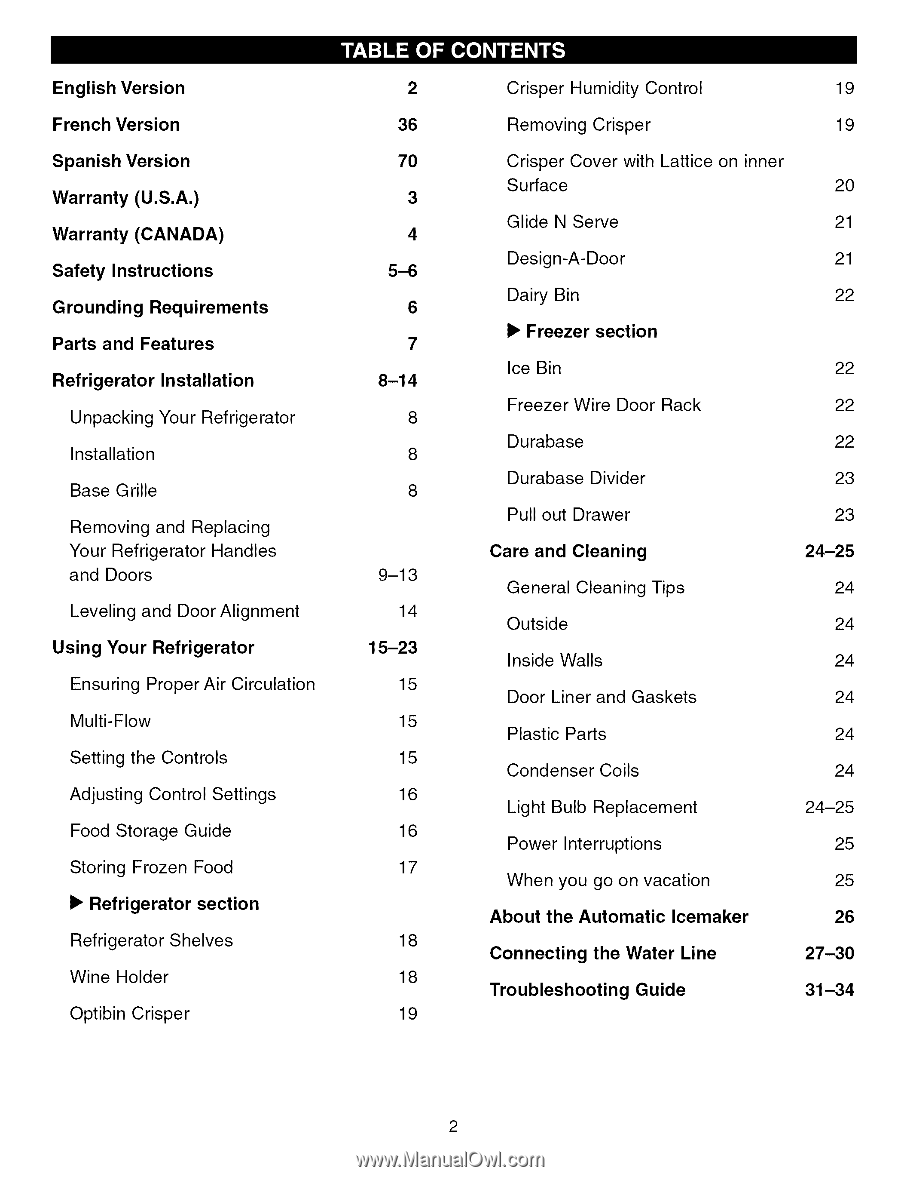
General Cleaning Tips Outside Inside Walls Door Liner and Gaskets Plastic Parts Condenser Coils 24-25 24 24 24 24 24 24 Light Bulb Replacement Power Interruptions When you go on vacation About the Automatic Icemaker 24-25 25 25 26 Connecting the Water Line Troubleshooting Guide 27-30 31-34 - LG LRFC25750TT | User Guide - Page 2
PERIOD: REFRIGERATOR/FREEZER LABOR: One Year from the Date of Purchase. PARTS: One Year from the Date of Purchase. SEALED SYSTEM (Compressor, Condenser, and Evaporator) LABOR: One Year from the Date of Purchase. PARTS: Seven years from the Date of Purchase. Replacement Units and Repair Parts are - LG LRFC25750TT | User Guide - Page 3
LIMITED WARRANTY (CANADA) LG REFRIGERATOR LG Electronics wilt repair or at its option replace, without chaige, your product which proves to be detective in material or workananship under normal use, during the warranty period listed below from the date of original purchase. This warran D"is good - LG LRFC25750TT | User Guide - Page 4
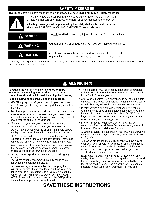
the front of the refrigerator. Read all instructions before using this appliance. • NEVER unplug your refrigerator by pulling on the power cord. Always grip the plug firmly and pull it straight out from the outlet. • Repair or replace immediately all electric service cords that have become frayed - LG LRFC25750TT | User Guide - Page 5
of your old refrigerator, please follow the instructions at right to help prevent accidents. BEFORE YOU THROW AWAY YOUR OLD REFRIGERATOR OR FREEZER • Take off the doors. • Leave the shelves in place so that children may not easily climb inside. Your old refrigerator may have a cooling system that - LG LRFC25750TT | User Guide - Page 6
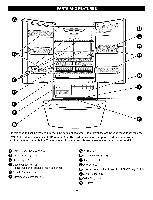
Use this page to become more familiar with the parts and features. Page references are included for your convenience. NOTE: This guide covers several different models. The refrigerator you have purchased may have some or all of the items listed below. The locations of the features shown below may - LG LRFC25750TT | User Guide - Page 7
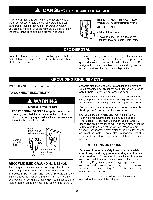
for at least 2 or 3 hours before putting food in it. Check the flow of cold air in the freezer compartment to ensure proper cooling. Your refrigerator is now ready for use. CAUTION • Be careful when you work with hinge, base grille, stopper etc. You may be injured. • Do not put hands or metal sticks - LG LRFC25750TT | User Guide - Page 8
HOW TO REMOVE DOOR/DRAWER HANDLES 1. Removing Refrigerator Handle NOTE: Handle appearance may vary. • Grasp moment force. Screws _ mounted C3_ on door Keyhole slots on back of handle 2. Removing Freezer Drawer Handle NOTE: Handle appearance may vary. • Grasp the handle tightly with both hands - LG LRFC25750TT | User Guide - Page 9
HOW TO REPLACE DOOR/DRAWER HANDLES 1. Replacing Refrigerator Door Handle NOTE: Handle appearance may vary firmly against the front of the door and slide the handle down (3). mounted on door 2. Replacing Freezer Drawer Handle NOTE: Handle appearance may vary. • Align keyhole slots (4) on the right - LG LRFC25750TT | User Guide - Page 10
wire harness (4). • Remove the earth screw (5). • Rotate the lever hinge (6) to counter clockwise and lift off the top hinge (7). • Slightly lift up the refrigerator door and remove it. • Place the door on a non-scratching surface with the inside up. • Right Door • Remove the right door followed by - LG LRFC25750TT | User Guide - Page 11
pin(8) Make sure the door is aligned with the cabinet • Replace the top hinge(7) by rotating the lever hinge (6) to counter clockwise to tighten it Make sure the gasket on the door is flush against the cabinet and is not folded Support the door on the handle side while tightening And make sure - LG LRFC25750TT | User Guide - Page 12
damage, you will need two people to perform the following instructions. 2. Installing Pullout Drawer • Pull both rails (1) out to lifting basket from rail system. • Lift the top of door to unhook door supports from rail system Lift door up to remove • With the drawer pulled out Freezer Door. 13 - LG LRFC25750TT | User Guide - Page 13
refrigerator takes some weight off the leveling screws. This makes it easier to adjust the screws. Door Alignment If the space between your doors is uneven, follow the instructions Owner's manual). 3. Open both doors again and check to make sure that they close easily. If not, tilt the refrigerator - LG LRFC25750TT | User Guide - Page 14
to freezer. MULTI-FLOW • Multi-Flow means powerful and effective cooling operation. This is especially noticeable when new food is placed in the refrigerator compartment. • If water or foreign substances enter the cool air vent while cleaning, efficiency will be lowered. In addition, if gasket is - LG LRFC25750TT | User Guide - Page 15
set correctly when milk or juice is as cold as you like and when ice cream is firm. The refrigerator control functions as the thermostat for the entire appliance (refrigerator and freezer sections). The higher the number setting, the longer the compressor will run to keep the temperature colder. The - LG LRFC25750TT | User Guide - Page 16
storage times, check a freezer guide or a reliable cookbook. Packaging Successful freezing depends on correct packaging. When you close and seal the package, it must not allow air or moisture in or out. If it does, you could have food odor and taste transfer throughout the refrigerator and also dry - LG LRFC25750TT | User Guide - Page 17
model may have glass or wire shelves. Storing similar food items together in your refrigerator the refrigerator door is open, saving energy. IMPORTANT: Do not clean glass shelves with warm water when shelf. I, • To replace a shelf--Tilt the front of the shelf up and guide the shelf hooks into the - LG LRFC25750TT | User Guide - Page 18
moist air out of the crisper for best storage of fruits. • ,_:: keeps moist air in the crisper for best storage of fresh, leafy vegetables. J To replace crisper: 1. Push rails to the back of the compartment. 2. Insert the back corner of the basket into frame. _, CAUTION: The glass shelf over the - LG LRFC25750TT | User Guide - Page 19
it will open. 2. Press the plastic hinge toward the center of the door flap with your finger. 3. Lift the door out of its place. 4. To replace, reverse above procedure. CRISPER COVER WITH LATTICE ON INNER SURFACE To remove the lattice on inner surface: To remove the glass: 1. Lift up the glass - LG LRFC25750TT | User Guide - Page 20
bin, simply lift the bin up and pull straight out. 2. To replace the bin, slide it in above the desired support button and push down until it stops. To replace Glide N Serve: 1. Push metal rails to the back of the refrigerator. 2. Place drawer onto rails and slide drawer back until it falls into - LG LRFC25750TT | User Guide - Page 21
, simply lift it and pull straight out. 2. To replace the dairy bin, slide it in above the desired location and push down until it stops. FREEZER SECTION ICE BIN 1. To remove ice bin, pull it out as far it comes. Tilt up the front of the ice bin and pull straight out. 2. To Install, insert - LG LRFC25750TT | User Guide - Page 22
durabase. PULL OUT DRAWER 1. To remove, lift basket up and pull straight out. 2. To Install, pull both rails out to full extension. Hook the basket supports into the rail tabs and push to the back of compartment. 23 - LG LRFC25750TT | User Guide - Page 23
LIGHT BULB REPLACEMENT GENERAL CLEANING TIPS • Unplug refrigerator or disconnect power. • Remove all removable parts, such as shelves, crispers, etc. Refer to sections in Using Your Refrigerator for removal instructions. • Use a clean sponge or soft cloth and a mild detergent in warm water. Do not - LG LRFC25750TT | User Guide - Page 24
, wipe and dry thoroughly. 5. Take out all removable parts, wrap them well and tape them together so they don't shift and rattle during the move. Refer to sections in Using your Refrigerator for removable instructions. 6. Depending on the model, raise the front of the refrigerator so it rolls more - LG LRFC25750TT | User Guide - Page 25
take 12 to 24 hours to begin making ice cubes. Throw away the first few batches of ice to allow the water line to clear. Set the icemaker power switch to O (off) and shut off the water supply to the refrigerator. If the ambient temperature will drop below freezing, have a qualified servicer drain - LG LRFC25750TT | User Guide - Page 26
is not warranted by the refrigerator or icemaker manufacturer. Follow these instructions carefully to minimize the risk of expensive water damage. Water hammer (water banging in the pipes) in house plumbing can cause damage to refrigerator parts and lead to water leakage or flooding. Call - LG LRFC25750TT | User Guide - Page 27
INSTRUCTIONS (CONTINUED) 4. FASTEN THE SHUTOFF VALVE Fasten the shutoff valve to the cold water pipe with the pipe clamp. Pipe Clamp Saddle-Type J Shutoff Valve Vertical Cold Water water line and the refrigerator. Route the tubing through a hole drilled in the wall or floor (behind the refrigerator - LG LRFC25750TT | User Guide - Page 28
, CONNECT THE PIPE TO THE REFRIGERATOR Removing and Replacing a Cover Valve NOTE: • Before making the connection to the refrigerator, be sure the refrigerator power cord is not plugged into the wall outlet. • If your refrigerator does not have a water filter, we recommend installing one. If your - LG LRFC25750TT | User Guide - Page 29
10.TURN THE WATER ON AT THE SHUTOFF VALVE Tighten any connections that leak. Reattach the compressor compartment access cover. 11. PLUG IN THE REFRIGERATOR Arrange the coil of tubing so that it does not vibrate against the back of the refrigerator or against the wall. Push the refrigerator back to - LG LRFC25750TT | User Guide - Page 30
a sizzling sound. You may hear air being forced over the condenser by the condenser fan. You may hear water running into the drain pan during the defrost cycle. Then... REFRIGERATOR DOES NOT OPERATE The power supply cord is unplugged. A household fuse has blown or circuit breaker tripped. The - LG LRFC25750TT | User Guide - Page 31
are blocking the door open. The ice bin, crisper cover, pans, shelves, door bins or baskets are out of position. The gaskets are sticking. The refrigerator wobbles or seems unstable. The doors were removed during product installation and not properly replaced. • See Leveling and Door Alignment on - LG LRFC25750TT | User Guide - Page 32
to the ice if food is not wrapped properly. • A filter may need to be installed (or replaced) to eliminate taste and odor problems. • See Care and Cleaning section on pages 24-25. • Empty and wash bin. Discard old cubes. THERE IS WATER IN THE DEFROST DRAIN PAN The refrigerator is defrosting - LG LRFC25750TT | User Guide - Page 33
has just been added to the refrigerator or freezer. The food is not packaged refrigerator must cool. In order to keep the refrigerator cool, try to get everything you need out of the refrigerator number at a time. • Adding food warms the refrigerator. It can take a few hours for the refrigerator - LG LRFC25750TT | User Guide - Page 34
35
-
 1
1 -
 2
2 -
 3
3 -
 4
4 -
 5
5 -
 6
6 -
 7
7 -
8
-
9
-
10
-
11
-
12
-
13
-
14
-
15
-
16
-
17
-
18
-
19
-
20
-
21
-
22
-
23
-
24
-
25
-
26
-
27
-
28
-
29
-
30
-
31
-
32
-
33
-
34
 |
 |
English
Version
French
Version
Spanish
Version
Warranty
(U.S.A.)
Warranty
(CANADA)
Safety
Instructions
Grounding
Requirements
Parts
and
Features
Refrigerator
Installation
Unpacking
Your
Refrigerator
Installation
Base
Grille
Removing
and
Replacing
Your
Refrigerator
Handles
and
Doors
Leveling
and
Door Alignment
Using
Your
Refrigerator
Ensuring
Proper
Air Circulation
Multi-Flow
Setting
the Controls
Adjusting
Control
Settings
Food
Storage
Guide
Storing
Frozen
Food
I_ Refrigerator
section
Refrigerator
Shelves
Wine
Holder
Optibin
Crisper
2
36
70
3
4
5-6
6
7
8-14
8
8
8
9-13
14
15-23
15
15
15
16
16
17
18
18
19
Crisper
Humidity
Control
19
Removing
Crisper
19
Crisper
Cover
with
Lattice
on inner
Surface
20
Glide
N Serve
21
Design-A-Door
21
Dairy
Bin
22
Freezer
section
Ice Bin
22
Freezer
Wire
Door
Rack
22
Durabase
22
Durabase
Divider
23
Pull out Drawer
23
Care
and
Cleaning
24-25
General
Cleaning
Tips
24
Outside
24
Inside
Walls
24
Door
Liner and
Gaskets
24
Plastic
Parts
24
Condenser
Coils
24
Light
Bulb
Replacement
24-25
Power
Interruptions
25
When
you
go on vacation
25
About
the Automatic
Icemaker
26
Connecting
the
Water
Line
27-30
Troubleshooting
Guide
31-34