LG LWHD8000R User Manual
LG LWHD8000R Manual
 |
View all LG LWHD8000R manuals
Add to My Manuals
Save this manual to your list of manuals |
LG LWHD8000R manual content summary:
- LG LWHD8000R | User Manual - Page 1
- LG LWHD8000R | User Manual - Page 2
Vent Control 19 Drain Pipe 20 Removal from Window 20 Maintenance and Service 21 Air Filter 21 Cleaning the Air Conditioner .....21 How to Remove the Front Grille 22 Common Problems and Solutions 23 Troubleshooting 24 FOR YOUR RECORDS Write the model and serial numbers here: Model # Serial - LG LWHD8000R | User Manual - Page 3
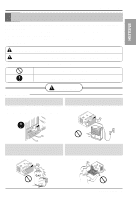
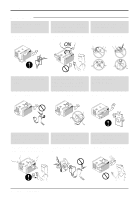
user or other people and property damage, the following instructions must be followed. s Incorrect operation due to ignoring instructions symbols used in this manual are as shown below. Be sure not to do. Be sure to follow the instruction. WARNING s Installation Always . Gasolin Owner's Manual 3 - LG LWHD8000R | User Manual - Page 4
cord. • It will cause electric shock or fire. ON Do not modify power cord length. • It will cause electric shock or fire. Use the air conditioner on a single outlet circuit. (See page 7.) Do not share the outlet with other appliances. Always plug into a grounded outlet. • It will cause electric - LG LWHD8000R | User Manual - Page 5
performance deteriorate. Ensure that the outer case is not damaged by age or wear. • If the outer case is damaged, it must be repaired or replaced immediately. Leaving it damaged could result in the air conditioner falling out of the window, creating a safety hazard. Owner's Manual 5 - LG LWHD8000R | User Manual - Page 6
a precision refrigeration system. Always insert the filter securely. Clean it every two weeks. • Operation without filters will cause failure. Use a soft cloth to clean. Do not use wax, thinner, or a strong detergent. Do not drink water drained from air conditioner. Do not direct airflow at room - LG LWHD8000R | User Manual - Page 7
on while cleaning inner parts of the unit. Service For repair and maintenance, contact an Authorized Service Center. See the warranty page for details or call (800) 243-0000. Have your model number and serial number available. They should be written on page 2 of this manual. Owner's Manual 7 - LG LWHD8000R | User Manual - Page 8
with the National Electric Code. Upper Guide Cabinet Front Grille Air Filter Evaporator Control Board Remote Controller 8 Room Air Conditioner Horizontal Air Deflector (Horizontal Louver) Vertical Air Deflector (Vertical Louver) Air Discharge Air Intake (Inlet Grille) Brace Compressor Condenser - LG LWHD8000R | User Manual - Page 9
button will not stay engaged, discontinue use of the air conditioner and contact a qualified service technician. Use Wall Receptacle Standard 125V, 3-wire may pose special problems. Consult a qualified electrician. ELECTRICAL SAFETY IMPORTANT GROUNDING INSTRUCTIONS Air conditioner has a three - LG LWHD8000R | User Manual - Page 10
-slot grounding wall power outlet. If the power outlet does not include a grounding slot, have a qualified electrician replace the outlet before you use the room air conditioner. WARNING: Changing the outlet without making the appropriate wiring changes will create an unsafe condition that could - LG LWHD8000R | User Manual - Page 11
an extension cord due to potential safety hazards. For temporary situations, use only CSA certified and UL listed 3-wire grounded extension cords, rated 15 A, 125 V. Owner's Manual 11 - LG LWHD8000R | User Manual - Page 12
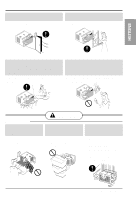
(Not adhesive backed) Type G: 2 EA (Guide Panel) Type H: 1 EA (Support Bracket) Have the following tools available for installation: * Screwdriver (Slotted and Phillips) * Knife * Pencil * Ruler * Hammer * Level Window Requirements Size This room air conditioner is designed for installation in - LG LWHD8000R | User Manual - Page 13
should be approximately 3/4" higher than the storm window frame (Storm Window Frame) or wood strip (Outdoors) to help condensation to drain properly to the outside. 3. Install a second Wood Strip for L Bracket Storm Window Frame Outer Sill Indoors Outdoors Figure. A Figure. B Owner's Manual 13 - LG LWHD8000R | User Manual - Page 14
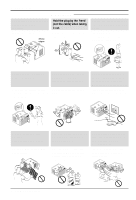
1. Insert the guide panels into the guides of the air conditioner. Fasten the curtains to the unit with screws Type A (Type A). Tip! : Use a long screwdriver and installing the screws will be easier. Type A 2. Cut the adhesive-backed seal strip (Type E) to the window width. Remove the - LG LWHD8000R | User Manual - Page 15
ool E nergy S aver F F1 LOW F2 ME D F3 HIGH Fan Dry T imer TE MP C enter Line 1-2. While steadying the air conditioner, carefully bring the window sash down behind the upper guide of the air conditioner. When the air conditioner is properly installed, it should tilt slightly down at the back - LG LWHD8000R | User Manual - Page 16
bracket (Type H) using a screw removed from the air conditioner cabinet. Attach the Type B support bracket (Type H) to the inner window sill with a screw (Type B). Support Bracket (Type H) 4. Window installation of room air conditioner is now completed. See ELECTRICAL DATA for attaching power - LG LWHD8000R | User Manual - Page 17
- LG LWHD8000R | User Manual - Page 18
Operating Instructions Remote Controller CAUTION: The Remote Controller will not function properly if strong light strikes the sensor window of the air conditioner or if there are obstacles between the Remote Controller and the air conditioner. Power Operation starts when this button is pressed - LG LWHD8000R | User Manual - Page 19
cooling to maximize cooling efficiency. Operating Instructions Adjusting horizontal air flow Adjusting vertical air flow Vent Control For maximum cooling efficiency, CLOSE the vent. This will allow internal air circulation. OPEN the vent to discharge stale air. CLOSE VENT OPEN Owner ,s Manual 19 - LG LWHD8000R | User Manual - Page 20
when inserting the drain pipe. Push away from the sharp fin area to avoid slipping injuring yourself. Removal From Window Turn the air conditioner off, disconnect the power cord, remove the L bracket, the screws and Support Bracket installed through the top and bottom of the guide panels, and save - LG LWHD8000R | User Manual - Page 21
air filter from the front grille by pulling the air filter up slightly. 3. Wash the filter using lukewarm water below 40 C (104 F). 4. Gently shake the excess water from the filter and replace. Cleaning The Air Conditioner Saver F F1 LOW F2 MED F3 HIGH Fan Dry Timer TEMP Owner ,s Manual 21 - LG LWHD8000R | User Manual - Page 22
Maintenance and Service How to Remove the Front Grille 1. Pull the inlet grille forward 2. Remove the screw securing the Front Grille. 3. Push the from the case as the top tabs lift out of their slots. Cool Energy Saver F F1 LOW F2 MED F3 HIGH Fan Dry Timer TEMP 22 Room Air Conditioner - LG LWHD8000R | User Manual - Page 23
all doors and windows and check for any source of heat in the room. Before calling for service, please review the following list of common problems and solutions. The air conditioner is operating normally when: • You hear a pinging noise. This is caused by water being picked up by the fan on rainy - LG LWHD8000R | User Manual - Page 24
- LG LWHD8000R | User Manual - Page 25
ENGLISH Memo Owner's Manual 25 - LG LWHD8000R | User Manual - Page 26
Memo 26 Room Air Conditioner - LG LWHD8000R | User Manual - Page 27
- LG LWHD8000R | User Manual - Page 28
de lesiones o daños materi-ales. s El significado de los símbolos utilizados en este manual se indica a continuación. Asegúrese de no hacerlo. Asegúrese de seguir las instrucciones. s No desarme o modifique los productos. • Puede causar descarga eléctrica y fallos. Gasolin 28 Aire Acondicionador - LG LWHD8000R | User Manual - Page 29
o incendio. No modifique la longitud del cable de corriente eléctrica. Use el aparato de aire acondicionado en un solo circuito. (Consulte la página 30). No comparta el circuito con otros electrodom húmedas o en un ambiente húmedo. • Puede causar descarga eléctrica. Manual del Propietario 29 - LG LWHD8000R | User Manual - Page 30
acondicionado debe operarse en un área cerrada para ser más efectivo. Ventile antes de hacer funcionar el acondicionador de aire cuando sale el gas. • Puede causar explosión, incendio, quemaduras. Si entra agua a la unidad, gire el interruptor principal del artefacto. Tome contacto con el centro - LG LWHD8000R | User Manual - Page 31
No ponga un animal domestico una planta de la casa en donde sera expuesto al flujo de aire directo - LG LWHD8000R | User Manual - Page 32
confort del consumidor. No es un sistema aclimatizador. Limpieza y mantenimiento 1. No toque las partes de metal de la unidad cuando quite el filtro. Puede lastimarse cuando manipule bordes filosos y número de serie a mano. Los encontrará en la página 25 de este manual. 32 Aire Acondicionador - LG LWHD8000R | User Manual - Page 33
ÑOL Guía Superior Gavinete Rejilla Frontal Filtro de Aire Evaporador Panel de Control Control Remoto Deflector Vertical de Aire Deflector Horizontal de Aire Salida de Aire Toma de Aire (Recolector de Aire) Abrazadera Compresor Condensador Bandeja de Base Cable eléctrica Manual del Propietario 33 - LG LWHD8000R | User Manual - Page 34
UL de tres espigas con conexion a tierra calificado 15A, 125V. CONSEJO El cableado domestico de aluminio podria ocasionar problemas especiales. Consulte a un electricista calificado. 34 Aire Acondicionador - LG LWHD8000R | User Manual - Page 35
. En el caso de cualquier duda respecto a la correcta puesta a tierra del ventilador, haga revisar el enchufe de pared y el circuito por un electricista profesional. Manual del Propietario 35 - LG LWHD8000R | User Manual - Page 36
con la polaridad correcta. Desconectando el cable de alimentación del adaptador utilice una mano para sendas partes para evitar un daño del borne de tierra. Evite una desconexión frecuente del cable de alimentaci como UL con tres conductores de valores 15 A, 125 V. 36 Aire Acondicionador - LG LWHD8000R | User Manual - Page 37
superior hasta el antepecho. 22" a 36" Min. 13" ADVERTENCIA : Este producto es un aparato de AIRE ACONDICIONADO PARA INSTALACIÓN EN VENTANAS. Como tal, se necesita una ventana de un cuelgue o de doble utilizando casquillos, orificios en las paredes ni cualquier otro tipo. Manual del Propietario 37 - LG LWHD8000R | User Manual - Page 38
gruesa para elevar el descanso de la ventana, de tal manera que la unidad de aire acondicionado pueda ser intalada sin interferencia del marco de la sobreventana (storm window). 2. Ver Figura. B. La parte superior de la tira de madera debe estar aproximadamente a 3/4 de pulg más alta que el marco - LG LWHD8000R | User Manual - Page 39
paneles en los guías del aire acondicionado. Las cortinas atorníllelas plástico de la banda adhesiva y colóquela en la parte superior de el marco inferior de la ventana. Banda Adhesiva ( poner la ménsula en L contra la parte posterior del descanso interior. Descanso Exterior Descanso Interior - LG LWHD8000R | User Manual - Page 40
firmemente hasta que la parte corrediza de la ventana descanse sobre la parte superior del canal y Fan Dry T imer TE MP Linea del C entro CONSEJO Cuando el aire acondicionado sea fijado en el support en L, el aire acondicionado será centrado como pueden observar. 1-2. Mientras mantiene el aire - LG LWHD8000R | User Manual - Page 41
H) a la parte interior de la repisa de la ventana con un tornillo (Tipo B). Instalación Tipo B Sostenga Parentesis (Tipo H) 4. La instalación del aire acondicionado de ventana no estará completa. Vea SEGURIDAD ELECTRICA para conectar la extensión eléctrica al toma corriente. ESPAÑOL Manual del - LG LWHD8000R | User Manual - Page 42
- LG LWHD8000R | User Manual - Page 43
- LG LWHD8000R | User Manual - Page 44
- LG LWHD8000R | User Manual - Page 45
través del condensador, haciendo más eficiente al aparato de aire acondicionado. Drain Pipe Drain Cap Ring PRECAUTIÓN: Tenga cuidado al insertar el tubo de aire acondicionado, desconecte el cordón eléctrico del toma corriente, remueva la cerradura del marco y los tornillos instalados en la parte - LG LWHD8000R | User Manual - Page 46
al mes si no es necesario limpiar el filtro de aire. Las partículas detenidad se pueden acumular en el filtro impidiendo el flujo del aire, limitando el rendimiento de enfriamiento y causando la acumulación . Cool Energy Saver F F1 LOW F2 MED F3 HIGH Fan Dry Timer TEMP 46 Aire Acondicionador - LG LWHD8000R | User Manual - Page 47
aire hasta sacarlo. 2. Saque el tornillo que asegura la Parrilla Frontal. 3. Suelte el lado izquierdo primero. Después cuidadosamente hale desde la parte de arriba y empuje hacia la derecha. Las lengüetas están aseguradas. Cool Energy Saver F F1 LOW F2 MED F3 HIGH Fan Dry Timer TEMP Manual - LG LWHD8000R | User Manual - Page 48
está atascado de polvo. En el caso de que sí, cambie el filtro. 3. Compruebe que afuera no haya un obstáculo del flujo de aire y si entre la parte trasera del ventilador y la pared o la barrera haya espacio libre de por lo menos 1 metro (20"). 4. Cierre todas las puertas y ventanas y compruebe que - LG LWHD8000R | User Manual - Page 49
- LG LWHD8000R | User Manual - Page 50
Nota 50 Aire Acondicionador - LG LWHD8000R | User Manual - Page 51
-243-0000 y seleccione la opción adecuada. Por favor, tenga disponible el tipo de producto (Aire acondicionado), número de modelo, número de serie, y código postal. La mano de obra bajo garantía cubre el coste de la Asistencia en domicilio de todas las piezas, incluyendo el compresor. ESTA GARANT - LG LWHD8000R | User Manual - Page 52
prompt. Please have product type (Room Air Conditioner), model number, serial number, and ZIP code ready. The warranted labor covers the cost of In-Home Service on all parts including the compressor. THIS WARRANTY IS IN LIEU OF ANY OTHER WARRANTIES, EXPRESS OR IMPLIED, INCLUDING WITHOUT LIMITATION
-
 1
1 -
 2
2 -
 3
3 -
 4
4 -
 5
5 -
 6
6 -
 7
7 -
8
-
9
-
10
-
11
-
12
-
13
-
14
-
15
-
16
-
17
-
18
-
19
-
20
-
21
-
22
-
23
-
24
-
25
-
26
-
27
-
28
-
29
-
30
-
31
-
32
-
33
-
34
-
35
-
36
-
37
-
38
-
39
-
40
-
41
-
42
-
43
-
44
-
45
-
46
-
47
-
48
-
49
-
50
-
51
-
52
 |
 |