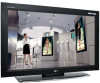
LG M4200C Owner's Manual (English)
LG M4200C Manual
 |
View all LG M4200C manuals
Add to My Manuals
Save this manual to your list of manuals |
LG M4200C manual content summary:
- LG M4200C | Owner's Manual (English) - Page 1
and Accessories A4 Using the Remote Control A5 Connection To arrange cables in order - Optional A8 Connecting the Speakers - Optional A9 Adjusting PIP/POP/PBP Mode (Multiple Screen) Functions A30 Miscellaneous Troubleshooting A32 Specifications A35 is a trademark of SRS Labs,Inc. - LG M4200C | Owner's Manual (English) - Page 2
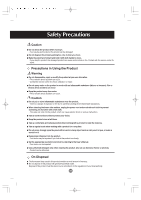
shock, fire or product damage. If you can smell smoke or other odors or hear a strange sound unplug the power cord and contact the service center. - If you continue to use without taking proper measures, electrical shock or fire can occur. If you dropped the product or the case is broken, turn off - LG M4200C | Owner's Manual (English) - Page 3
power cable to the grounded current. - You may be electrocuted or injured. Use the rated voltage only. - The product can be damaged, or you - You may be electrocuted due to excess moisture. If you don't intend to use the product for a long time, unplug the power cable from the product. - Covering - LG M4200C | Owner's Manual (English) - Page 4
damaged product can cause electric shock or fire. Contact with the service center for repair. Precautions in Using the Product Warning Do not disassemble, repair the User's Manual. - Your vision can be impaired. Use authorized detergent only when cleaning the product. (Do not use benzene, thinner - LG M4200C | Owner's Manual (English) - Page 5
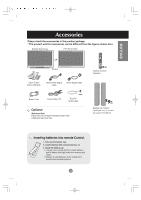
Free Mount Type OR Product User's Guide/ Driver CD/Cards 15-pin D- support the speakers) Inserting batteries into remote Control. 1. Take out the battery cap. 2. Insert batteries with correct polarity (+/-). 3. Close the battery cap. • You can use a remote Control 7 meter distance and 30 degree - LG M4200C | Owner's Manual (English) - Page 6
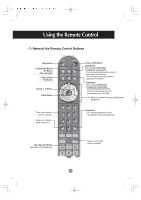
Using the Remote Control Name of the Remote Control Buttons Mute button • Input Select Button • AV Button (See next page) • Menu Button • Exit Button Volume Button Check Button There is not a function which is supported * There is not a function which is supported Power On/Off Button Sleep Button - LG M4200C | Owner's Manual (English) - Page 7
ENGLISH • Input Select Button If you press the button once, the following Input Signal Window will appear. Select the signal type you want using the button. • AV Button This button will be enabled only when you selected the AV signal. The signal type will be changed with the following - LG M4200C | Owner's Manual (English) - Page 8
the main screen and the sub-screen when the PIP/POP/PBP function is used. PIP POP PBP SWAP SWAP When 'Input Signal 1' comes on in the can swap 'Input Signal 1' and 'Input Signal 2' using the SWAP button. *PIP function is not supported in 480i, 576i and 1080i modes. - LG M4200C | Owner's Manual (English) - Page 9
ENGLISH To arrange cables in order - Optional * Applicable only for models that support the stand 1. Disassemble the stand cover. The cover may be easily disassembled by pressing down on the base as shown in the figure. Stand cover 2. - LG M4200C | Owner's Manual (English) - Page 10
Connecting the Speakers - Optional * Applicable only for models that support the speakers Use the screws to secure the speakers on the rear side of the product as shown in the below figure. When the speaker is installed. A9 - LG M4200C | Owner's Manual (English) - Page 11
in the user's guide could be different from sound card. AV Ports *LINE OUT A terminal used to connect to the speaker including a built-in amplifier (Amp). Make Speaker Out, reduce the PC volume. If the Audio Out of the PC sound card supports both Speaker Out and Line Out, convert to Line Out using - LG M4200C | Owner's Manual (English) - Page 12
D-Sub signal input cable. (Macintosh) Rear side of the product. PC 1 PC 2 A PC B2 PC B1 PC C MAC Macintosh Adapter (not included) Use the standard Macintosh adapter since an incompatible adaptor is available in the market. (Different signaling system) Connect the power cord. Rear side of - LG M4200C | Owner's Manual (English) - Page 13
to two computers. Connect the signal cables (DVI and D-Sub) to each computer. Press the SOURCE button in a remote control to select the computer to use. • Directly connect to a grounded power outlet on the wall or a power bar with a ground wire. A12 - LG M4200C | Owner's Manual (English) - Page 14
function when displaying ANALOG RGB inputs of a PC to the other product. • To use different products connected to each other Connect one end of the signal input cable(15-pin D-Sub Signal Cable) to the RGB OUT connector of - LG M4200C | Owner's Manual (English) - Page 15
ENGLISH When watching VCR / DVD Connect the video cable as shown in the below figure and then connect the power cord (See page A11). A When connecting with a RCA cable. • Connect the input terminal with a proper color match. (Video - Yellow, Sound (left) - White, Sound (right) - Red) B When - LG M4200C | Owner's Manual (English) - Page 16
color match. Product Green Blue Red White Red Component Cable (not included) Audio Cable (not included) Green Blue Red White Red HDTV Receiver * The HDTV terminal also supports SDTV (480i/480p/576i/576p). Select an input signal. Press the SOURCE button on the remote control to select the input - LG M4200C | Owner's Manual (English) - Page 17
ENGLISH When watching DVD(480i/576i) Connect the video/audio cable as shown in the below figure and then, connect the power cord (See page A11). • Connect the input terminal with a proper color match. Product White Red Green Blue Red Audio Cable (not included) Component Cable (not included) - LG M4200C | Owner's Manual (English) - Page 18
Connecting to External Devices When watching DVI-D(HDCP) from the VCR/DVD/Set-top Box Connect the video/audio cable as shown in the below figure and then connect the power cord (See page A11). Product DVI-D Signal Cable RCA-PC Audio Cable VCR/DVD/Set-top Box Select an input signal. Press the - LG M4200C | Owner's Manual (English) - Page 19
ENGLISH Red White Yellow (not included) RCA Cable Watching AV Outputs Connect to the external device if you record the broadcasting. • When you set the input signal of the main screen as 'AV (CVBS)', you can transmit the signal that you're watching to the AV output terminal. Product Video/TV/ - LG M4200C | Owner's Manual (English) - Page 20
this button to show/hide the OSD (On Screen Display) menu screen. OSD Select / Adjust Button • Use this button to select an icon or adjust the setting in the OSD screen. • Use this button to directly control brightness and contrast of the PC signal (RGB1, RGB2 / DVI ). • Adjust the volume. A19 - LG M4200C | Owner's Manual (English) - Page 21
and mode information will be displayed. SOURCE Button • Select the input signal AV S-Video Component 1 Component 2 RGB1 RGB2 DVI Composite Video Separate Video HDTV DVD 15-pin D-Sub analog signal 15-pin D-Sub analog signal DVI digital signal • The unit that receives the signal from the remote - LG M4200C | Owner's Manual (English) - Page 22
Selecting and Adjusting the Screen OSD Menu Icon Function Description PICTURE SOUND SPECIAL SCREEN PIP/POP/PBP Adjusts screen brightness, contrast and color that you prefer. Adjusts the audio function. Adjusts the screen status according to the circumstances. Adjusts the screen video. Adjusts - LG M4200C | Owner's Manual (English) - Page 23
want to adjust Select a menu icon Move where you want to adjust Select a Adjust the status menu icon Save Exit from the adjustment menu screen. • Use the remote control to adjust the OSD screen. 1 Press the MENU Button, then the main menu of the OSD appears. 2 To access a control - LG M4200C | Owner's Manual (English) - Page 24
Select this option to display with a mild image. • Game : Select this option to enjoy dynamic image when playing a game. • User : Select this option to use the user-defined settings. Contrast To adjust the contrast of the screen. Brightness To adjust the brightness of the screen. Color To adjust the - LG M4200C | Owner's Manual (English) - Page 25
sound. • Speech Select this option to watch sports broadcasting. • User Select this option to use the user-defined audio settings. Use this function to balance sound from the left and right speakers. To adjust uneven sound volumes across all channels or signals automatically to the most appropriate - LG M4200C | Owner's Manual (English) - Page 26
MENU button on the remote control and set Child Lock to the 'Off' position. To choose the language in which the control names are displayed. Use this function to set the power indicator on the front side of the product to On or Off. If you set Off, it will go - LG M4200C | Owner's Manual (English) - Page 27
with various other products. - Must be in a function that can be connected to RS-232C or RGB Out Tile mode It is used to enlarge the screen and also used with several products to view screen, Tile mode and choose Tile alignment and set the ID of the current product to set - LG M4200C | Owner's Manual (English) - Page 28
Selecting and Adjusting the Screen Selecting the options • Tile mode - Tile mode : row x column ( r = 1, 2, 3, 4 c = 1, 2, 3, 4) - 4 x 4 available. - Configuration of an integration screen is also available as well as configuration of one by one Display. - Tile mode (product 1 ~ 4) : r(2) x c(2) - LG M4200C | Owner's Manual (English) - Page 29
Set ID NO (name assignment) to each product when several products are connected for display. Specify the number (0~99) using the button and exit. Use the assigned Set ID to individually control each product using the Product Control Program. Logo Display Lamp Optional (46 inch model only - LG M4200C | Owner's Manual (English) - Page 30
Autoconfigure Clock Phase Position *When the Component 1 input signal is 720p or 1080i, the spectacle function is not supported. This button is for the automatic adjustment of the screen position, clock and phase. This function is suitable for analoge singnal input only - LG M4200C | Owner's Manual (English) - Page 31
, Large / PBP : Full, 4:3) To adjust the image of the PIP/POP/PBP screen; Press the button to display the submenu for PIP/POP/PBP image. Use the buttons to adjust the item to the desired level. The items of the sub-menu may vary depending on the type of the source - LG M4200C | Owner's Manual (English) - Page 32
Selecting and Adjusting the Screen Adjusting PIP/POP/PBP Mode (Multiple Screen) Functions Position To adjust the position to PIP screen. Swap To switch the main-screen and subscreen in PIP/POP/PBP mode. PIP POP PBP SWAP SWAP A31 - LG M4200C | Owner's Manual (English) - Page 33
Troubleshooting the Specifications in this user's guide. * Maximum resolution - 32 / 37 / 42 inch model RGB1 / site. (http://www.lge.com) • See if the plug&play function is supported by referring to the video card user's guide set this function using the remote control buttons number of horizontal lines displayed - LG M4200C | Owner's Manual (English) - Page 34
to automatically select the optimal screen status that fits into the current mode. If adjustment is not satisfactory, use the Position OSD menu. • See if the video card resolution and frequency are supported by the product. If the frequency is out of range, set to the recommended resolution in the - LG M4200C | Owner's Manual (English) - Page 35
the PIP/POP/PBP function is in use, the screen size function may not work. Screen color is abnormal. q Screen has poor color resolution (16 colors). • Set the number of colors to more than 24 bits can be attributable to the unique characteristics of the LCD panel. It is not a malfunction of the - LG M4200C | Owner's Manual (English) - Page 36
) [46 inch] 46 inches (116.84 cm) TFT (Thin Film Transistor) LCD (Liquid Crystal Display) Panel Anti-Glare coating Visible diagonal size: 116.84 cm 50/60Hz 2.0A On Mode : 145W (Without Speaker) Sleep Mode : ≤ 4W Off Mode : ≤ 2W [37 inch] Rated Voltage Power Consumption AC 100-240V~ 50/ - LG M4200C | Owner's Manual (English) - Page 37
ENGLISH The product specifications can change without prior notice for product improvement. Dimensions &Weight [1] H [2] H W D [3] W D [4] H W D H W D .00 cm (4.72 inches) [3] 112.9 cm (44.45 inches) x 61.90 cm (24.37 inches) x 22.77 cm (8.96 inches) [4] 112.9 cm (44.45 inches) x 57 - LG M4200C | Owner's Manual (English) - Page 38
Specifications The product specifications can change without prior notice for product improvement. Dimensions &Weight Net [32 inch] [1] 19.4 kg (42.77 lbs) [3] 21.1 kg (46.52 lbs) [37 inch] [1] 26.7 kg (58.86 lbs) [3] 30.5 kg (67.24 lbs) [42 inch] [1] 35.2 kg (77.60 lbs) [3] 40.0 kg (88.18 lbs) - LG M4200C | Owner's Manual (English) - Page 39
, DVI-D (digital), S-Video, Composite Video, HDTV, DVD, RS-232C Operational Condition Temperature: 10˚C ~ 35˚C , Humidity: 10% ~ 80% Storage Condition Temperature: -20˚C ~ 60˚C , Humidity: 5% ~ 95% * Applicable only for models that support the speakers Audio RMS Audio Output Input Sensitivity - LG M4200C | Owner's Manual (English) - Page 40
, DVI-D (digital), S-Video, Composite Video, HDTV, DVD, RS-232C Operational Condition Temperature: 10˚C ~ 35˚C , Humidity: 10% ~ 80% Storage Condition Temperature: -20˚C ~ 60˚C , Humidity: 5% ~ 95% * Applicable only for models that support the speakers. Audio RMS Audio Output Input Sensitivity - LG M4200C | Owner's Manual (English) - Page 41
x 350 31.469 70 2 VGA 720 x 400 31.468 70 3 VGA 640 x 480 31.469 60 4 VESA 640 x 480 37.500 75 5 VESA 640 x 480 43.269 85 6 VESA 800 x 600 37.879 60 7 VESA 800 x 600 46.875 75 8 VESA 800 x 600 53.674 85 9 MAC 832 x 624 49.725 75 - LG M4200C | Owner's Manual (English) - Page 42
and wall-mounted type.) This product accepts a VESAcompliant mounting interface pad.- (optional) For further information, refer to the VESA Wall Mounting Instruction Guide. Kensington Security Slot- optional Connected to a locking cable that can be purchased separately at most computer stores A41 - LG M4200C | Owner's Manual (English) - Page 43
a time by connecting them to a single PC. Connecting the cable Connect the RS-232C cable as shown in the picture. * The RS-232C protocol is used for communication between the PC and product. You can turn the product on/off, select an input source or adjust the OSD menu from your - LG M4200C | Owner's Manual (English) - Page 44
ENGLISH Command Reference List 01. Power 02. Input Select 03. Aspect Ratio 04. Screen Mute 05. Volume Mute 06. Volume Control 07. Contrast 08. Brightness 09. Color 10. Tint 11. Sharpness 12. OSD Select 13. Remote Lock On/Off 14. PIP/PBP/POP On/Off 15. PIP Position 16. Balance 17. ACC 18. PIP/PBP/ - LG M4200C | Owner's Manual (English) - Page 45
[Command 2]: Second command. * [Set ID]: You can adjust the set ID to choose desired product ID number in Special menu. Adjustment range is 0 ~ 99. When selecting Set ID '0', every connected TV set is or communication errors. Data 1: Illegal Code 2: Not supported function 3: Wait more time A3 - LG M4200C | Owner's Manual (English) - Page 46
v 02. Input Select(Command : b) (Main Picture Input) To select input source for the Set. You can also select an input source using the SOURCE button on the remote control. Transmission [k][b][ ][Set ID][ ][Data][Cr] Data 2 : AV 3 : S-Video 4 : Component 1 5 : Component 2 Acknowledgement 6 : RGB1 - LG M4200C | Owner's Manual (English) - Page 47
/ Receiving Protocol 03. Aspect Ratio(Command : c) (Manin picure format) To adjust the screen format. You can also adjust the screen format using the ARC (Aspect Ratio Control) button on remote control or in the Screen menu. Transmission [k][c][ ][Set ID][ ][Data][Cr] Data 1 : 4:3 2 : Full - LG M4200C | Owner's Manual (English) - Page 48
ENGLISH v v Transmission / Receiving Protocol 05. Volume Mute(Command : e) To control On/Off of the Volume Mute. Transmission [k][e][ ][Set ID][ ][Data][Cr] Data 0 : Volume Mute On (Volume Off) 1 : Volume Mute Off (Volume On) Acknowledgement [e][ ][Set ID][ ][OK][Data][x] Data 0 : Volume Mute On - LG M4200C | Owner's Manual (English) - Page 49
v RS-232C Controlling the Multiple Product Transmission / Receiving Protocol 07. Contrast(Command : g) To adjust screen contrast. You can also adjust the contrast in the Picture menu. Transmission [k][g][ ][Set ID][ ][Data][Cr] Data Min : 00H ~ Max : 64H • Refer to 'Real data mapping' as shown - LG M4200C | Owner's Manual (English) - Page 50
ENGLISH v v Transmission / Receiving Protocol 09. Color(Command : i) (Video only) To adjust the screen color. You can also adjust the color in the Picture menu. Transmission [k][i][ ][Set ID][ ][Data][Cr] Data Min : 00H ~ Max : 64H (Hexadecimal code) Acknowledgement [i][ ][Set ID][ ][OK][Data][x] - LG M4200C | Owner's Manual (English) - Page 51
RS-232C Controlling the Multiple Product Transmission / Receiving Protocol v 11. Sharpness(Command : k) (Video only) To adjust the screen Sharpness. You can also adjust the sharpness in the Picture menu. Transmission [k][k][ ][Set ID][ ][Data][Cr] Data Min : 00H ~ Max : 64H (Hexadecimal code) - LG M4200C | Owner's Manual (English) - Page 52
ENGLISH v v Transmission / Receiving Protocol 14. PIP/PBP/POP On/Off(Command : n) To control PIP/PBP/POP On/Off of the Set. Transmission [k][n][ ][Set ID][ ][Data][Cr] Data 0 : OFF 1 : PIP 2 : PBP 3 : POP Acknowledgement [n][ ][Set ID][ ][OK][Data][x] Data 0 : OFF 1 : PIP 2 : PBP 3 : POP 15. PIP - LG M4200C | Owner's Manual (English) - Page 53
RS-232C Controlling the Multiple Product Transmission / Receiving Protocol v 16. Balance(Command : t) To adjust the sound balance. Transmission [k][t][ ][Set ID][ ][Data][Cr] Data Min : 00H ~ Max : 64H (Hexadecimal code) Acknowledgement [t][ ][Set ID][ ][OK][Data][x] Data Min : 00H ~ Max : 64H * - LG M4200C | Owner's Manual (English) - Page 54
ENGLISH Transmission / Receiving Protocol v 18. PIP/PBP/POP SOURCE(Command : y) To select the sub-screen source. Transmission [k][y][ ][Set ID][ ][Data][Cr] Data 2 : AV 3 : S-Video 4 : Component 1 5 : Component 2 6 : RGB1 7 : RGB2 8 : DVI Acknowledgement [y][ ][Set ID][ ][OK][Data][x] Data - LG M4200C | Owner's Manual (English) - Page 55
RS-232C Controlling the Multiple Product Transmission / Receiving Protocol v 21. Tiling Mode(Command : d d) Change a Tiling Mode. Transmission [d][d][][Set ID][][Data][x] Data 00 12 13 14 ... 44 Description Tiling mode is off. 1 x 2 mode(column x row) 1 x 3 mode 1 x 4 mode ... 4 x 4 mode * The - LG M4200C | Owner's Manual (English) - Page 56
ENGLISH v v Transmission / Receiving Protocol 23. Tile V Position(Command : d f) To set the Vertical position. Transmission [d][f][][Set ID][][Data][x] * The data range is from 00 to 64(in Hex). Acknowledgement [f][][Set ID][][OK/NG][Data][x] 24. Tile H Size(Command : d g) To set the Horizontal - LG M4200C | Owner's Manual (English) - Page 57
v v RS-232C Controlling the Multiple Product Transmission / Receiving Protocol 26. Tile ID Set(Command : d i) To assign the Tile ID for Tiling function . Transmission [d][i][][Set ID][][Data][x] * The data range is from 00 to 00 x 10 tile mode. Acknowledgement [i][][Set ID][][OK/NG][Data][x] 27. - LG M4200C | Owner's Manual (English) - Page 58
ENGLISH v v Transmission / Receiving Protocol *29. Temperature value Return(Command : d n) - Optional To read the inside temperature value. Transmission [d][n][][Set ID][][Data][x] * The data is always FF(in Hex). Acknowledgement [n][][Set ID][][OK/NG][Data][x] Data are 1 byte long in Hex ASCII - LG M4200C | Owner's Manual (English) - Page 59
the Product. Remote Control IR Code Output waveform single pulse, modulated with 37.917KHz signal at 455KHz Tc Carrier frequency FCAR = 1/Tc = fosc/12 = T1/Tc = 1/3 Configuration of frame • 1st frame Lead code Low custom code High custom code Data code Data code C0 C1 C2 C3 C4 C5 C6 C7 C0 - LG M4200C | Owner's Manual (English) - Page 60
POWER ON/OFF C4 POWER ON C5 POWER OFF 09 MUTE 10 Number Key 0 11 Number Key 1 12 Number Key 2 13 Number Key 3 14 Number Key 4 15 Number Key 5 16 Number Key 6 17 Number Key 7 18 Number Key 8 19 Number Key 9 98 SOURCE 5A AV D8 S-Video BF Component1 D4 Component2 C6
-
 1
1 -
 2
2 -
 3
3 -
 4
4 -
 5
5 -
 6
6 -
 7
7 -
8
-
9
-
10
-
11
-
12
-
13
-
14
-
15
-
16
-
17
-
18
-
19
-
20
-
21
-
22
-
23
-
24
-
25
-
26
-
27
-
28
-
29
-
30
-
31
-
32
-
33
-
34
-
35
-
36
-
37
-
38
-
39
-
40
-
41
-
42
-
43
-
44
-
45
-
46
-
47
-
48
-
49
-
50
-
51
-
52
-
53
-
54
-
55
-
56
-
57
-
58
-
59
-
60
 |
 |
i
ENGLISH
Table of Contents
is a trademark of SRS Labs,Inc.
technology is incorporated under license from SRS Labs,Inc.
A1
A4
A5
A8
A9
A10
A11
A11
A13
A14
A15
A16
A17
A18
Safety Precautions
Accessories
Using the Remote Control
To arrange cables in order - Optional
Connecting the Speakers - Optional
Name and Function of the Parts
Connecting to External Devices
When Connecting to your PC
Watching
RGB Outputs
When Watching VCR/DVD
When Watching HDTV (720p/1080i)
When Watching DVD (480i/576i)
When Watching
DVI-D(HDCP) from the VCR/DVD/Set-top Box
Watching AV Outputs
A32
A35
Selecting and Adjusting the Screen
How to adjust the OSD (On Screen Display) Screen
Adjusting Screen Color
Adjusting the audio function
Selecting the Options
Adjusting Screen CLOCK/PHASE and Position
Adjusting PIP/POP/PBP Mode (Multiple Screen) Functions
A19
A22
A23
A24
A25
A29
A30
Troubleshooting
Specifications
Installation
and
Connection
Input
Selection
and Tracking
Miscellaneous