LG M4210N-B21 Owner's Manual (English)
LG M4210N-B21 - LG - 42" LCD Flat Panel Display Manual
 |
UPC - 719192184077
View all LG M4210N-B21 manuals
Add to My Manuals
Save this manual to your list of manuals |
LG M4210N-B21 manual content summary:
- LG M4210N-B21 | Owner's Manual (English) - Page 1
User's Guide M4210N Make sure to read the Important Precautions before using the product. Keep the User's Guide(CD) in an accessible place for furture reference. See the label attached on the product and give the information to your dealer when you ask for service. Important WARRANTY VOID - LG M4210N-B21 | Owner's Manual (English) - Page 2
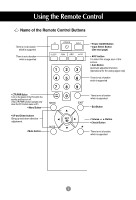
Using the Remote Control Name of the Remote Control Buttons There is not a function which is supported There is not a function which is supported • CTR.PWR Button Turn on the power of the PC built in the monitor and then turn off. (The CTR.PWR function operates only when the PC Control menu is - LG M4210N-B21 | Owner's Manual (English) - Page 3
Using the Remote Control 123 456 789 CTR. PWR 0 • Input Select Button If you press the button once, the following Input Signal Window will appear. Select the signal type you want using the button. INPUT RGB DVI * Inserting batteries into remote control. 1. Take out the battery cap. 2. - LG M4210N-B21 | Owner's Manual (English) - Page 4
Connecting the Speakers * Applicable only for models that support the speakers Mount the product onto the speaker by using a screw as following picture, and then connect the speaker cable. 4 - LG M4210N-B21 | Owner's Manual (English) - Page 5
guide could be different from the actual image. Rear View REMOTE CONTROL IN RS-232C (CONTROL& SERVICE IN RS-232C (CONTROL& SERVICE) OUT IN DVI IN to connect to the speaker including a built-in Speaker Out, reduce the PC volume. If the Audio Out of the PC sound card supports both Speaker - LG M4210N-B21 | Owner's Manual (English) - Page 6
the DVI signal input cable. 1. Rear side of the product. REMOTE CONTROL IN RS-232C (CONTROL& SERVICE) OUT IN DVI IN RGB IN AUDIO (RGB/DVI) RGB OUT LAN RGB OUT H/PHONE USB OUT Select DVI : DVI Digital signal. INPUT RGB DVI 4. Install the driver files contained at the supplied CD. 6 - LG M4210N-B21 | Owner's Manual (English) - Page 7
Connecting to External Devices When connecting with the D-Sub signal input cable. 1. Install the Video driver file contained at the supplied CD. 2. Rear side of the product. REMOTE CONTROL IN RS-232C (CONTROL& SERVICE) OUT IN DVI IN RGB IN AUDIO (RGB/DVI) RGB OUT LAN RGB OUT H/PHONE - LG M4210N-B21 | Owner's Manual (English) - Page 8
Connecting to External Devices 4. 1 2 1 Move the mouse pointer to an empty area on the Windows screen (with no icons or task bars) and click the right mouse button. 2 When the pop-up menu appears, click the 'Properties' menu. 5. 1 Select 'Settings' tab. 2 8 Click 'Advanced' button. - LG M4210N-B21 | Owner's Manual (English) - Page 9
Connecting to External Devices 6. 1 Select 'CATALYST(R)Control Center' tab. 2 Click 'ATI CATALYST(R)Control Center' button. 7. 1 Select 'Display Manager'menu. 2 Select 'Detect Displays'button. 9 - LG M4210N-B21 | Owner's Manual (English) - Page 10
and then press the right button of the mouse. 2 Select 'Clone Main with monitor' menu. 9. Click 'Yes' button. 10. Select an input signal. Press the INPUT button on the remote control to select the input signal. INPUT SET Or, - LG M4210N-B21 | Owner's Manual (English) - Page 11
. PC Connect the Audio cable. AUDIO (RGB/DVI) Rear side of the product. Connect the power cord. 11 PC REMOTE CONTROL IN RS-232C (CONTROL& SERVICE) OUT IN DVI IN RGB IN AUDIO (RGB/DVI) RGB OUT LAN RGB OUT H/PHONE USB OUT SP/DIF SERLAL PORT Rear side of the - LG M4210N-B21 | Owner's Manual (English) - Page 12
Connecting to External Devices 2. 1 Turn on power by pressing the power button on the product. 2 Turn on the PC. SOURCE AUTO/SET ON/OFF Power button 3.Select an input signal. Press the INPUT button on the remote control to select the input signal. INPUT SET Or, press the SOURCE button at the - LG M4210N-B21 | Owner's Manual (English) - Page 13
Connecting to External Devices Watching RGB Outputs Use this function when displaying ANALOG RGB inputs of a PC to the other product. • To use different products connected to each other Connect one end of the signal input cable(15-pin D-Sub Signal Cable) to the RGB OUT connector of product 1 and - LG M4210N-B21 | Owner's Manual (English) - Page 14
To arrange cables using cable management * Applicable only for models that support the stand. 1. Arrange the cables in the center as shown in the following picture. 2. Fit it downward. Warning • Do not use the cable management as a handle for the Monitor. • Do not press the cable management. 14 - LG M4210N-B21 | Owner's Manual (English) - Page 15
is not available for all models. • Set it up close to the wall so the product doesn't fall over when it is pushed backwards. The instructions shown below is a safer way to set up the product, which is to fix it on the wall so the product doesn't fall over when - LG M4210N-B21 | Owner's Manual (English) - Page 16
Selecting and Adjusting the Screen Name of the Buttons in the Screen Adjustment Unit SOURCE SOURCE AUTO/SET ON/OFF AUTO/SET ON/OFF Power Button • Press this button to turn on the power. Press this button again to turn it off. Power Indicator • This Indicator lights up blue when the display - LG M4210N-B21 | Owner's Manual (English) - Page 17
Selecting and Adjusting the Screen Name of the Buttons in the Screen Adjustment Unit AUTO/SET Button If the resolution is 1360X768 (RGB Mode) Auto in progress If the resolution is not 1360X768 (RGB Mode) Auto in progress For optimal display Change resolution to 1360 X 768 SOURCE Button • Select - LG M4210N-B21 | Owner's Manual (English) - Page 18
Selecting and Adjusting the Screen OSD Menu Icon Function Description PICTURE SOUND SPECIAL SCREEN Adjusts screen brightness, contrast and color that you prefer. Adjusts the audio function. Adjusts the screen status according to the circumstances. Adjusts the screen video. Note OSD(On Screen - LG M4210N-B21 | Owner's Manual (English) - Page 19
Selecting and Adjusting the Screen How to adjust the OSD (On Screen Display) screen Pops up the menu screen Move where you want to adjust Select a menu icon Move where you want to adjust Select a Adjust the status menu icon Save Exit from the adjustment menu screen. • Use the remote control - LG M4210N-B21 | Owner's Manual (English) - Page 20
Selecting and Adjusting the Screen Adjusting Screen Color CSM CSM • 6500K/9300K Selecting a factory setting color set. 6500K: Slightly reddish white. 9300K: Slightly bluish white. • User : Select this option to use the user-defined settings. Contrast To adjust the contrast of the screen. CSM - LG M4210N-B21 | Owner's Manual (English) - Page 21
: Select this option to use the user-defined audio settings. Balance SOUND SSM Balance 0 L Use this function to balance sound from the left and right speakers. R Note When connected to your computer and the 'SSM' setting in the audio menu is one of Flat, Music, Movie or Sports, the available - LG M4210N-B21 | Owner's Manual (English) - Page 22
Selecting and Adjusting the Screen Selecting the options Input Reset If you press the button once, the following Input Signal Window will appear. Select the signal type you want using the button. Reset Child lock Language Power indicator Transparency Use the buttons to select On or Off. The Set - LG M4210N-B21 | Owner's Manual (English) - Page 23
Selecting and Adjusting the Screen Selecting the options • To use this function - You can connect the product with several other products and use the Tile mode function. Tile mode Reset Tile mode Off H-Size 0 V-Size 0 H-Position V-Position Reset ID It is used to enlarge the screen and also - LG M4210N-B21 | Owner's Manual (English) - Page 24
Selecting and Adjusting the Screen Selecting the options • Tile mode - Tile mode : row x column ( r = 1, 2, 3, 4 c = 1, 2, 3, 4) - 4 x 4 available. - Configuration of an integration screen is also available as well as configuration of one by one Display. - Tile mode (product 1 ~ 4) : r(2) x c(2) - LG M4210N-B21 | Owner's Manual (English) - Page 25
On, the lamp will automatically be turned on. PC Control You can change the power setting of the PC built in the monitor. On : Turn on/off both the monitor and the built-in PC. Off : Turn on/off the built-in PC only. * How to turn on or off the PC - LG M4210N-B21 | Owner's Manual (English) - Page 26
Adjusting the Screen Adjusting Screen CLOCK/PHASE and Position Auto-configure ARC To select the image size of the screen. (1:1 menu are not supported over 1360 X 768 resolution) Auto-configure Auto-configure This button is for the automatic adjustment of the screen position, clock and phase. This - LG M4210N-B21 | Owner's Manual (English) - Page 27
Troubleshooting No image is displayed G Is the product power cord connected? • See if the frequency range by referring to the Specifications in this manual. * Maximum resolution RGB : 1280 X 1024 @60Hz DVI : 1280 X 1024 @60Hz - It may not be supported depending on the OS or video card type. G Does - LG M4210N-B21 | Owner's Manual (English) - Page 28
Troubleshooting The screen image looks abnormal. G Is the screen position wrong is not satisfactory, use the Position OSD menu. • See if the video card resolution and frequency are supported by the product. If the frequency is out of range, set to the recommended resolution in the Control - LG M4210N-B21 | Owner's Manual (English) - Page 29
Troubleshooting 'Child lock on' message appears. G The 'Child lock on' message appears when pressing the Menu button. Push the MENU (red, green, white or black color) may appear on the screen, which can be attributable to the unique characteristics of the LCD panel. It is not a malfunction of the - LG M4210N-B21 | Owner's Manual (English) - Page 30
Power 42 inches visible diagonal (106.73 cm) TFT (Thin Film Transistor) LCD (Liquid Crystal Display) Panel Anti-Glare coating Visible diagonal size: 106.73 cm 0.681 mm (Pixel Pitch) Rated Voltage Power Consumption AC 100-240V~ 50/60Hz 2.7A On Mode : 270W Typ.(with PC), 240W Typ.(only Monitor - LG M4210N-B21 | Owner's Manual (English) - Page 31
, Humidity: 10% ~ 80% Storage Condition Temperature: -20˚C ~ 60˚C , Humidity: 5% ~ 95% * Applicable only for models that support the speakers Audio RMS Audio Output Input Sensitivity Speaker Impedance 10W+10W(R+L) 0.7Vrms 8Ω NOTE Information in this document is subject to change without notice - LG M4210N-B21 | Owner's Manual (English) - Page 32
2 VGA 720 x 400 31.468 70 3 VGA 640 x 480 31.469 60 4 VESA 640 x 480 37.500 75 5 VESA 800 x 600 37.879 60 6 VESA 800 x 600 46.875 75 7 MAC 832 x 624 49.725 75 8 VESA 1024 x 768 48.363 60 9 VESA 1024 x 768 60.123 75 Preset mode Horizontal Vertical Frequency Frequency (kHz - LG M4210N-B21 | Owner's Manual (English) - Page 33
accepts a VESAcompliant mounting interface pad.- (This has to be purchased separately if required.) For further information, refer to the VESA Wall Mounting Instruction Guide. Kensington Security Slot- (This has to be purchased separately if required.) Connected to a locking cable that can be - LG M4210N-B21 | Owner's Manual (English) - Page 34
Specifications Signal Connector Pin Assignment 1 8 9 16 17 24 DVI-D Connector Pin Signal(DVI-D) Pin Signal(DVI-D) 1 T. M. D. S. Data2- 16 Hot Plug Detect 2 T. M. D. S. Data2+ 17 T. M. D. S. Data0- 3 T. M. D. S. Data2/4 Shield 18 T. M. D. S. Data0+ 4 T. M. D. S. Data4- 19 T. M. D. - LG M4210N-B21 | Owner's Manual (English) - Page 35
USB OUT SP/DIF SERLAL PORT USB downstream Port connect the cables from USB compliant peripherals-such as keyboard, mouse, etc 3. The monitor's USB terminal supports USB 2.0 and High Speed cables. Data Rate Power Consumption High Speed 480Mbps 2.5W (Max,each Port) Full Speed 12Mbps 2.5W (Max - LG M4210N-B21 | Owner's Manual (English) - Page 36
) OUT IN RS-232C (CONTROL& SERVICE) OUT IN RS-232C (CONTROL& SERVICE) OUT IN RS-232C (CONTROL& SERVICE) OUT IN RS-232C Cable RS-232C Configurations 7-Wire Configurations (Standard RS-232C cable) PC RXD 2 TXD 3 GND 5 DTR 4 DSR 6 RTS 7 CTS 8 Monitor 2 3 5 4 6 7 8 TXD RXD GND DSR DTR CTS - LG M4210N-B21 | Owner's Manual (English) - Page 37
RS-232C Controlling the Multiple Product Command Reference List 01. Power 02. Main Input Select 03. Aspect Ratio 04. Screen Mute 05. Volume Mute 06. Volume Control 07. Contrast 08. Brightness 09. OSD Select 10. Remote On/Off 11. Balance 12. Select Color Temp 13. Auto Configure 14. Red Gain Adjust - LG M4210N-B21 | Owner's Manual (English) - Page 38
][Data][x] * The Product transmits ACK (acknowledgement) based on this format when receiving abnormal data from non-viable functions or communication errors. Data 1: Illegal Code 2: Not supported function 3: Wait more time 3 - LG M4210N-B21 | Owner's Manual (English) - Page 39
L RS-232C Controlling the Multiple Product Transmission / Receiving Protocol L 01. Power On(Command : a) To control Power On/Off of the Set. Transmission [k][a][ ][Set ID][ ][Data][Cr] Data 0 : Power Off 1 : Power On Acknowledgement [a][ ][Set ID][ ][OK][Data][x] ff: Read Status To show - LG M4210N-B21 | Owner's Manual (English) - Page 40
L RS-232C Controlling the Multiple Product Transmission / Receiving Protocol 03. Aspect Ratio(Command : c) (Main picure format) To adjust the screen format. You can also adjust the screen format using the ARC (Aspect Ratio Control) button on remote control or in the Screen menu. Transmission - LG M4210N-B21 | Owner's Manual (English) - Page 41
L L RS-232C Controlling the Multiple Product Transmission / Receiving Protocol 05. Volume Mute(Command : e) To control On/Off of the Volume Mute. Transmission [k][e][ ][Set ID][ ][Data][Cr] Data 0 : Volume Mute On (Volume Off) 1 : Volume Mute Off (Volume On) Acknowledgement [e][ ][Set ID][ ][OK][ - LG M4210N-B21 | Owner's Manual (English) - Page 42
L RS-232C Controlling the Multiple Product Transmission / Receiving Protocol 07. Contrast(Command : g) To adjust screen contrast. You can also adjust the contrast in the Picture menu. Transmission [k][g][ ][Set ID][ ][Data][Cr] Data Min : 00H ~ Max : 64H • Refer to 'Real data mapping' as shown - LG M4210N-B21 | Owner's Manual (English) - Page 43
ID][ ][OK][Data][x] Data 0 : OSD Off 1 : OSD On 10. Remote On/Off (Command : m) Lock the buttons at the rear side of the monitor and the button at the remote control. Transmission [k][m][ ][Set ID][ ][Data][Cr] Data 0 : Off 1 : On Acknowledgement [m][ ][Set ID][ ][OK][Data][x] Data 0 : Off - LG M4210N-B21 | Owner's Manual (English) - Page 44
L RS-232C Controlling the Multiple Product Transmission / Receiving Protocol 12. Select Color Temp (Command : u) To adjust the screen color temperature. Transmission [k][u][ ][Set ID][ ][Data][Cr] Data 0 : User 1 : 9300K 2 : 6500K Acknowledgement [u][ ][Set ID][ ][OK][Data][x] Data 0 : User 1 : - LG M4210N-B21 | Owner's Manual (English) - Page 45
L L RS-232C Controlling the Multiple Product Transmission / Receiving Protocol 14. Red Gain Adjust (Command: j w) To adjust Red color level. Transmission [j][w][ ][Set ID][ ][Data][Cr] Data Min : 00H ~ Max : 64H Acknowledgement [w][ ][Set ID][ ][OK][Data][x] * When it is executed with the 6500K or - LG M4210N-B21 | Owner's Manual (English) - Page 46
RS-232C Controlling the Multiple Product L Transmission / Receiving Protocol 17. Tiling Mode (Command :d d) Change a Tiling Mode. Transmission [d][d][][Set ID][][Data][x] Data 00 12 13 14 ... 44 Description Tiling mode is off. 1 x 2 mode(column x row) 1 x 3 mode 1 x 4 mode ... 4 x 4 mode * The - LG M4210N-B21 | Owner's Manual (English) - Page 47
L L RS-232C Controlling the Multiple Product Transmission / Receiving Protocol 19. Tile V Position(Command : d f) To set the Vertical position. Transmission [d][f][][Set ID][][Data][x] * The data range is from 00 to 64(in Hex). Acknowledgement [f][][Set ID][][OK/NG][Data][x] 20. Tile H Size( - LG M4210N-B21 | Owner's Manual (English) - Page 48
L L RS-232C Controlling the Multiple Product Transmission / Receiving Protocol 22. Tile ID Set (Command : d i) To assign the Tile ID for Tiling function. Transmission [d][i][][Set ID][][Data][x] * The data range is from 00 to 10 tile mode. (in Hex). Acknowledgement [i][][Set ID][][OK/NG][Data][x] - LG M4210N-B21 | Owner's Manual (English) - Page 49
Off'. 26. PC Control On/Off (Command : d t) It sets the synchronized power on/off between the built-in PC of the monitor and the monitor. Transmission [d][t][][Set ID][][Data][x] Data 0 : Off 1 : On Acknowledgement [t][][Set ID][][OK/NG][Data][x] 27. Input Selection (Command : b) (Main Picture Input - LG M4210N-B21 | Owner's Manual (English) - Page 50
RS-232C IR Codes L L L L How to connect Connect your wired remote control to Remote Control port on the Product. Remote Control IR Code Output waveform single pulse, modulated with 37.917KHz signal at 455KHz Tc Carrier frequency FCAR = 1/Tc = fosc/12 T1 Duty ratio = T1/Tc = 1/3 - LG M4210N-B21 | Owner's Manual (English) - Page 51
RS-232C IR Codes Code(Hexa) 00 01 02 03 08 C4 C5 09 0B 43 5B 44 10 11 12 13 14 15 16 17 18 19 D5 C6 79 77 AF L L Function L M VOL( ) VOL( ) POWER ON/OFF POWER ON POWER OFF MUTE INPUT MENU EXIT SET Number Key 0 Number Key 1 Number Key 2 Number Key 3 Number Key 4 Number Key 5 Number Key 6 Number - LG M4210N-B21 | Owner's Manual (English) - Page 52
P/NO : 3840TRL098E (0801-REV00)
-
 1
1 -
 2
2 -
 3
3 -
 4
4 -
 5
5 -
 6
6 -
 7
7 -
8
-
9
-
10
-
11
-
12
-
13
-
14
-
15
-
16
-
17
-
18
-
19
-
20
-
21
-
22
-
23
-
24
-
25
-
26
-
27
-
28
-
29
-
30
-
31
-
32
-
33
-
34
-
35
-
36
-
37
-
38
-
39
-
40
-
41
-
42
-
43
-
44
-
45
-
46
-
47
-
48
-
49
-
50
-
51
-
52
 |
 |

M
ake sure to read the
Important Precautions
before using the product.
Keep the User's Guide(CD) in an accessible place for furture reference.
S
ee the label attached on the product and give the information to your dealer when you ask
for service.
M4210N
User’s Guide
Warranty void if removed.
Important
WARRANTY VOID
IF REMOVED
3850TAZ209Y