LG VX9200 Owner's Manual - Page 40
To Online Album/ To Blog
 |
UPC - 652810814218
View all LG VX9200 manuals
Add to My Manuals
Save this manual to your list of manuals |
Page 40 highlights
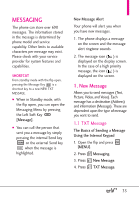
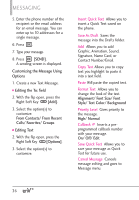
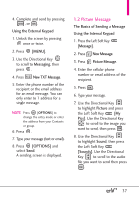
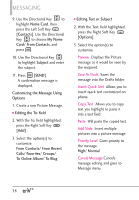
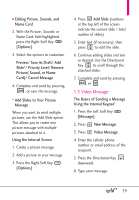
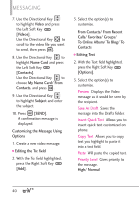
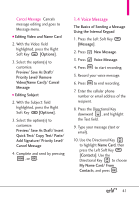
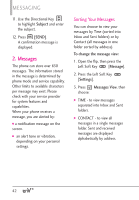
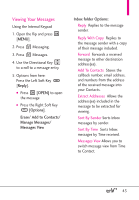
MESSAGING 9. Use the Directional Key to highlight Name Card, then press the Left Soft Key [Contacts]. Use the Directional Key to choose My Name Card/ From Contacts, and press . 10. Use the Directional Key to highlight Subject and enter the subject. 11. Press [SEND]. A confirmation message is displayed. Customizing the Message Using Options 1. Create a new Picture Message. ● Editing the To: field 2. With the To: field highlighted, press the Right Soft Key [Add] . 3. Select the option(s) to customize. From Contacts/ From Recent Calls/ Favorites/ Groups/ To Online Album/ To Blog ● Editing Text or Subject 2. With the Text: field highlighted, press the Right Soft Key [Options]. 3. Select the option(s) to customize. Preview Displays the Picture message as it would be seen by the recipient. Save As Draft Saves the message into the Drafts folder. Insert Quick Text Allows you to insert quick text customized on phone. Copy Text Allows you to copy text you highlight to paste it into a text field. Paste Will paste the copied text. Add Slide Insert multiple pictures into a picture message. Priority Level Gives priority to the message. High/ Normal Cancel Message Cancels message editing and goes to Message menu. 38
-
 1
1 -
2
-
3
-
4
-
5
-
6
-
7
-
8
-
9
-
10
-
11
-
12
-
13
-
14
-
15
-
16
-
17
-
18
-
19
-
20
-
21
-
22
-
23
-
24
-
25
-
26
-
27
-
28
-
29
-
30
-
31
-
32
-
33
-
34
-
 35
35 -
 36
36 -
 37
37 -
 38
38 -
 39
39 -
 40
40 -
 41
41 -
 42
42 -
 43
43 -
 44
44 -
 45
45 -
46
-
47
-
48
-
49
-
50
-
51
-
52
-
53
-
54
-
55
-
56
-
57
-
58
-
59
-
60
-
61
-
62
-
63
-
64
-
65
-
66
-
67
-
68
-
69
-
70
-
71
-
72
-
73
-
74
-
75
-
76
-
77
-
78
-
79
-
80
-
81
-
82
-
83
-
84
-
85
-
86
-
87
-
88
-
89
-
90
-
91
-
92
-
93
-
94
-
95
-
96
-
97
-
98
-
99
-
100
-
101
-
102
-
103
-
104
-
105
-
106
-
107
-
108
-
109
-
110
-
111
-
112
-
113
-
114
-
115
-
116
-
117
-
118
-
119
-
120
-
121
-
122
-
123
-
124
-
125
-
126
-
127
-
128
-
129
-
130
-
131
-
132
-
133
-
134
-
135
-
136
-
137
-
138
-
139
-
140
-
141
-
142
-
143
-
144
-
145
-
146
-
147
-
148
-
149
-
150
-
151
-
152
-
153
-
154
-
155
 |
 |