LG W2363D Owner's Manual
LG W2363D Manual
 |
View all LG W2363D manuals
Add to My Manuals
Save this manual to your list of manuals |
LG W2363D manual content summary:
- LG W2363D | Owner's Manual - Page 1
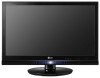
ENGLISH OWNER'S MANUAL LCD MONITOR Please read this manual carefully before operating your set and retain it for future reference. LCD MONITOR MODELS W2363D www.lg.com - LG W2363D | Owner's Manual - Page 2
this manual or listed on the display. If you are not sure what type of power supply you have in your home, consult with your dealer. Overloaded AC outlets and extension cords are dangerous. So are frayed power cords and broken plugs. They may result in a shock or fire hazard. Call your service - LG W2363D | Owner's Manual - Page 3
pool. Displays are provided with ventilation openings in the cabinet to allow the release of heat LCD panel. Leaving a fixed image on the screen for a long time may cause damage to the screen and cause image burn-in. Make sure to use a screen saver on the product. Burn-in and related problems - LG W2363D | Owner's Manual - Page 4
not wet) cloth. Do not use an aerosol directly on the display screen because over-spraying may cause electrical shock. When cleaning the , repack it in its original material. On Disposal (Only, Hg lamp used LCD Monitor) The fluorescent lamp used in this product contains a small amount of mercury. - LG W2363D | Owner's Manual - Page 5
items are included with your monitor. If any items are missing, contact your dealer. OWNER'S MANUAL/Cards Power Cord (Depending on 3D (3 Dimensional) imagery 1. NVIDIA® GeForce® 3D Vision kit(Purchase Separately). 2. Compatible NVIDIA GPU(Purchase Separately) For a complete list of supported - LG W2363D | Owner's Manual - Page 6
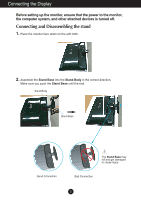
Connecting the Display Before setting up the monitor, ensure that the power to the monitor, the computer system, and other attached devices is turned off. Connecting and Disassembling the stand 1. Place the monitor face down on the soft cloth. 2. Assemble the Stand Base into the Stand Body in the - LG W2363D | Owner's Manual - Page 7
Connecting the Display 3. Turn the screw to the right to fix the Stand Body to the Stand Base. Screw Turn the screw by using the screw handle. 4. Then fold the screw handle flat. 5. Once assembled take the monitor up carefully and face the front side. 6. To disconnect the Stand Base from the - LG W2363D | Owner's Manual - Page 8
Connecting the Display Before setting up the monitor, ensure that the power to the monitor, the computer system, and other attached devices is turned off. Positioning your display After installation, adjust the angle as shown below. 1. Adjust the position of the panel in various ways for maximum - LG W2363D | Owner's Manual - Page 9
rear view represents a general model; your display may differ from the view as shown. Varies according to model Wall-outlet type DVI-D AV equipment (Set-Top Box, DVD,Video, Video Game Console) * HDMI is optimized on the AV equipment. * Not supported PC. Headphone/Earphone output PC Speaker Out - LG W2363D | Owner's Manual - Page 10
is connected, it is automatically detected. MENU Button Use this button to enter or exit the On Screen Display. OSD LOCKED/UNLOCKED This function allows you to lock the current control settings, so that they cannot be inadvertently changed. Press and hold the MENU button for several seconds. The - LG W2363D | Owner's Manual - Page 11
Control Panel Functions Buttons Use these buttons to select or adjust functions in the On Screen Display. SET Button Use this button to enter a selection in the On Screen Display. TRU-LIGHT Button You can select GAME, MOVIE or MUSIC by using this button and the LED light shape will change - LG W2363D | Owner's Manual - Page 12
can make using the OSD. To make adjustments in the On Screen Display, follow these steps: Pops up the menu screen Move where you icon you want becomes highlighted, press the SET Button. 3 Use the / Buttons to adjust the image to the desired level. Use the SET Button to select other sub-menu items - LG W2363D | Owner's Manual - Page 13
The following table indicates all the On Screen Display control, adjustment, and setting menus. 3D mode : 3D mode output DVI-D : DVI-D(Digital signal) input HDMI : HDMI input Main menu Sub-menu Supported input Description G-MODE THRU MODE DVI-D HDMI Use Frame-Buffer to prevent picture delay - LG W2363D | Owner's Manual - Page 14
*What is frame buffer memory? This is the function to provide the optimized display by saving the video in frame units before being displayed on the screen. When operating 3D screen, THRU MODE function is inactivated. It is not supported in 1080i input signal. G-MODE SRS TRUSURROUND HD ON SRS ON - LG W2363D | Owner's Manual - Page 15
displayed depends on Input resolution.No Scaling. If 640 x 480 resolution input, the picture will just display 640 x 480 size even though the 1920 x 1080 size panel. ORIGINAL The picture will be displayed When set to ON, this adjusts the screen brightness automatically to the display data - LG W2363D | Owner's Manual - Page 16
Button, then the main menu of the OSD appears. Main Menu Menu Name MENU SET : Exit : Adjust (Decrease/Increase) : Enter : Select another sub-menu : Restart to select sub-menu Button Tip Icons Sub-menus NOTE OSD (On Screen Display) menu languages on the monitor may differ from the manual. 15 - LG W2363D | Owner's Manual - Page 17
HDMI input BRIGHTNESS To adjust the brightness of the screen. CONTRAST To adjust the contrast of the screen. GAMMA Set your own gamma value: -50 / 0 / 50 On the monitor, high gamma values display whitish images and low gamma values display blackish images. BLACK LEVEL You can set the off set - LG W2363D | Owner's Manual - Page 18
On Screen Display(OSD) Selection and Adjustment Main menu Sub menu Description COLOR DVI-D input HDMI input PRESET • sRGB: Set the screen color to fit the sRGB standard color specification. • 6500K: Slightly reddish white. • 9300K: Slightly bluish white. RED GREEN BLUE Set your own red - LG W2363D | Owner's Manual - Page 19
On Screen Display(OSD) Selection and Adjustment Main menu Sub menu Description TRACKING DVI-D, HDMI input SHARPNESS To adjust the clearness of the screen. MENU : Exit : Decrease : Increase SET : Select another sub-menu 18 - LG W2363D | Owner's Manual - Page 20
are displayed. HDMI input VOLUME To adjust the volume of headphone/Earphone. OVERSCAN Removes noise that may occur at the edges of an image when HDMI is of noise. (Only for HDMI input) R T C If you set ON, you enable the Response Time Control function. If you set OFF, you disable the Response - LG W2363D | Owner's Manual - Page 21
Troubleshooting Check the following before calling for service. No image appears G Is the power cord of the • Check and see if the power cord is connected display ? frequency range of the display. See the 'Specifications' section of this manual and configure your display again. G Do you - LG W2363D | Owner's Manual - Page 22
monitor found" message? G Have you installed the display driver? • Be sure to install the display driver from the display driver CD (or diskette) that comes with your display. Or, you can also download the driver from our web site: http://www.lg.com. • Make sure to check if the video card supports - LG W2363D | Owner's Manual - Page 23
Weight 58.4 cm (23.0 inch) Flat Panel Active matrix-TFT LCD Anti-Glare coating Visible diagonal size: 58.4 cm 0.266 mm x 0.266 mm (Pixel Pitch) Horizontal Freq. Vertical Freq. Input Form Digital: 30 kHz to 141 kHz HDMI: 30 kHz to 83 kHz Digital: 56 Hz to 120 Hz HDMI: 56 Hz to 61 Hz Digital (HDCP - LG W2363D | Owner's Manual - Page 24
INPUT Display Modes **17 1920 x 1080 HDMI Vedio INPUT Display Modes (Resolution) 1 480P Hz) 70 70 60 75 60 75 60 75 75 60 75 60 60 60 100 110 120 *Recommend Mode **3D Mode output Horizontal Freq. (kHz) 31.50 31.25 37.50 45.00 28.12 33.75 56.25 67.50 Vertical Freq. (Hz - LG W2363D | Owner's Manual - Page 25
Installing the Wall mount plate This monitor satisfies the specifications of the Wall mount plate or the interchange device. 1. Place the monitor face down on the soft cloth. 2. To disconnect the Stand Base from the Stand Body, unfold the screw handle and turn it to the left. 3. - LG W2363D | Owner's Manual - Page 26
type and is connectable with Wall mount plate. Please refer to the installation guide for more details, which is provided when Wall mount plate is purchased. Please use VESA standard as below. * 784.8 mm and under (30.9 inch) - Wall Mount Pad Thickness : 2.6 mm - Screw : 4.0 mm x Pitch 0.7 - LG W2363D | Owner's Manual - Page 27
Make sure to read the Important Precautions before using the product. Keep the User's Guide(CD) in an accessible place for furture reference. The model and serial number of the SET is located on the back and one side of the SET. Record it below should you ever need service. MODEL SERIAL
-
 1
1 -
 2
2 -
 3
3 -
 4
4 -
 5
5 -
 6
6 -
 7
7 -
8
-
9
-
10
-
11
-
12
-
13
-
14
-
15
-
16
-
17
-
18
-
19
-
20
-
21
-
22
-
23
-
24
-
25
-
26
-
27
 |
 |

www.lg.com
OWNER’S MANUAL
LCD MONITOR
LCD MONITOR MODELS
W2363D
Please read this manual carefully before operating your set and
retain it for future reference.
ENGLISH