LG WM1812CW Owners Manual
LG WM1812CW Manual
 |
View all LG WM1812CW manuals
Add to My Manuals
Save this manual to your list of manuals |
LG WM1812CW manual content summary:
- LG WM1812CW | Owners Manual - Page 1
WM1815CS - LG WM1812CW | Owners Manual - Page 2
to change the settings during operation. CONTENTS Important Safety Information ...3 Specifications...4 Installation Instructions ...5 Preparation Before Washing...10 Using the Dispenser ...11 Cycles ...13 How to Use the Washer...14 Maintenance ...16 Troubleshooting Guide ...19 Warranty ...22 2 - LG WM1812CW | Owners Manual - Page 3
door to prevent children from hiding inside. • Do not install or store the washer where it will be exposed to the weather. • Do not tamper with controls. • Do not repair or replace any part of the washer or attempt any servicing unless specifically recommended in the user-maintenance instructions - LG WM1812CW | Owners Manual - Page 4
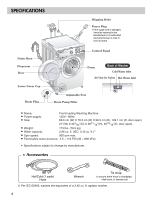
SPECIFICATIONS Name: Front-loading Washing Machine Power supply: 120V~ 60Hz Size: 68.6 cm (W) X 76.3 cm (D) X 98.3 cm (H), 129.1 cm (D, door open) 27"(W) X 301/32"(D) X 3811/16"(H), 5013/16"(D, door open) Weight: 173 lbs. (78.5 kg) Wash capacity: 2.96 cu. ft. (IEC: 3.42 cu. ft.)1) Spin - LG WM1812CW | Owners Manual - Page 5
to outside weather conditions. Properly ground washer to conform with all governing codes and ordinances. To reduce the risk of electric shock, do not install the washer in humid spaces. The base opening must not be obstructed by carpeting when the washing machine is installed on a carpeted floor - LG WM1812CW | Owners Manual - Page 6
on a platform or weakly supported structure. NOTE: A firm, solid floor is even more critical to a front-loading washer than to a top-loader. If your floor is wood and/or frame construction, you may need to reinforce it. Front-loaders use substantially faster spin speeds than top-loaders, causing - LG WM1812CW | Owners Manual - Page 7
reducing device should be installed. • Two Sealing washers are supplied with the water inlet hoses to prevent water leaks. • Check for leakage of washing machine connections by turning the tap completely on. • Periodically check the condition of the hose and replace the hose if necessary. • Make - LG WM1812CW | Owners Manual - Page 8
INSTRUCTIONS Installation of drain hose 63 41 60 78 41 40 • Place the end of the drain hose in the hole of the floor drain system. • The drain hose should not be placed higher than 96 in. from the bottom of the washer. • Properly securing the drain faucet if the machine is to be the door lock - LG WM1812CW | Owners Manual - Page 9
noise during the spin cycle, re-check the leveling of the washer, adjust the feet as required, and tighten the lock nuts securely to prevent changes in adjustment. Run the washer with a test load to make certain your washer is properly leveled. Put approximately 6 pounds of laundry in the machine - LG WM1812CW | Owners Manual - Page 10
will tell you about the fabric content of your garment and how it should be washed. 2. Sorting To get the best results, sort clothes into loads that can be washed with the same wash cycle. Different fabrics need to be washed in different ways. Always sort dark colors from pale colors and whites - LG WM1812CW | Owners Manual - Page 11
to the automatic dispenser following these steps: 1. Open the dispenser drawer. 2. Load the laundry products into the appropriate compartments. 3. drain into the washer drum as it is added. Liquid Chlorine Bleach Compartment Liquid Fabric Softener Compartment Prewash Compartment Main Wash - LG WM1812CW | Owners Manual - Page 12
directly on the wash load. • The fabric softener will be automatically dispensed during the last rinse cycle. NOTE: Do not place, store, or spill laundry products (soap, detergent, bleach, softener, etc.) on the top of your washer or dryer. These products can damage the finish or controls if left - LG WM1812CW | Owners Manual - Page 13
soil levels. Tap Cold/Cold Tap Cold/Cold Tap Cold/Cold Gentle Tap Cold/Cold Gentle Gentle Tap Cold/Cold 1) Automatic wash load (weight) detection: Automatically detects the load and optimizes the washing time. After detecting, the estimated time remaining in the cycle will be displayed. 13 - LG WM1812CW | Owners Manual - Page 14
preset Water Temperature, Spin Speed, Soil Level, and Option (See page 13). • The preset settings can be changed anytime before Start. NOTE: This front load washer requires longer cycle time and gets clothes much cleaner, yet is more gentle on the fabrics, than top load washers. Washing time can be - LG WM1812CW | Owners Manual - Page 15
shows: a) the estimated time remaining in the cycle when operating, b) the error code when an error has been detected. CHILD LOCK • Use this option to prevent unwanted use of the washer. Press and hold Option button for 3 seconds to lock/unlock control. • When Child lock is set, " " blinks and - LG WM1812CW | Owners Manual - Page 16
disable the door lock to prevent young children from being trapped inside. The water inlet filter • " " error message will blink on the control panel when running of your machine. CAUTION Drain, using the drain hose, before opening the pump filter to remove objects. Be careful when draining if the - LG WM1812CW | Owners Manual - Page 17
the illustrations in reverse order to replace the parts to their proper location. NOTE: Do not use any cleaning substance on the drawer opening other than water because it will drain into the tub. If this should happen, set the washer for a rinse and spin cycle to remove any cleaning substance from - LG WM1812CW | Owners Manual - Page 18
around the washer door opening, flexible gasket and door glass. These areas should always be clean to ensure a water-tight seal. Run washer through a complete cycle using hot water. Repeat process if necessary. NOTE: Remove hard water deposits using only cleaners labeled as safe for washing machines - LG WM1812CW | Owners Manual - Page 19
firmly on the ground? See Installation Instructions for removing shipping bolts. Stop washer and rearrange wash load. Adjust the leveling feet. Make sure all four feet are in firm contact with the floor, while the washer is in the spin cycle with load. Water leaks • Fill hose connection is loose - LG WM1812CW | Owners Manual - Page 20
circuit breaker or replace fuse. Do not increase fuse capacity. If problem is a circuit overload, have it corrected by a qualified electrician. • Water supply tap is not turned on. Turn on water supply tap. Washer won't spin • Check that the door is firmly shut. Close the door and press the - LG WM1812CW | Owners Manual - Page 21
to restart the spin cycle the machine will stop and the error code will be displayed. Add 1 or 2 similar items to help balance the load. Rearrange load to allow proper spinning. • Is the door opened or not completely closed? Close the door completely. If is not released, call for service. Unplug - LG WM1812CW | Owners Manual - Page 22
WARRANTY (24 hours a day, 365 days per year) 22 - LG WM1812CW | Owners Manual - Page 23
- LG WM1812CW | Owners Manual - Page 24
CARACTERÍSTICAS DEL PRODUCTO Sistema DD Invertidor. El avanzado motor de DC sin cepillo que mueve directamente el cilindro sin cinturón ni polea. Cilindro Inclinado y Abertura Extra Grande. El cilindro inclinado y la abertura extra grande, - LG WM1812CW | Owners Manual - Page 25
DE USARLA. ! ADVERTENCIA! Para su seguridad, la información en este manual debe ser seguida para minimizar el riesgo de incendio ó explosión, descarga el expuesta a la intemperie. • No estropee los controles. • No intente reparar ni reemplazar ninguna parte de la lavadora ni intente dar servicio a - LG WM1812CW | Owners Manual - Page 26
á dañado, debe ser reemplazado por el fabricante ó sus agentes de servicio, ó alguna persona calificada en orden a evitar cualquier riesgo. Panel de Control Cilindro Atrás de la Lavadora Entrada de Agua Fría Ventilación por Seguridad Entrada de Agua Caliente Patas Ajustables Filtro de Bomba de - LG WM1812CW | Owners Manual - Page 27
INSTRUCCIONES DE INSTALACIÓN Instale ó almacene en un lugar donde no esté expuesta a temperaturas inferiores a la congelación ni expuesta a la intemperie. Conecte a tierra correctamente y cumpliendo con todos los códigos y ordenanzas gubernamentales. Para reducir los riesgos de electrocución, no - LG WM1812CW | Owners Manual - Page 28
INSTRUCCIONES DE INSTALACIÓN Espacios Libres de instalación El lugar debe ser lo suficientemente grande para abrir en su totalidad la puerta de la lavadora. Dimensiones de la lavadora 30 1 32 76.3 [Vista lateral] ESPAÑOL 30 1 32 • La mayoría de las instalaciones requieren un mínimo de 10 cm. - LG WM1812CW | Owners Manual - Page 29
en habitaciones donde puedan darse temperaturas inferiores a la congelación. Una manguera congelada puede reventarse bajo presión. La fiabilidad de la unidad de control electrónica puede ser deteriorada a temperaturas por debajo del punto de congelación. Si el aparato es entregado en los meses de - LG WM1812CW | Owners Manual - Page 30
ESPAÑOL INSTRUCCIONES DE INSTALACIÓN Instalación de la Manguera de Desagüe Aprox. 63˝ Aprox. 41˝ Aprox. 60˝ Aprox. 78˝ Aprox. 41˝ Aprox. 40˝ • Ubique el extremo de la manguera de desagüe en el orificio del sistema de drenaje en el piso. Tina de ropa sucia max. 96" Soporte de manguera Plástico - LG WM1812CW | Owners Manual - Page 31
INSTRUCCIONES DE INSTALACIÓN Nivelar Alto Pie ajustable Tuerca de seguro Pie ajustable Bajo Pie ajustable • Nivelar correctamente la lavadora previene el ruido y las vibraciones excesivos. Instale el aparato sobre un piso sólido y parejo y preferentemente en una esquina de la habitación. • Si el - LG WM1812CW | Owners Manual - Page 32
, lea las Instrucciones Importantes de Seguridad antes de operar este aparato. 1. Etiquetas de Cuidado Busque etiquetas de cuidado en sus prendas. Esto le dirá sobre el contenido de las telas de su ropa y como debe ser lavada. 2. Clasificando Para obtener los mejores resultados, clasifique al - LG WM1812CW | Owners Manual - Page 33
USANDO EL DISTRIBUIDOR El distribuidor automático consiste de cuatro compartimentos que retienen 1) cloro líquido blanqueador, 2) suavizante de telas líquido, 3) detergente líquido ó en polvo para el prelavado y 4) detergente en polvo ó líquido y blanqueador seguro para los colores para el lavado - LG WM1812CW | Owners Manual - Page 34
áticamente durante el último ciclo de enjuague. NOTA: No coloque, guarde o derrame productos de lavado (jabón, detergente, blanqueador, suavizante, etc.) en la parte superior de su lavadora o secadora. Estos productos pueden dañar el terminado o los controles si se deja por mucho tiempo ahí. 33 - LG WM1812CW | Owners Manual - Page 35
/Fría Tibia/Tibia Medio No Giros Pesado Ligero O O O O Ligeramente Fría/Fría Gentil Lavado a Mano Artículos Etiquetados para lavado a mano (Hand Wash) Fría/Fría Tibia/Fría Tibia/Tibia Ligeramente Fría/Fría Gentil Bajo Medio No Giros Normal Ligero O O O 1) Detección (peso) de la - LG WM1812CW | Owners Manual - Page 36
este botón para iniciar y pausar la lavadora. 4. Temperatura de Lavado/Enjuague (Wash/Rinse) • Seleccione la temperatura del agua basándose en el tipo de 5. Velocidad de Giro (Spin Speed) • Para cambiar la velocidad de giro, presione el botón de Velocidad de Giro (Spin Speed) hasta configurar la - LG WM1812CW | Owners Manual - Page 37
Ciclo Rápido (Quick Cycle) • El Ciclo Rá 3. Enjuague+Giro (Rinse+Spin) • Use esta opción el botón de Terminado de Retraso (Delay Wash) una vez por una hora ó de b) El código de error cuando este ha sido para bloquear/ desbloquear el control. • Cuando esté puesto PUERTA ASEGURADA (DOOR LOCKED) • Se - LG WM1812CW | Owners Manual - Page 38
seguro de la puerta para evitar que algún niño pequeño quede atrapado dentro. El Filtro de Entrada de Agua. • El mensaje de error " "parpadeará en el panel de control cuando no entre agua al compartimiento de detergente. • Si su agua es muy dura ó contiene residuos de cal, el filtro de entrada de - LG WM1812CW | Owners Manual - Page 39
MANTENIMIENTO Limpiando el Distribuidor • El distribuidor puede necesitar que lo limpie periódicamente debido a los residuos de los aditivos de lavandería. 1 Jale el cajòn dispensador fuera hasta que termine. 2 Presione abajo la lengüeta de la cerradura en el relleno del blanqueo. Quite el cajón. - LG WM1812CW | Owners Manual - Page 40
ESPAÑOL MANTENIMIENTO Limpiando su Lavadora 1. Exterior El cuidado adecuado de su lavadora puede extender su vida. El exterior de la máquina puede ser limpiado con agua tibia y un detergente casero neutral, no-abrasivo. Limpie inmediatamente cualquier derrame. Limpie con un trapo húmedo. Trate de - LG WM1812CW | Owners Manual - Page 41
GUÍA PARA LA LOCALIZACIÓN DE PROBLEMAS Esta lavadora está equipada con funciones de seguridad automáticas que detectan y diagnostican fallas tempranamente y reaccionan apropiadamente. Cuando la máquina no funcione apropiadamente ó no funcione para nada, verifique los puntos siguientes antes de - LG WM1812CW | Owners Manual - Page 42
ESPAÑOL GUÍA PARA LA LOCALIZACIÓN DE PROBLEMAS Problema Posible Causa Solución La lavadora no enciende • El cable de suministro de energía puede no estar conectado ó está suelto. Asegúrese de que esté bien conectado. • El fusible de la casa puede estar fundido, ó se botó el interruptor de - LG WM1812CW | Owners Manual - Page 43
persiste llame a Servicio. Desconecte el suministro de energía y llame a Servicio. • El agua sobrellena hasta la válvula de falla de agua. • Hay una falla en el sensor de nivel de agua. Cierre la llave del agua. Desconecte la clavija de energía. Llame a servicio. • Sobrecarga en el - LG WM1812CW | Owners Manual - Page 44
PARTES (exceptuando la siguiente lista): 1 año desde la fecha de compra. Piezas para el panel de control electrónico: 2 años desde la fecha de compra. Piezas para el motor la exclusión mencionada en la parte de arriba puede que no aplique para usted. Esta garantía le da derechos legales específicos y - LG WM1812CW | Owners Manual - Page 45
P/ No.: 3828ER3025L
-
 1
1 -
 2
2 -
 3
3 -
 4
4 -
 5
5 -
 6
6 -
 7
7 -
8
-
9
-
10
-
11
-
12
-
13
-
14
-
15
-
16
-
17
-
18
-
19
-
20
-
21
-
22
-
23
-
24
-
25
-
26
-
27
-
28
-
29
-
30
-
31
-
32
-
33
-
34
-
35
-
36
-
37
-
38
-
39
-
40
-
41
-
42
-
43
-
44
-
45
 |
 |

WM1815CS