LG WM2801HRA Owner's Manual - Page 10
Flooring, Installations With Optional Pedestal Base Or Stacking Kit - instructions
 |
View all LG WM2801HRA manuals
Add to My Manuals
Save this manual to your list of manuals |
Page 10 highlights
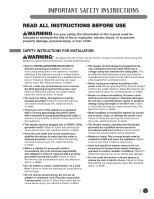
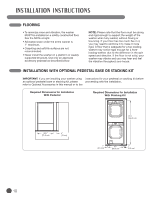
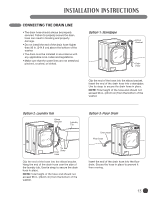
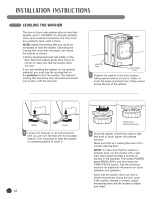
INSTALLATION INSTRUCTIONS FLOORINg • To minimize noise and vibration, the washer MUST be installed on a solidly constructed floor. See the NOTE at right. • Allowable slope under the entire washer is 1° maximum. • Carpeting and soft tile surfaces are not recommended. • Never install the washer on a platform or weakly supported structure. Use only an approved accessory pedestal as described below. NOTE: Please note that the floor must be strong and rigid enough to support the weight of the washer when fully loaded, without flexing or bouncing. If your floor has too much flex in it, you may need to reinforce it to make it more rigid. A floor that is adequate for a top-loading washer may not be rigid enough for a frontloading washer, due to the difference in the spin speed and direction. If the floor is not solid, your washer may vibrate and you may hear and feel the vibration throughout your house. INSTALLATIONS WITH OPTIONAL PEDESTAL BASE OR STACkINg kIT IMPORTANT: If you are installing your washer using instructions for your pedestal or stacking kit before an optional pedestal base or stacking kit, please proceeding with the installation. refer to Optional Accessories in this manual or to the Required Dimensions for Installation With Pedestal Required Dimensions for Installation With Stacking Kit 293⁄4" (75.6 cm) 4" (10 cm) 771⁄2" (196.8 cm) 1" (2.5 cm) 27" (68.6 cm) 1" (2.5 cm) 10
-
 1
1 -
2
-
3
-
4
-
 5
5 -
 6
6 -
 7
7 -
 8
8 -
 9
9 -
 10
10 -
 11
11 -
 12
12 -
 13
13 -
 14
14 -
 15
15 -
16
-
17
-
18
-
19
-
20
-
21
-
22
-
23
-
24
-
25
-
26
-
27
-
28
-
29
-
30
-
31
-
32
-
33
-
34
-
35
-
36
-
37
-
38
-
39
-
40
-
41
-
42
-
43
-
44
-
45
-
46
-
47
-
48
-
49
-
50
-
51
-
52
-
53
-
54
-
55
-
56
-
57
-
58
-
59
-
60
-
61
-
62
-
63
-
64
-
65
-
66
-
67
-
68
-
69
-
70
-
71
-
72
-
73
-
74
-
75
-
76
-
77
-
78
-
79
-
80
-
81
-
82
-
83
-
84
-
85
-
86
-
87
-
88
-
89
-
90
-
91
-
92
-
93
-
94
-
95
-
96
-
97
-
98
-
99
-
100
-
101
-
102
-
103
-
104
-
105
-
106
-
107
-
108
-
109
-
110
-
111
-
112
-
113
-
114
-
115
-
116
 |
 |
