Lenovo B560 Lenovo B560 User Guide V1.0
Lenovo B560 Manual
 |
View all Lenovo B560 manuals
Add to My Manuals
Save this manual to your list of manuals |
Lenovo B560 manual content summary:
- Lenovo B560 | Lenovo B560 User Guide V1.0 - Page 1
Lenovo B560 User Guide V1.0 Read the safety notices and important tips in the included manuals before using your computer. - Lenovo B560 | Lenovo B560 User Guide V1.0 - Page 2
to read it before usingwireless devices on your computer. • To refer to it, go to http://www.lenovo.com, click Support, and then click User's guides and manuals. First Edition (May 2010) © Copyright Lenovo 2010. LENOVO products, data, computer software, and services have been developed exclusively - Lenovo B560 | Lenovo B560 User Guide V1.0 - Page 3
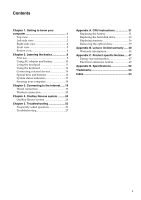
24 OneKey Rescue system 24 Chapter 5. Troubleshooting 25 Frequently asked questions 25 Troubleshooting 27 Appendix A. CRU instructions 31 Replacing the battery 31 Replacing the hard disk drive 32 Replacing memory 36 Removing the optical drive 39 Appendix B. Lenovo limited warranty ..... 40 - Lenovo B560 | Lenovo B560 User Guide V1.0 - Page 4
- Lenovo B560 | Lenovo B560 User Guide V1.0 - Page 5
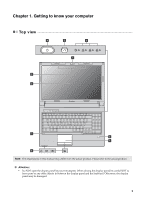
your computer Top view d e f a b c g h i f Note: The illustrations in this manual may differ from the actual product. Please refer to the actual product. Attention: • Do NOT open the display panel beyond 130 degrees. When closing the display panel, be careful NOT to leave pens or any other - Lenovo B560 | Lenovo B560 User Guide V1.0 - Page 6
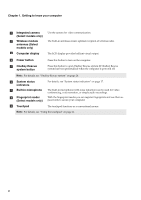
(Select models only) c Computer display Use the camera for video communication. The built-in antennas ensure optimal reception of wireless radio. The LCD display provides brilliant visual output. d Power button Press this button to turn on the computer. e OneKey Rescue system button Press - Lenovo B560 | Lenovo B560 User Guide V1.0 - Page 7
connection" on page 19. d VGA port Connects to external display devices. e HDMI port (Select models only) f USB port or eSATA/ USB combo port (Select models only) Connects to devices with HDMI input such as a TV or a display. Connects to eSATA or USB devices. Note: For details, see "Connecting - Lenovo B560 | Lenovo B560 User Guide V1.0 - Page 8
drive Reads/Burns optical disks. e Kensington slot Attach a security lock (not supplied) here. Note: For details, see "Attaching a security lock (not supplied)" on page 18. f AC power adapter jack Connect the AC adapter here. Note: For details, see "Using AC adapter and battery" on page 10 - Lenovo B560 | Lenovo B560 User Guide V1.0 - Page 9
Front view a b a Integrated wireless device switch (Select models only) b Memory card slot Use this switch to turn on/off the wireless radio of all wireless devices on your computer. Insert memory cards (not supplied) here. Note: For details, see "Using memory cards (not supplied)" on page 14 - Lenovo B560 | Lenovo B560 User Guide V1.0 - Page 10
, see "Using AC adapter and battery" on page 10. c Battery latch - spring loaded d Speakers The spring-loaded battery latch keeps the battery pack secured in place. The stereo speakers provide rich and powerful sound. e Hard disk drive (HDD) / Memory / Mini PCI Express Card slot compartment 6 - Lenovo B560 | Lenovo B560 User Guide V1.0 - Page 11
Getting to know your computer f SIM card slot (Select models only) Insert a SIM card (not supplied) for using Mobile Broadband. Note: • In order to be able to insert a SIM card into this slot, you must first disconnect the AC adapter and remove the battery pack. • For details, see "Using Mobile - Lenovo B560 | Lenovo B560 User Guide V1.0 - Page 12
outlet 1 Connect the power cord to the AC adapter. 2 Connect the AC adapter to the AC power adapter jack of the computer firmly. 3 Plug the power cord into an electrical outlet. „ Turning on the computer Press the power button to turn on the computer. „ Configuring the operating system You may need - Lenovo B560 | Lenovo B560 User Guide V1.0 - Page 13
select Sleep from the Start menu. • Press Fn + F1. Note: Wait until the power indicator light starts blinking (indicating that the disk is spinning can damage the hard disk, causing loss of data. To wake the computer, do one of the following. • Press the power button. • Press any key on the keyboard - Lenovo B560 | Lenovo B560 User Guide V1.0 - Page 14
example, how often you access the hard disk drive and how bright you make the computer display. „ Charging the battery When you find that the battery power is low, you need to charge the battery or replace it with a fully charged one. You need to charge the battery in any of the following situations - Lenovo B560 | Lenovo B560 User Guide V1.0 - Page 15
Chapter 2. Learning the basics Using the touchpad a bc a Touchpad b Left click button c Right click button To move the cursor on the screen, slide your fingertip over the pad in the direction in which you want the cursor to move. The function corresponds to that of the left - Lenovo B560 | Lenovo B560 User Guide V1.0 - Page 16
keypad The keyboard has a separate numeric keypad. To enable or disable the numeric keypad, press the Num Lock key. Note: The Num lock indicator will light on if the numeric keypad is enabled. „ Function key combinations Through the use of the function keys, you can change operational features - Lenovo B560 | Lenovo B560 User Guide V1.0 - Page 17
the display device switch to select this notebook or an external display. Fn + F4: Open the interface for display resolution settings. Fn + F5: Open the interface for integrated wireless devices settings (on/off). Fn + F8: Enable/Disable the touchpad. Fn + F9: Start/Pause playback of Windows - Lenovo B560 | Lenovo B560 User Guide V1.0 - Page 18
types of memory cards: • Secure Digital (SD) card • MultiMediaCard (MMC) • Memory Stick (MS) • Secure Digital PRO (SD PRO) Notes: • Insert ONLY one card in the slot at a time. • This card reader does not support SDIO devices (e.g., SDIO Bluetooth, etc.). Inserting a memory card 1 Push the dummy card - Lenovo B560 | Lenovo B560 User Guide V1.0 - Page 19
Chapter 2. Learning the basics „ Connecting a Bluetooth device (Select models only) If your computer has an integrated Bluetooth adapter card, it can connect to and transfer data wirelessly to other Bluetooth enabled devices, such as notebook computers, PDAs and cell phones. You can transfer data - Lenovo B560 | Lenovo B560 User Guide V1.0 - Page 20
keys and buttons „ OneKey Rescue system button • When the computer is powered-off, press this button to enter the OneKey Rescue system if Lenovo OneKey Rescue system has been preinstalled. • In Windows operating system, press this button to start Lenovo OneKey Recovery. Note: For details, see - Lenovo B560 | Lenovo B560 User Guide V1.0 - Page 21
Chapter 2. Learning the basics System status indicators These indicators inform you of the computer status. a bcd efg h a Hard disk drive indicator b Num lock indicator c Caps lock indicator d Scroll lock indicator e Power status indicator f Battery status indicator g Wireless communication - Lenovo B560 | Lenovo B560 User Guide V1.0 - Page 22
To enter BIOS setup utility, press F2 when the Lenovo logo appears on the screen while the computer is starting up. „ Fingerprint reader (Select models only) With the fingerprint reader, in addition to registering fingerprint information and using it as a password for Windows operating system or Web - Lenovo B560 | Lenovo B560 User Guide V1.0 - Page 23
: connect without wiring. Wired connection Wired connections are a reliable and safe way to connect the computer to the Internet. Cable Cable Internet services use a cable modem connected to the residential cable TV line. DSL DSL is a family of related technologies that bring high-speed - Lenovo B560 | Lenovo B560 User Guide V1.0 - Page 24
access to computers, cell phones and other devices over a large geographic area. Mobile networks are used for data transmission, and access is usually provided by a mobile network operator. A Mobile Broadband SIM card is necessary for the connection. Note: Your computer may not support all wireless - Lenovo B560 | Lenovo B560 User Guide V1.0 - Page 25
. For instructions on inserting the SIM card, refer to "Inserting the SIM card" on page 22. Notes: • Various standards are in use by mobile operators to provide Mobile Broadband services. The Lenovo Mobile Broadband module may support one or more of the following standards: ƒ GSM (Global System for - Lenovo B560 | Lenovo B560 User Guide V1.0 - Page 26
Connecting to the Internet Inserting the SIM card To insert the SIM card: 1 Turn off the computer; then disconnect the AC adapter and all cables from the computer. 2 Close the computer display and turn it over. 3 Remove the battery. 4 Insert the SIM card in the card slot until it clicks into place - Lenovo B560 | Lenovo B560 User Guide V1.0 - Page 27
Chapter 3. Connecting to the Internet Removing the SIM card To remove the SIM card: 1 Turn off the computer, then disconnect the AC adapter and all cables from the computer. 2 Close the computer display and turn it over. 3 Remove the battery. 4 Push the SIM card in until you hear a click, and then - Lenovo B560 | Lenovo B560 User Guide V1.0 - Page 28
desktop to launch Lenovo OneKey Recovery. Within the program, you can back up the system partition on the hard disk drive, other storage devices, or by creating recovery discs. Notes: • The backup process and creation of recovery discs may take some time, connect the AC adapter and battery pack to - Lenovo B560 | Lenovo B560 User Guide V1.0 - Page 29
find the detailed specifications for my computer? See http://consumersupport.lenovo.com. I need to upgrade a device or I need to replace one of the following: the hard disk drive, memory, or the keyboard. See "Appendix A. CRU instructions" on page 31 of this guide. Where are the recovery discs? Your - Lenovo B560 | Lenovo B560 User Guide V1.0 - Page 30
Chapter 5. Troubleshooting When do I need to restore the system to the factory status? You can use this feature when your system fails or you need to re-install your operating system. This will restore your computer back to the initial status when you first booted up your computer after receiving it - Lenovo B560 | Lenovo B560 User Guide V1.0 - Page 31
the more comprehensive information in Chapter 2. Display problems When I turn on the computer, nothing appears on the screen. • If the screen is blank, make sure that: - The battery is installed correctly. - The AC adapter is connected to the computer and the power cord is plugged into a working - Lenovo B560 | Lenovo B560 User Guide V1.0 - Page 32
." - Press Fn+F2 to confirm whether the LCD screen has been turned off. • Make sure that: - The display device driver is installed correctly. - The screen resolution and color quality are correctly set. - The monitor type is correct. • Did you install the operating system or application program - Lenovo B560 | Lenovo B560 User Guide V1.0 - Page 33
Rescue system problems Backup cannot be made. • You are not currently using a Windows operating system. • There is not enough space to store the backed up data. You will need to free more hard disk space on your system partition (C drive). Fail to restore system partition to factory default - Lenovo B560 | Lenovo B560 User Guide V1.0 - Page 34
high power consumption external devices such as an external USB optical disk drive, use external device power adapter. Otherwise, the device may not be recognized, or system shut down may result. For more technical support, please visit consumer product website http://consumersupport.lenovo.com - Lenovo B560 | Lenovo B560 User Guide V1.0 - Page 35
by Lenovo. Any other battery could ignite or explode. To replace the battery, do the following: 1 Turn off the computer, or enter hibernation mode. Disconnect the AC adapter and all cables from the computer. 2 Close the computer display, and turn the computer over. 3 Unlock the manual battery latch - Lenovo B560 | Lenovo B560 User Guide V1.0 - Page 36
with one of greater capacity. You can purchase a new hard disk drive from your reseller or Lenovo marketing representative. Notes: • Replace the hard disk drive only if you upgrade it or have it repaired. The connectors and bay of the hard disk drive were not designed for frequent changes, or drive - Lenovo B560 | Lenovo B560 User Guide V1.0 - Page 37
A. CRU instructions To replace the hard disk drive, do the following: 1 Turn off the computer; then disconnect the AC adapter and all cables from the computer. 2 Close the computer display, and then turn the computer over. 3 Remove the battery pack. 4 Remove the Hard disk drive (HDD)/Memory/Mini PCI - Lenovo B560 | Lenovo B560 User Guide V1.0 - Page 38
Appendix A. CRU instructions 5 Remove the frame fixing screw c . c 6 Pull the tab in the direction shown by arrow d . d 34 - Lenovo B560 | Lenovo B560 User Guide V1.0 - Page 39
hard disk drive bay with the tab facing upwards and the connectors facing each other; then push it firmly into space. A Reinstall the frame fixing screw. B Reinstall the compartment cover and tighten the screws. C Reinstall the battery pack. D Turn the computer over again. Connect the AC adapter and - Lenovo B560 | Lenovo B560 User Guide V1.0 - Page 40
off the computer. Disconnect the AC adapter and all cables from the computer. 3 Close the computer display, and turn the computer over. 4 Remove the battery pack. 5 Remove the Hard disk drive (HDD)/Memory/Mini PCI Express Card slot compartment cover. a. Loosen the screws that secure the compartment - Lenovo B560 | Lenovo B560 User Guide V1.0 - Page 41
Appendix A. CRU instructions 6 If two DDR3 SDRAMs are already installed in the memory slot, remove one of them to b a 9 Reinstall the compartment cover and tighten the screws. 0 Reinstall the battery pack. A Turn the computer over again. Connect the AC adapter and the cables to the computer again. 37 - Lenovo B560 | Lenovo B560 User Guide V1.0 - Page 42
you are servicing, the card must be installed in SLOT-0 ( : lower slot), but not in SLOT-1 ( : upper slot). To make sure that the DDR3 SDRAM is installed correctly, do as follows: 1 Turn the computer on. 2 Hold F2 during startup. The BIOS setup utility screen opens. The System Memory item shows - Lenovo B560 | Lenovo B560 User Guide V1.0 - Page 43
The following table provides a list of CRUs (Customer Replaceable Units) for your computer, and informs you of where to find replacement instructions. AC adapter Power cord for AC adapter Battery Bottom access doors Hard disk drive Memory Optical drive Setup Poster O O O User Guide O O O O O 39 - Lenovo B560 | Lenovo B560 User Guide V1.0 - Page 44
at www.lenovo.com/support/phone. Warranty service may not be available in all locations and may differ from location to location. Charges may apply outside a Service Provider's normal service area. Contact a local Service Provider for location-specific information. „ What your service provider will - Lenovo B560 | Lenovo B560 User Guide V1.0 - Page 45
unable to either repair or replace your product, your sole remedy is to return the product to your place of purchase or to Lenovo for a refund of your purchase price. „ Replacement of a product or part When the warranty service involves the replacement of a product or part, the replaced product or - Lenovo B560 | Lenovo B560 User Guide V1.0 - Page 46
, power surges, or improper maintenance by you; • damage caused by a non-authorized service provider; • failure of, or damage caused by, any third party products, including those that Lenovo may provide or integrate into the Lenovo product at your request; and • any technical or other support - Lenovo B560 | Lenovo B560 User Guide V1.0 - Page 47
India shall be held in accordance with the laws of India THIS WARRANTY GIVES YOU SPECIFIC LEGAL RIGHTS AND YOU MAY Lenovo at the following address: EMEA Service Organisation, Lenovo (International) B.V., Floor 2, Einsteinova 21, 851 01, Bratislava, Slovakia. Service under this warranty for Lenovo - Lenovo B560 | Lenovo B560 User Guide V1.0 - Page 48
warranty for power adapters, keyboards, plastics and hinges. If required, your Service Provider will provide repair or exchange service depending on the type of warranty service specified for your product and the available service. Scheduling of service will depend upon the time of your call, parts - Lenovo B560 | Lenovo B560 User Guide V1.0 - Page 49
B. Lenovo limited warranty „ Types of warranty service 1 Customer Replaceable Unit ("CRU") Service Under CRU Service, your Service Provider will ship CRUs to you for installation by you. CRU information and replacement instructions are shipped with your product and are available from Lenovo at - Lenovo B560 | Lenovo B560 User Guide V1.0 - Page 50
must pack the failed product in the shipping carton used to ship the replacement product and return it to Lenovo. Transportation charges, both ways, are paid by Lenovo. Failure to use the carton in which the replacement product was received may result in your responsibility for damage to the failed - Lenovo B560 | Lenovo B560 User Guide V1.0 - Page 51
designation. Lenovo computers of the following machine types, if the ENERGY STAR mark is affixed, have been designed and tested to conform to the ENERGY STAR 5.0 program requirements for computers. • 20068, 4330 By using ENERGY STAR compliant products and taking advantage of the power-management - Lenovo B560 | Lenovo B560 User Guide V1.0 - Page 52
to sleep: After 25 minutes • Advanced power settings: - Turn off hard disks: After 20 minutes - Hibernate: After 1 hour To awaken your computer from a Sleep mode, press any key on your keyboard. For more information about these settings, refer to your Windows Help and Support information system. 48 - Lenovo B560 | Lenovo B560 User Guide V1.0 - Page 53
Product specific Notices Electronic emissions notices The following information refers to Lenovo B560, machine type 20068, 4330. „ Federal Communications Commission (FCC) Statement This equipment has been tested and found to comply with the limits for a Class B digital device, pursuant to Part 15 - Lenovo B560 | Lenovo B560 User Guide V1.0 - Page 54
Appendix C. Product specific Notices „ Industry Canada Class B Emission Compliance Statement This Class B führen. Verantwortlich für die Konformitätserklärung nach Paragraf 5 des EMVG ist die Lenovo (Deutschland) GmbH, Gropiusplatz 10, D-70563 Stuttgart. Informationen in Hinsicht EMVG Paragraf 4 - Lenovo B560 | Lenovo B560 User Guide V1.0 - Page 55
specific Member States relating to electromagnetic compatibility. Lenovo cannot accept responsibility for any failure product, including the installation of option cards from other manufacturers. This product has against interference with licensed communication devices. Properly shielded and grounded - Lenovo B560 | Lenovo B560 User Guide V1.0 - Page 56
Model Name: B560 Machine Type 20068 / 4330 Note: The following specifications may contain technical inaccuracies or typographical errors. Lenovo reserves the right to improve and/or change specifications at any time without notice. Form Factor Size Weight System CPU Memory LCD HDD Keyboard - Lenovo B560 | Lenovo B560 User Guide V1.0 - Page 57
or registered trademarks of Lenovo in the United States, other countries, or both. Lenovo OneKey Microsoft and Windows are trademarks of Microsoft Corporation in the United States, other countries, or both. Other company, products, or service names may be trademarks or service marks of others. 53 - Lenovo B560 | Lenovo B560 User Guide V1.0 - Page 58
Rescue system button 24 P Password Problems 27 Using 18 Problems Battery 29 Computer screen 28 Display 27 Hard disk drive 29 Hibernation model 28 Password 27 Sleep model 28 Sound 28 Startup 29 S Security 18 SIM card 22 T Touchpad 11 Trademarks 53 Troubleshooting 27 U USB port 3, 14 - Lenovo B560 | Lenovo B560 User Guide V1.0 - Page 59
THE STORE. For technical assistance, contact a Lenovo support specialist 24 hours a day by calling toll free 1-877-4 LENOVO (1-877-453-6686). Additionally, you can find support information and updates on the Lenovo Web site located at http://consumersupport.lenovo.com. * Only for the users from the - Lenovo B560 | Lenovo B560 User Guide V1.0 - Page 60
©Lenovo China 2010 New World. New Thinking.TM www.lenovo.com P/N: 147003455 Printed in China
-
 1
1 -
 2
2 -
 3
3 -
 4
4 -
 5
5 -
 6
6 -
 7
7 -
8
-
9
-
10
-
11
-
12
-
13
-
14
-
15
-
16
-
17
-
18
-
19
-
20
-
21
-
22
-
23
-
24
-
25
-
26
-
27
-
28
-
29
-
30
-
31
-
32
-
33
-
34
-
35
-
36
-
37
-
38
-
39
-
40
-
41
-
42
-
43
-
44
-
45
-
46
-
47
-
48
-
49
-
50
-
51
-
52
-
53
-
54
-
55
-
56
-
57
-
58
-
59
-
60
 |
 |

Read the safety notices and important tips in the
included manuals before using your computer.
Lenovo B560
User Guide
V1.0