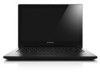
Lenovo G400s Touch User Guide - Lenovo G400s, G400s Touch, G500s, G500s Touch,
Lenovo G400s Touch Manual
 |
View all Lenovo G400s Touch manuals
Add to My Manuals
Save this manual to your list of manuals |
Lenovo G400s Touch manual content summary:
- Lenovo G400s Touch | User Guide - Lenovo G400s, G400s Touch, G500s, G500s Touch, - Page 1
Lenovo G400s/G405s/G400s Touch G500s/G505s/G500s Touch User Guide Read the safety notices and important tips in the included manuals before using your computer. - Lenovo G400s Touch | User Guide - Lenovo G400s, G400s Touch, G500s, G500s Touch, - Page 2
. Regulatory Notice • For details, refer to Guides & Manuals at http://support.lenovo.com. Second Edition (August 2013) © Copyright Lenovo 2013. LIMITED AND RESTRICTED RIGHTS NOTICE: If data or software is delivered pursuant a General Services Administration "GSA" contract, use, reproduction, or - Lenovo G400s Touch | User Guide - Lenovo G400s, G400s Touch, G500s, G500s Touch, - Page 3
Touch screen operation (on select models 22 Connecting to a wireless network 25 Help and support ...26 Chapter 3. Lenovo OneKey Recovery system 27 Chapter 4. Troubleshooting 29 Frequently asked questions 29 Troubleshooting ...32 Appendix. CRU instructions 37 Replacing the battery 37 Replacing - Lenovo G400s Touch | User Guide - Lenovo G400s, G400s Touch, G500s, G500s Touch, - Page 4
- Lenovo G400s Touch | User Guide - Lenovo G400s, G400s Touch, G500s, G500s Touch, - Page 5
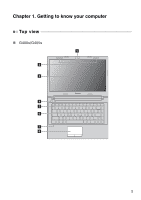
Chapter 1. Getting to know your computer Top view „ G400s/G405s a b c d e f g h 1 - Lenovo G400s Touch | User Guide - Lenovo G400s, G400s Touch, G500s, G500s Touch, - Page 6
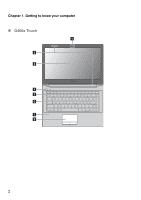
Chapter 1. Getting to know your computer „ G400s Touch a b c d e f g h 2 - Lenovo G400s Touch | User Guide - Lenovo G400s, G400s Touch, G500s, G500s Touch, - Page 7
„ G500s/G505s b c d e f g h Chapter 1. Getting to know your computer a i 3 - Lenovo G400s Touch | User Guide - Lenovo G400s, G400s Touch, G500s, G500s Touch, - Page 8
Chapter 1. Getting to know your computer „ G500s Touch a b c d e f i g h Note: The dashed areas indicate internal parts. Attention: • Do not open the display panel beyond 120 degrees. When closing the display panel, be careful not - Lenovo G400s Touch | User Guide - Lenovo G400s, G400s Touch, G500s, G500s Touch, - Page 9
Caps lock indicator Num lock indicator (G500s/G505s/G500s Touch only) Captures sound which can be used for video conferencing, voice narration, or audio recording. The touchpad functions as a conventional mouse. Touchpad To move the cursor on the screen, slide your fingertip over the pad in the - Lenovo G400s Touch | User Guide - Lenovo G400s, G400s Touch, G500s, G500s Touch, - Page 10
Your computer has number keys and function keys and may also have a numeric keypad (G500s/G505s/G500s Touch only) incorporated into its standard keyboard. Numeric keypad G500s/G505s/G500s Touch The keyboard has a separate numeric keypad. To enable or disable the numeric keypad, press the Num Lock - Lenovo G400s Touch | User Guide - Lenovo G400s, G400s Touch, G500s, G500s Touch, - Page 11
the appropriate function keys. G400s/G405s/G400s Touch : Mutes/unmutes the sound. : Decreases the volume level. : Increases the volume level. : Closes the currently active window. : Refreshes the desktop or the currently active window. : Enables/disables the touchpad. : Enables/disables - Lenovo G400s Touch | User Guide - Lenovo G400s, G400s Touch, G500s, G500s Touch, - Page 12
instantly. To use this function, press and hold Fn a ; then press one of the function keys b . G400s/G405s/G400s Touch a G500s/G505s/G500s Touch b b a The following describes the features of each function key. Fn + Home: Activate the pause function. Fn + End: Activate the break function. Fn - Lenovo G400s Touch | User Guide - Lenovo G400s, G400s Touch, G500s, G500s Touch, - Page 13
Ethernet network. e HDMI port f USB ports Connects to devices with HDMI input such as a TV or a display. Connect to USB devices. Notes: • The blue port supports USB 3.0. • For details, see "Connecting USB devices" on page - Lenovo G400s Touch | User Guide - Lenovo G400s, G400s Touch, G500s, G500s Touch, - Page 14
particular USB port on your computer, Windows automatically installs a driver for that device. After the driver is installed, you can disconnect and Hardware and Eject Media icon in the notification area of the Windows desktop screen to remove the device before disconnecting. Notes: • If your USB - Lenovo G400s Touch | User Guide - Lenovo G400s, G400s Touch, G500s, G500s Touch, - Page 15
PDAs and cell phones. You can transfer data between these devices up to 10 meters range in open space. Note: The actual maximum range may vary you do not need to use the Bluetooth function, turn it off to save battery power. • You need to pair the Bluetooth enabled device with your computer before - Lenovo G400s Touch | User Guide - Lenovo G400s, G400s Touch, G500s, G500s Touch, - Page 16
jack does not support conventional microphones. • The recording function may not be supported if third-party Note: For details, see "Connecting USB devices" on page 10. d Optical disc drive Reads/Burns optical discs. Note: Some instructions shipped with the security lock that you have purchased. 12 - Lenovo G400s Touch | User Guide - Lenovo G400s, G400s Touch, G500s, G500s Touch, - Page 17
and 20% charge. Fast blinking amber There is a problem with the battery or the battery connection. Slow blinking amber The battery is being charged. When battery charge reaches 20%, the blinking color changes to white. Slow blinking white The battery has between 20% and 80% charge and is still - Lenovo G400s Touch | User Guide - Lenovo G400s, G400s Touch, G500s, G500s Touch, - Page 18
memory card: • Secure Digital (SD) card • MultiMediaCard (MMC) Notes: • Insert only one card in the slot at a time. • This card reader does not support SDIO devices (e.g., SDIO Bluetooth, etc.). Inserting a memory card 1 Push the dummy card in until you hear a click. 2 Gently pull the dummy card out - Lenovo G400s Touch | User Guide - Lenovo G400s, G400s Touch, G500s, G500s Touch, - Page 19
Chapter 1. Getting to know your computer Bottom view „ G400s/G405s/G400s Touch a b cd e „ G500s/G505s/G500s Touch a b cd e 15 - Lenovo G400s Touch | User Guide - Lenovo G400s, G400s Touch, G500s, G500s Touch, - Page 20
Chapter 1. Getting to know your computer a Battery latch manual b Battery pack c Battery latch spring loaded d Louvers e Speakers The manual battery latch is used to keep the battery pack secured in place. The spring-loaded battery latch keeps the battery pack secured in place. Allow air to enter - Lenovo G400s Touch | User Guide - Lenovo G400s, G400s Touch, G500s, G500s Touch, - Page 21
user interfaces: the Start screen and the Windows desktop. To switch from the Start screen to the Windows desktop, do one of the following: • Select the Windows desktop tile on the Start screen. • Press the Windows key + D. To switch from the desktop to the Start screen, do one of the following - Lenovo G400s Touch | User Guide - Lenovo G400s, G400s Touch, G500s, G500s Touch, - Page 22
the charms, do one of the following: • Move the cursor to the upper-right or lower-right corner until the charms bar is displayed. • Press Windows key + C. Search charm The Search charm is a powerful new way to find what you are looking for, including settings, files, Web images, Web videos, etc - Lenovo G400s Touch | User Guide - Lenovo G400s, G400s Touch, G500s, G500s Touch, - Page 23
Chapter 2. Starting to use Windows 8.1 Share charm The Share charm lets you send links, photos, and more to your friends and social networks without leaving the app you are in. Start charm The Start charm is a fast way to go to the Start screen. Devices charm The Devices charm allows you to connect - Lenovo G400s Touch | User Guide - Lenovo G400s, G400s Touch, G500s, G500s Touch, - Page 24
Chapter 2. Starting to use Windows 8.1 Putting the computer to sleep or shutting it down When you have finished working with your computer, you can put it to sleep or shut it down. „ Putting your computer to sleep If you will be away from your - Lenovo G400s Touch | User Guide - Lenovo G400s, G400s Touch, G500s, G500s Touch, - Page 25
Chapter 2. Starting to use Windows 8.1 „ Shutting down the computer If you are not going to use your computer for a long time, shut it down. To shut down your computer: 1 Open the charms, select Settings . 2 Select Power → Shut down. 21 - Lenovo G400s Touch | User Guide - Lenovo G400s, G400s Touch, G500s, G500s Touch, - Page 26
Starting to use Windows 8.1 Touch screen operation (on select models The display panel can accept inputs like a tablet, using its fully-featured, multi-touch screen; or like a traditional notebook computer, using keyboard and touchpad. „ Multi-touch gestures You can touch the screen with one or - Lenovo G400s Touch | User Guide - Lenovo G400s, G400s Touch, G500s, G500s Touch, - Page 27
Starting to use Windows 8.1 (continued) Frequently used gestures Pinch Move two fingers together or apart while touching the screen. Tasks performed depending upon the app.) two or more Slide Drag your finger across the screen. Pans or scrolls through lists and pages, but you can also use it - Lenovo G400s Touch | User Guide - Lenovo G400s, G400s Touch, G500s, G500s Touch, - Page 28
Chapter 2. Starting to use Windows 8.1 (continued) Frequently used gestures Swipe Start from any edge of the screen, then swipe inwards toward the center. Tasks performed Number of fingers used • Swiping from the bottom or top edge displays app commands, including save, edit, - Lenovo G400s Touch | User Guide - Lenovo G400s, G400s Touch, G500s, G500s Touch, - Page 29
Chapter 2. Starting to use Windows 8.1 Connecting to a wireless network Enabling wireless connection To enable wireless functions, do one of the . To connect to one of those networks, ask the network administrator or the Internet service provider (ISP) for the security key or passphrase. 25 - Lenovo G400s Touch | User Guide - Lenovo G400s, G400s Touch, G500s, G500s Touch, - Page 30
the Windows Help and Support file on your computer. You can also get online help and support by clicking on one of the two links listed under More to explore. Note: Windows 8.1 also provides an app, Help+Tips. You can find it on the Start screen, to learn more information on new features of Windows - Lenovo G400s Touch | User Guide - Lenovo G400s, G400s Touch, G500s, G500s Touch, - Page 31
available. • To utilize the features of the OneKey Recovery system back-up process is only available when Windows can be started normally. „ Restoring You Lenovo OneKey Recovery system. 2 Click System Recovery. The computer will restart to the recovery environment. 3 Follow the on-screen instructions - Lenovo G400s Touch | User Guide - Lenovo G400s, G400s Touch, G500s, G500s Touch, - Page 32
Chapter 3. Lenovo OneKey Recovery system If Windows cannot be started, then follow the steps below to start the Lenovo OneKey Recovery system: 1 Shut down the computer. 2 Press the Novo button. From Novo Button Menu, select System recovery and press Enter. 28 - Lenovo G400s Touch | User Guide - Lenovo G400s, G400s Touch, G500s, G500s Touch, - Page 33
the installation program there, download it from the Lenovo consumer support Web site. Where can I find drivers for the various hardware devices of my computer? If your computer is preinstalled with a Windows operating system, Lenovo provides drivers for the hardware devices that you need on the - Lenovo G400s Touch | User Guide - Lenovo G400s, G400s Touch, G500s, G500s Touch, - Page 34
Chapter 4. Troubleshooting „ Lenovo OneKey Recovery system Where are the recovery discs? Your computer did not come with recovery discs. Use the Lenovo OneKey Recovery system if you need to restore the system to its factory status. What can I do if the back-up process fails? If you - Lenovo G400s Touch | User Guide - Lenovo G400s, G400s Touch, G500s, G500s Touch, - Page 35
mode to Legacy Support. The legacy operating system, such as Windows, Linux or Dos, etc., cannot be installed if you don't change the boot mode. „ Getting help How can I contact the customer support center? See "Chapter 3. Getting help and service" of Lenovo Safety and General Information Guide. 31 - Lenovo G400s Touch | User Guide - Lenovo G400s, G400s Touch, G500s, G500s Touch, - Page 36
• Restore backed-up files to your Windows environment or the entire contents of your hard disk to its original factory contents using the Lenovo OneKey Recovery system. If you still see only the cursor on the screen, have the computer serviced. My screen goes blank while the computer is on. • Your - Lenovo G400s Touch | User Guide - Lenovo G400s, G400s Touch, G500s, G500s Touch, - Page 37
Chapter 4. Troubleshooting BIOS password problems I forgot my password. • If you forget your user password, you must ask the system administrator to reset your user password. • If you forget your HDD password, a Lenovo authorized servicer cannot reset your password or recover data from the hard - Lenovo G400s Touch | User Guide - Lenovo G400s, G400s Touch, G500s, G500s Touch, - Page 38
computer, press and hold the power button for 4 seconds or more. If the computer is still not reset, remove the AC power adapter and the battery. Display panel problems The screen is blank. • Do the following: - If you are using the AC power adapter or the - Lenovo G400s Touch | User Guide - Lenovo G400s, G400s Touch, G500s, G500s Touch, - Page 39
Chapter 4. Troubleshooting Sound problems No sound can be heard from the speaker even when the volume is turned up. • Make sure that: - The Mute function is off. - The combo audio jack is not used. - The speaker is selected as the playback device. Battery problems Your computer shuts down - Lenovo G400s Touch | User Guide - Lenovo G400s, G400s Touch, G500s, G500s Touch, - Page 40
Troubleshooting Other problems Your computer does not respond. The computer does not start from a device you want. The connected external device does not work from which the computer starts is enabled. In the Boot menu in the BIOS setup utility, make sure that the device is included in the EFI list - Lenovo G400s Touch | User Guide - Lenovo G400s, G400s Touch, G500s, G500s Touch, - Page 41
Appendix. CRU instructions Notes: • The illustrations used in this appendix are for the Lenovo G500s, unless otherwise stated. • The following steps about upgrading and replacing devices may differ slightly between G500s and G400s/G405s/G400s Touch/G505s/G500s Touch. • Make sure the battery has been - Lenovo G400s Touch | User Guide - Lenovo G400s, G400s Touch, G500s, G500s Touch, - Page 42
Appendix. CRU instructions Replacing memory You can increase the amount of memory in your beep will sound when you try to start the computer. To install a DDR3L SDRAM, do the following: 1 Touch a metal table or a grounded metal object to reduce any static electricity in your body, which could - Lenovo G400s Touch | User Guide - Lenovo G400s, G400s Touch, G500s, G500s Touch, - Page 43
Appendix. CRU instructions 6 If two DDR3L SDRAMs are already installed in the memory with their matching gaps, reinstall the compartment cover. 0 Reinstall and tighten the screws. A Reinstall the battery. B Turn the computer over again. C Connect the AC power adapter and the cables to the computer - Lenovo G400s Touch | User Guide - Lenovo G400s, G400s Touch, G500s, G500s Touch, - Page 44
the computer you are servicing, the card must be installed in SLOT-0 ( : lower slot), but not in SLOT-1 ( : upper slot). b a To make sure that the DDR3L SDRAM is installed correctly, do as follows: 1 Turn the computer on. 2 Hold Fn + F2 during startup. The BIOS setup utility screen opens. The System - Lenovo G400s Touch | User Guide - Lenovo G400s, G400s Touch, G500s, G500s Touch, - Page 45
Appendix. CRU instructions Replacing the wireless LAN card To replace the wireless LAN card, do the following: 1 Turn off the computer. Disconnect the AC power adapter and all cables from the computer. 2 Close the computer display and turn the computer over. 3 Remove the battery pack. 4 Remove the - Lenovo G400s Touch | User Guide - Lenovo G400s, G400s Touch, G500s, G500s Touch, - Page 46
A(AUX). • In models with a wireless LAN card that has only one cable, plug the black cable (MAIN) into the jack labeled M(MAIN). A Reinstall the compartment cover and tighten the screws. B Reinstall the battery pack. C Turn the computer over again. D Connect the AC power adapter and the cables to - Lenovo G400s Touch | User Guide - Lenovo G400s, G400s Touch, G500s, G500s Touch, - Page 47
following table provides a list of CRUs (Customer Replaceable Units) for your computer, and informs you of where to find replacement instructions. AC power adapter Power cord for AC power adapter Battery pack Memory Wireless LAN card Optical disc drive Setup Poster O O O User Guide O O O O 43 - Lenovo G400s Touch | User Guide - Lenovo G400s, G400s Touch, G500s, G500s Touch, - Page 48
or registered trademarks of Lenovo in the United States, other countries, or both. Lenovo OneKey Microsoft and Windows are trademarks of Microsoft Corporation in the United States, other countries, or both. Other company, products, or service names may be trademarks or service marks of others. 44 - Lenovo G400s Touch | User Guide - Lenovo G400s, G400s Touch, G500s, G500s Touch, - Page 49
- Lenovo G400s Touch | User Guide - Lenovo G400s, G400s Touch, G500s, G500s Touch, - Page 50
©Lenovo China 2013 en-US Rev. CT01
-
 1
1 -
 2
2 -
 3
3 -
 4
4 -
 5
5 -
 6
6 -
 7
7 -
8
-
9
-
10
-
11
-
12
-
13
-
14
-
15
-
16
-
17
-
18
-
19
-
20
-
21
-
22
-
23
-
24
-
25
-
26
-
27
-
28
-
29
-
30
-
31
-
32
-
33
-
34
-
35
-
36
-
37
-
38
-
39
-
40
-
41
-
42
-
43
-
44
-
45
-
46
-
47
-
48
-
49
-
50
 |
 |

Lenovo
G400s/G405s/G400s Touch
G500s/G505s/G500s Touch
User Guide
Read the safety notices and important tips in the
included manuals before using your computer.