Lenovo IdeaCentre B520 Lenovo IdeaCentre B5 Series User Guide - Page 32
System Setup, 3.1 Launch, 3.2 Network Settings - driver
 |
View all Lenovo IdeaCentre B520 manuals
Add to My Manuals
Save this manual to your list of manuals |
Page 32 highlights
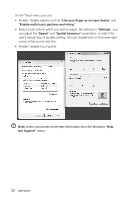
Method 1: Automatic Installation Repeatedly press and release the F2 key once turning on the computer until the Lenovo Rescue System open, then select Drivers and Application Installation. Follow the screen prompts to install the Lenovo Drivers and Application Installation. Click Install to start installing the Lenovo Drivers and Application Installation. The system will restart. After the system has restarted, the installation process will continue until completion. Method 2: Manual Installation In the Windows system, Click Start → All Programs → Lenovo → Lenovo Drivers and Application Installation. After starting the procedure, install all the drivers and software manually according to the prompts. Notes: 1. It is recommended not to install the software which is already on the computer. 2. Before accessing the operating system, make sure that the Drivers and Application installation has been installed automatically. After that, the manual installation function can be used. 3.3 System Setup System Setup configures the network configuration for the Lenovo Rescue System to ensure your Rescue System can connect to internet. In addition, System Setup sets and manages all passwords for the Lenovo Rescue system. 3.3.1 Launch Repeatedly press and release the F2 key once turning on the computer until the Lenovo Rescue System open, then select System Setup. 3.3.2 Network Settings Depending on the network access mode of the computer, select "ADSL" or "LAN Connection" in the network connection modes. 1. If you select "ADSL," input the username and password of the ADSL connection. User Guide 27
-
 1
1 -
2
-
3
-
4
-
5
-
6
-
7
-
8
-
9
-
10
-
11
-
12
-
13
-
14
-
15
-
16
-
17
-
18
-
19
-
20
-
21
-
22
-
23
-
24
-
25
-
26
-
 27
27 -
 28
28 -
 29
29 -
 30
30 -
 31
31 -
 32
32 -
 33
33 -
 34
34 -
 35
35 -
 36
36 -
 37
37 -
38
-
39
-
40
-
41
-
42
-
43
-
44
-
45
-
46
-
47
-
48
-
49
 |
 |