Lenovo ThinkPad Edge E430 (English) User Guide - Page 77
Using the OneKey Recovery Pro workspace, The OneKey Recovery Pro program opens. - hard drive
 |
View all Lenovo ThinkPad Edge E430 manuals
Add to My Manuals
Save this manual to your list of manuals |
Page 77 highlights
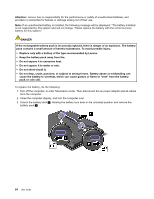
3. Click Back up your hard drive and select backup operation options. Then, follow the instructions on the screen to complete the backup operation. Performing a recovery operation This section provides instructions on how to perform a recovery operation using the OneKey Recovery Pro program. 1. From the Windows desktop, click Start ➙ All Programs ➙ Lenovo ThinkVantage Tools ➙ Enhanced Backup and Restore. The OneKey Recovery Pro program opens. 2. In the OneKey Recovery Pro program main window, click the Launch advanced OneKey Recovery Pro arrow. 3. Click the Restore your system from a backup icon. 4. Follow the instructions on the screen to complete the recovery operation. For more information about performing a recovery operation from the OneKey Recovery Pro workspace, see "Using the OneKey Recovery Pro workspace" on page 59. Using the OneKey Recovery Pro workspace The OneKey Recovery Pro workspace resides in a protected, hidden area of your hard disk drive that operates independently from the Windows operating system. This enables you to perform recovery operations even if you cannot start the Windows operating system. You can perform the following recovery operations from the OneKey Recovery Pro workspace: • Rescue files from your hard disk drive or from a backup The OneKey Recovery Pro workspace enables you to locate files on your hard disk drive and transfer them to a network drive or other recordable media, such as a USB device or a disc. This solution is available even if you did not back up your files or if changes were made to the files since your last backup operation. You also can rescue individual files from a OneKey Recovery Pro backup located on your local hard disk drive, a USB device, or a network drive. • Restore your hard disk drive from a OneKey Recovery Pro backup If you have backed up your hard disk drive using the OneKey Recovery Pro program, you can restore the hard disk drive from a OneKey Recovery Pro backup, even if you cannot start the Windows operating system. • Restore your hard disk drive to the factory default settings The OneKey Recovery Pro workspace enables you to restore the complete contents of your hard disk drive to the factory default settings. If you have multiple partitions on your hard disk drive, you have the option to restore the factory default settings to the C: partition and leave the other partitions intact. Because the OneKey Recovery Pro workspace operates independently from the Windows operating system, you can restore the factory default settings even if you cannot start the Windows operating system. Attention: If you restore the hard disk drive from a OneKey Recovery Pro backup or restore the hard disk drive to the factory default settings, all files on the primary hard disk drive partition (usually drive C:) will be deleted in the recovery process. If possible, make copies of important files. If you are unable to start the Windows operating system, you can use the rescue files feature of the OneKey Recovery Pro workspace to copy files from your hard disk drive to other media. To start the OneKey Recovery Pro workspace, do the following: 1. Make sure that the computer is turned off. 2. Repeatedly press and release the F11 key when turning on the computer. When you hear beeps or see a logo screen, release the F11 key. Chapter 5. Recovery overview 59
-
 1
1 -
2
-
3
-
4
-
5
-
6
-
7
-
8
-
9
-
10
-
11
-
12
-
13
-
14
-
15
-
16
-
17
-
18
-
19
-
20
-
21
-
22
-
23
-
24
-
25
-
26
-
27
-
28
-
29
-
30
-
31
-
32
-
33
-
34
-
35
-
36
-
37
-
38
-
39
-
40
-
41
-
42
-
43
-
44
-
45
-
46
-
47
-
48
-
49
-
50
-
51
-
52
-
53
-
54
-
55
-
56
-
57
-
58
-
59
-
60
-
61
-
62
-
63
-
64
-
65
-
66
-
67
-
68
-
69
-
70
-
71
-
 72
72 -
 73
73 -
 74
74 -
 75
75 -
 76
76 -
 77
77 -
 78
78 -
 79
79 -
 80
80 -
 81
81 -
 82
82 -
83
-
84
-
85
-
86
-
87
-
88
-
89
-
90
-
91
-
92
-
93
-
94
-
95
-
96
-
97
-
98
-
99
-
100
-
101
-
102
-
103
-
104
-
105
-
106
-
107
-
108
-
109
-
110
-
111
-
112
-
113
-
114
-
115
-
116
-
117
-
118
-
119
-
120
-
121
-
122
-
123
-
124
-
125
-
126
-
127
-
128
-
129
-
130
-
131
-
132
-
133
-
134
-
135
-
136
-
137
-
138
-
139
-
140
-
141
-
142
-
143
-
144
-
145
-
146
-
147
-
148
-
149
-
150
-
151
-
152
-
153
-
154
-
155
-
156
-
157
-
158
-
159
-
160
-
161
-
162
-
163
-
164
-
165
-
166
-
167
-
168
-
169
-
170
-
171
-
172
-
173
-
174
 |
 |