Lenovo ThinkPad L520 (English) User Guide - Page 157
Config menu, Date and time menu, Security menu, Enable or disable the Extended Memory Test.
 |
View all Lenovo ThinkPad L520 manuals
Add to My Manuals
Save this manual to your list of manuals |
Page 157 highlights
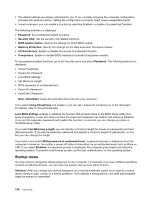
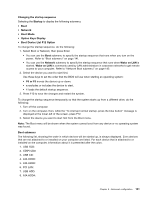
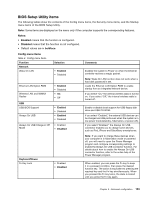
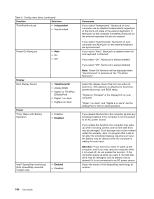
6. Press F3 or Esc to exit from the submenu. If you are in a nested submenu, press Esc repeatedly until you reach the BIOS Setup Utility menu. Note: If you need to restore the settings to their original state as of the time of purchase, press F9 key to load the default settings. You can also select an option in the Restart submenu to load the default settings or discard the changes. 7. Select Restart , then press Enter. Move the cursor to the option you want for restarting your computer, then press Enter. Your computer restarts. Config menu If you need to change the configuration of your computer, select Config from the BIOS Setup Utility menu. Notes: • The default settings are already optimized for you. If you consider changing the computer configuration, proceed with extreme caution. Setting the configuration incorrectly might cause unexpected results. • In each submenu, you can enable a function by selecting Enabled, or disable it by selecting Disabled. The following submenu is displayed: • Network: Set the LAN related functions. • USB: Enable or disable USB related functions. • Keyboard/Mouse: Set the keyboard and the mouse related functions. • Display: Specify the settings for display output. • Power: Set power management related functions. • Beep and Alarm: Enable or disable the audio related functions. • Memory: Enable or disable the Extended Memory Test. • Serial ATA (SATA): Specify the settings for the hard disk drive. • CPU: Specify the settings for the CPU. Date and time menu If you need to set the current date and time of your computer, select Date/Time from the BIOS Setup Utility menu. The following submenu is displayed: • System Date • System Time To change the date and time, do the following: 1. Using the up and down arrow keys, select the item to change, date or time. 2. Press Tab, Shift Tab, or Enter to select a field. 3. Type the date or time. Note: Another way to adjust date and time is press the F5 or F6 key. 4. Press F10 to save the changes and restart the system. Security menu If you need to set the security features of your computer, select Security from the BIOS Setup Utility menu. Notes: Chapter 8. Advanced configuration 139
-
 1
1 -
2
-
3
-
4
-
5
-
6
-
7
-
8
-
9
-
10
-
11
-
12
-
13
-
14
-
15
-
16
-
17
-
18
-
19
-
20
-
21
-
22
-
23
-
24
-
25
-
26
-
27
-
28
-
29
-
30
-
31
-
32
-
33
-
34
-
35
-
36
-
37
-
38
-
39
-
40
-
41
-
42
-
43
-
44
-
45
-
46
-
47
-
48
-
49
-
50
-
51
-
52
-
53
-
54
-
55
-
56
-
57
-
58
-
59
-
60
-
61
-
62
-
63
-
64
-
65
-
66
-
67
-
68
-
69
-
70
-
71
-
72
-
73
-
74
-
75
-
76
-
77
-
78
-
79
-
80
-
81
-
82
-
83
-
84
-
85
-
86
-
87
-
88
-
89
-
90
-
91
-
92
-
93
-
94
-
95
-
96
-
97
-
98
-
99
-
100
-
101
-
102
-
103
-
104
-
105
-
106
-
107
-
108
-
109
-
110
-
111
-
112
-
113
-
114
-
115
-
116
-
117
-
118
-
119
-
120
-
121
-
122
-
123
-
124
-
125
-
126
-
127
-
128
-
129
-
130
-
131
-
132
-
133
-
134
-
135
-
136
-
137
-
138
-
139
-
140
-
141
-
142
-
143
-
144
-
145
-
146
-
147
-
148
-
149
-
150
-
151
-
 152
152 -
 153
153 -
 154
154 -
 155
155 -
 156
156 -
 157
157 -
 158
158 -
 159
159 -
 160
160 -
 161
161 -
 162
162 -
163
-
164
-
165
-
166
-
167
-
168
-
169
-
170
-
171
-
172
-
173
-
174
-
175
-
176
-
177
-
178
-
179
-
180
-
181
-
182
-
183
-
184
-
185
-
186
-
187
-
188
-
189
-
190
-
191
-
192
-
193
-
194
-
195
-
196
-
197
-
198
-
199
-
200
-
201
-
202
-
203
-
204
-
205
-
206
-
207
-
208
-
209
-
210
-
211
-
212
-
213
-
214
-
215
-
216
-
217
-
218
-
219
-
220
-
221
-
222
-
223
-
224
-
225
 |
 |