Lenovo ThinkPad L520 (English) User Guide - Page 50
Using the UltraNav pointing device, For Windows 7 and Windows Vista
 |
View all Lenovo ThinkPad L520 manuals
Add to My Manuals
Save this manual to your list of manuals |
Page 50 highlights
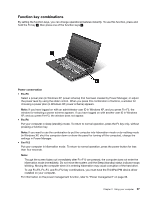
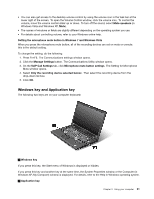
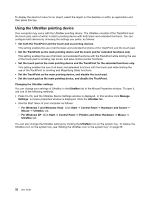
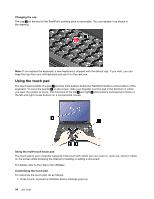
To display the shortcut menu for an object, select the object on the desktop or within an application and then press this key. Using the UltraNav pointing device Your computer may come with the UltraNav pointing device. The UltraNav consists of the TrackPoint and the touch pad, each of which is itself a pointing device with both basic and extended functions. You can configure both devices by choosing the settings you prefer, as follows: • Set both the TrackPoint and the touch pad as pointing devices. This setting enables the use of all the basic and extended functions of the TrackPoint and the touch pad. • Set the TrackPoint as the main pointing device and the touch pad for extended functions only. This setting enables the use of all basic and extended functions with the TrackPoint while limiting the use of the touch pad to scrolling, tap zones, and slow-motion pointer functions. • Set the touch pad as the main pointing device and the TrackPoint for the extended functions only. This setting enables the use of all basic and extended functions with the touch pad while limiting the use of the TrackPoint to scrolling and Magnifying Glass functions. • Set the TrackPoint as the main pointing device, and disable the touch pad. • Set the touch pad as the main pointing device, and disable the TrackPoint. Changing the UltraNav settings You can change your settings of UltraNav in the UltraNav tab of the Mouse Properties window. To open it, use one of the following methods: • Press Fn+F8, and the UltraNav Device Settings window is displayed. In this window click Manage Settings. A mouse properties window is displayed. Click the UltraNav tab. • Use the Start menu of your computer as follows: - For Windows 7 and Windows Vista: Click Start ➙ Control Panel ➙ Hardware and Sound ➙ Mouse ➙ UltraNav tab. - For Windows XP: Click Start ➙ Control Panel ➙ Printers and Other Hardware ➙ Mouse ➙ UltraNav tab. You can also change the UltraNav settings by clicking the UltraNav icon on the system tray. To display the UltraNav icon on the system tray, see "Adding the UltraNav icon to the system tray" on page 35. 32 User Guide
-
 1
1 -
2
-
3
-
4
-
5
-
6
-
7
-
8
-
9
-
10
-
11
-
12
-
13
-
14
-
15
-
16
-
17
-
18
-
19
-
20
-
21
-
22
-
23
-
24
-
25
-
26
-
27
-
28
-
29
-
30
-
31
-
32
-
33
-
34
-
35
-
36
-
37
-
38
-
39
-
40
-
41
-
42
-
43
-
44
-
 45
45 -
 46
46 -
 47
47 -
 48
48 -
 49
49 -
 50
50 -
 51
51 -
 52
52 -
 53
53 -
 54
54 -
 55
55 -
56
-
57
-
58
-
59
-
60
-
61
-
62
-
63
-
64
-
65
-
66
-
67
-
68
-
69
-
70
-
71
-
72
-
73
-
74
-
75
-
76
-
77
-
78
-
79
-
80
-
81
-
82
-
83
-
84
-
85
-
86
-
87
-
88
-
89
-
90
-
91
-
92
-
93
-
94
-
95
-
96
-
97
-
98
-
99
-
100
-
101
-
102
-
103
-
104
-
105
-
106
-
107
-
108
-
109
-
110
-
111
-
112
-
113
-
114
-
115
-
116
-
117
-
118
-
119
-
120
-
121
-
122
-
123
-
124
-
125
-
126
-
127
-
128
-
129
-
130
-
131
-
132
-
133
-
134
-
135
-
136
-
137
-
138
-
139
-
140
-
141
-
142
-
143
-
144
-
145
-
146
-
147
-
148
-
149
-
150
-
151
-
152
-
153
-
154
-
155
-
156
-
157
-
158
-
159
-
160
-
161
-
162
-
163
-
164
-
165
-
166
-
167
-
168
-
169
-
170
-
171
-
172
-
173
-
174
-
175
-
176
-
177
-
178
-
179
-
180
-
181
-
182
-
183
-
184
-
185
-
186
-
187
-
188
-
189
-
190
-
191
-
192
-
193
-
194
-
195
-
196
-
197
-
198
-
199
-
200
-
201
-
202
-
203
-
204
-
205
-
206
-
207
-
208
-
209
-
210
-
211
-
212
-
213
-
214
-
215
-
216
-
217
-
218
-
219
-
220
-
221
-
222
-
223
-
224
-
225
 |
 |