Lenovo ThinkPad T530 (English) User Guide - Page 107
and the blue cable to the, Reinstall the keyboard. See Replacing the keyboard
 |
View all Lenovo ThinkPad T530 manuals
Add to My Manuals
Save this manual to your list of manuals |
Page 107 highlights
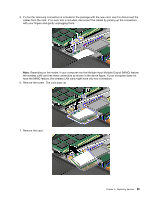
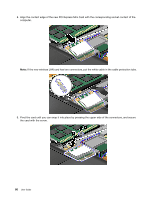
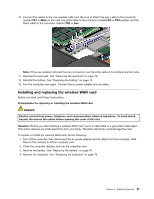
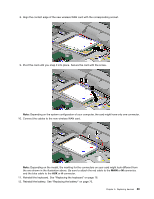
8. Align the contact edge of the new wireless WAN card with the corresponding socket. 9. Pivot the card until you snap it into place. Secure the card with the screw. Note: Depending on the system configuration of your computer, the card might have only one connector. 10. Connect the cables to the new wireless WAN card. Note: Depending on the model, the marking for the connectors on your card might look different from the one shown in the illustration above. Be sure to attach the red cable to the MAIN or M connector, and the blue cable to the AUX or A connector. 11. Reinstall the keyboard. See "Replacing the keyboard" on page 76. 12. Reinstall the battery. See "Replacing the battery" on page 70. Chapter 6. Replacing devices 89
-
 1
1 -
2
-
3
-
4
-
5
-
6
-
7
-
8
-
9
-
10
-
11
-
12
-
13
-
14
-
15
-
16
-
17
-
18
-
19
-
20
-
21
-
22
-
23
-
24
-
25
-
26
-
27
-
28
-
29
-
30
-
31
-
32
-
33
-
34
-
35
-
36
-
37
-
38
-
39
-
40
-
41
-
42
-
43
-
44
-
45
-
46
-
47
-
48
-
49
-
50
-
51
-
52
-
53
-
54
-
55
-
56
-
57
-
58
-
59
-
60
-
61
-
62
-
63
-
64
-
65
-
66
-
67
-
68
-
69
-
70
-
71
-
72
-
73
-
74
-
75
-
76
-
77
-
78
-
79
-
80
-
81
-
82
-
83
-
84
-
85
-
86
-
87
-
88
-
89
-
90
-
91
-
92
-
93
-
94
-
95
-
96
-
97
-
98
-
99
-
100
-
101
-
 102
102 -
 103
103 -
 104
104 -
 105
105 -
 106
106 -
 107
107 -
 108
108 -
 109
109 -
 110
110 -
 111
111 -
 112
112 -
113
-
114
-
115
-
116
-
117
-
118
-
119
-
120
-
121
-
122
-
123
-
124
-
125
-
126
-
127
-
128
-
129
-
130
-
131
-
132
-
133
-
134
-
135
-
136
-
137
-
138
-
139
-
140
-
141
-
142
-
143
-
144
-
145
-
146
-
147
-
148
-
149
-
150
-
151
-
152
-
153
-
154
-
155
-
156
-
157
-
158
-
159
-
160
-
161
-
162
-
163
-
164
-
165
-
166
-
167
-
168
-
169
-
170
-
171
-
172
-
173
-
174
-
175
-
176
-
177
-
178
-
179
-
180
-
181
-
182
-
183
-
184
-
185
-
186
-
187
-
188
-
189
-
190
-
191
 |
 |
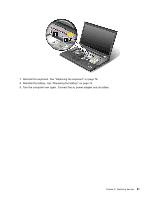
8. Align the contact edge of the new wireless WAN card with the corresponding socket.
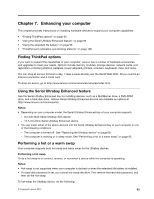
9. Pivot the card until you snap it into place. Secure the card with the screw.
Note:
Depending on the system configuration of your computer, the card might have only one connector.
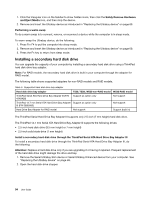
10. Connect the cables to the new wireless WAN card.
Note:
Depending on the model, the marking for the connectors on your card might look different from
the one shown in the illustration above. Be sure to attach the red cable to the
MAIN
or
M
connector,
and the blue cable to the
AUX
or
A
connector.
11. Reinstall the keyboard. See “Replacing the keyboard” on page 76.
12. Reinstall the battery. See “Replacing the battery” on page 70.
Chapter 6
.
Replacing devices
89