Lenovo ThinkPad T530 (English) User Guide - Page 138
Date and time menu, Security menu, System Date
 |
View all Lenovo ThinkPad T530 manuals
Add to My Manuals
Save this manual to your list of manuals |
Page 138 highlights
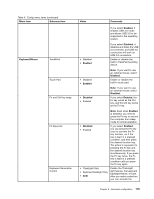
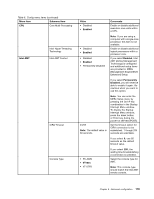
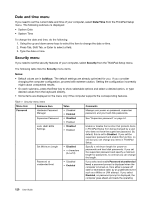
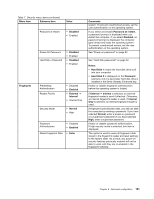
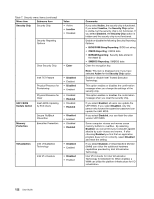
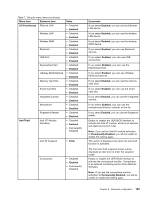
Date and time menu If you need to set the current date and time of your computer, select Date/Time from the ThinkPad Setup menu. The following submenu is displayed: • System Date • System Time To change the date and time, do the following: 1. Using the up and down arrow keys to select the item to change the date or time. 2. Press Tab, Shift Tab, or Enter to select a field. 3. Type the date or time. Security menu If you need to set the security features of your computer, select Security from the ThinkPad Setup menu. The following table lists the Security menu items. Notes: • Default values are in boldface. The default settings are already optimized for you. If you consider changing the computer configuration, proceed with extreme caution. Setting the configuration incorrectly might cause unexpected results. • On each submenu, press the Enter key to show selectable options and select a desired option, or type desired values from the keyboard directly. • Some items are displayed on the menu only if the computer supports the corresponding features. Table 7. Security menu items Menu item Submenu item Password Hardware Password Manager Supervisor Password Lock UEFI BIOS Settings Value • Disabled • Enabled • Disabled • Enabled • Disabled • Enabled Set Minimum Length • Disabled • x characters (4≤x≤12) Password at unattended boot • Disabled • Enabled Comments Manage your power-on password, supervisor password, and your hard disk passwords. See "Supervisor password" on page 54. Enable or disable the function that protects items in ThinkPad Setup from being changed by a user who does not have the supervisor password. By default, this is set to Disabled. If you set the supervisor password and enable this function, no one but you can change any items in ThinkPad Setup. Specify a minimum length for power-on passwords and hard disk passwords. If you set the supervisor password and specify a minimum length for passwords, no one but you can change the length. If you select and enable Password at unattended boot, a password prompt is displayed when the computer is turned on, from either a power-off state or hibernation state, by an unattended event such as a Wake on LAN attempt. If you select Disabled, no password prompt is displayed; the computer goes ahead and loads the operating 120 User Guide
-
 1
1 -
2
-
3
-
4
-
5
-
6
-
7
-
8
-
9
-
10
-
11
-
12
-
13
-
14
-
15
-
16
-
17
-
18
-
19
-
20
-
21
-
22
-
23
-
24
-
25
-
26
-
27
-
28
-
29
-
30
-
31
-
32
-
33
-
34
-
35
-
36
-
37
-
38
-
39
-
40
-
41
-
42
-
43
-
44
-
45
-
46
-
47
-
48
-
49
-
50
-
51
-
52
-
53
-
54
-
55
-
56
-
57
-
58
-
59
-
60
-
61
-
62
-
63
-
64
-
65
-
66
-
67
-
68
-
69
-
70
-
71
-
72
-
73
-
74
-
75
-
76
-
77
-
78
-
79
-
80
-
81
-
82
-
83
-
84
-
85
-
86
-
87
-
88
-
89
-
90
-
91
-
92
-
93
-
94
-
95
-
96
-
97
-
98
-
99
-
100
-
101
-
102
-
103
-
104
-
105
-
106
-
107
-
108
-
109
-
110
-
111
-
112
-
113
-
114
-
115
-
116
-
117
-
118
-
119
-
120
-
121
-
122
-
123
-
124
-
125
-
126
-
127
-
128
-
129
-
130
-
131
-
132
-
 133
133 -
 134
134 -
 135
135 -
 136
136 -
 137
137 -
 138
138 -
 139
139 -
 140
140 -
 141
141 -
 142
142 -
 143
143 -
144
-
145
-
146
-
147
-
148
-
149
-
150
-
151
-
152
-
153
-
154
-
155
-
156
-
157
-
158
-
159
-
160
-
161
-
162
-
163
-
164
-
165
-
166
-
167
-
168
-
169
-
170
-
171
-
172
-
173
-
174
-
175
-
176
-
177
-
178
-
179
-
180
-
181
-
182
-
183
-
184
-
185
-
186
-
187
-
188
-
189
-
190
-
191
 |
 |