Lenovo ThinkPad T530 (English) User Guide - Page 140
Technology for Directed I/O. When enabled, a, BIOS ROM String Reporting
 |
View all Lenovo ThinkPad T530 manuals
Add to My Manuals
Save this manual to your list of manuals |
Page 140 highlights
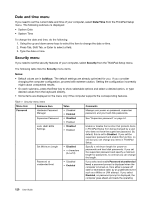
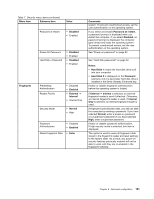
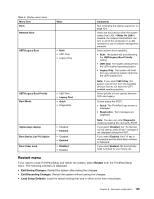
Table 7. Security menu items (continued) Menu item Submenu item Security Chip Security Chip Security Reporting Options Value • Active • Inactive • Disabled Clear Security Chip • Enter UEFI BIOS Update Option Intel TXT Feature Physical Presence for Provisioning Physical Presence for Clear Flash BIOS Updating by End-Users • Disabled • Enabled • Disabled • Enabled • Disabled • Enabled • Disabled • Enabled Memory Protection Secure RollBack Prevention Execution Prevention • Disabled • Enabled • Disabled • Enabled Virtualization Intel Virtualization Technology Intel VT-d Feature • Disabled • Enabled • Disabled • Enabled Comments If you select Active, the security chip is functional. If you select Inactive, the Security Chip option is visible, but the security chip is not functional. If you select Disabled, the Security Chip option is hidden and the security chip is not functional. Enable or disable the following Security Reporting Options: • BIOS ROM String Reporting: BIOS text string • CMOS Reporting: CMOS data • NVRAM Reporting: Security data stored in the Asset ID • SMBIOS Reporting: SMBIOS data Clear the encryption key. Note: This item is displayed only if you have selected Active for the Security Chip option. Enable or disable Intel Trusted Execution Technology. This option enables or disables the confirmation message when you change the settings of the security chip. This option enables or disables the confirmation message when you clear the security chip. If you select Enabled, all users can update the UEFI BIOS. If you select Disabled, only the person who knows the supervisor password can update the UEFI BIOS. If you select Disabled, you can flash the older version UEFI BIOS. Some computer viruses and worms cause memory buffers to overflow. By selecting Enabled, you can protect your computer against attacks by such viruses and worms. If after choosing Enabled you find that an application program does not run correctly, select Disabled and reset the setting. If you select Enabled, a Virtual Machine Monitor (VMM) can utilize the additional hardware capabilities provided by Intel Virtualization Technology. Intel VT-d stands for Intel Virtualization Technology for Directed I/O. When enabled, a VMM can utilize the platform infrastructure for I/O virtualization. 122 User Guide
-
 1
1 -
2
-
3
-
4
-
5
-
6
-
7
-
8
-
9
-
10
-
11
-
12
-
13
-
14
-
15
-
16
-
17
-
18
-
19
-
20
-
21
-
22
-
23
-
24
-
25
-
26
-
27
-
28
-
29
-
30
-
31
-
32
-
33
-
34
-
35
-
36
-
37
-
38
-
39
-
40
-
41
-
42
-
43
-
44
-
45
-
46
-
47
-
48
-
49
-
50
-
51
-
52
-
53
-
54
-
55
-
56
-
57
-
58
-
59
-
60
-
61
-
62
-
63
-
64
-
65
-
66
-
67
-
68
-
69
-
70
-
71
-
72
-
73
-
74
-
75
-
76
-
77
-
78
-
79
-
80
-
81
-
82
-
83
-
84
-
85
-
86
-
87
-
88
-
89
-
90
-
91
-
92
-
93
-
94
-
95
-
96
-
97
-
98
-
99
-
100
-
101
-
102
-
103
-
104
-
105
-
106
-
107
-
108
-
109
-
110
-
111
-
112
-
113
-
114
-
115
-
116
-
117
-
118
-
119
-
120
-
121
-
122
-
123
-
124
-
125
-
126
-
127
-
128
-
129
-
130
-
131
-
132
-
133
-
134
-
 135
135 -
 136
136 -
 137
137 -
 138
138 -
 139
139 -
 140
140 -
 141
141 -
 142
142 -
 143
143 -
 144
144 -
 145
145 -
146
-
147
-
148
-
149
-
150
-
151
-
152
-
153
-
154
-
155
-
156
-
157
-
158
-
159
-
160
-
161
-
162
-
163
-
164
-
165
-
166
-
167
-
168
-
169
-
170
-
171
-
172
-
173
-
174
-
175
-
176
-
177
-
178
-
179
-
180
-
181
-
182
-
183
-
184
-
185
-
186
-
187
-
188
-
189
-
190
-
191
 |
 |