Lenovo ThinkPad X1 Carbon (English) User Guide - Page 37
Using the TrackPoint pointing device, Start, Control Panel, Hardware and Sound, Mouse, UltraNav
 |
View all Lenovo ThinkPad X1 Carbon manuals
Add to My Manuals
Save this manual to your list of manuals |
Page 37 highlights
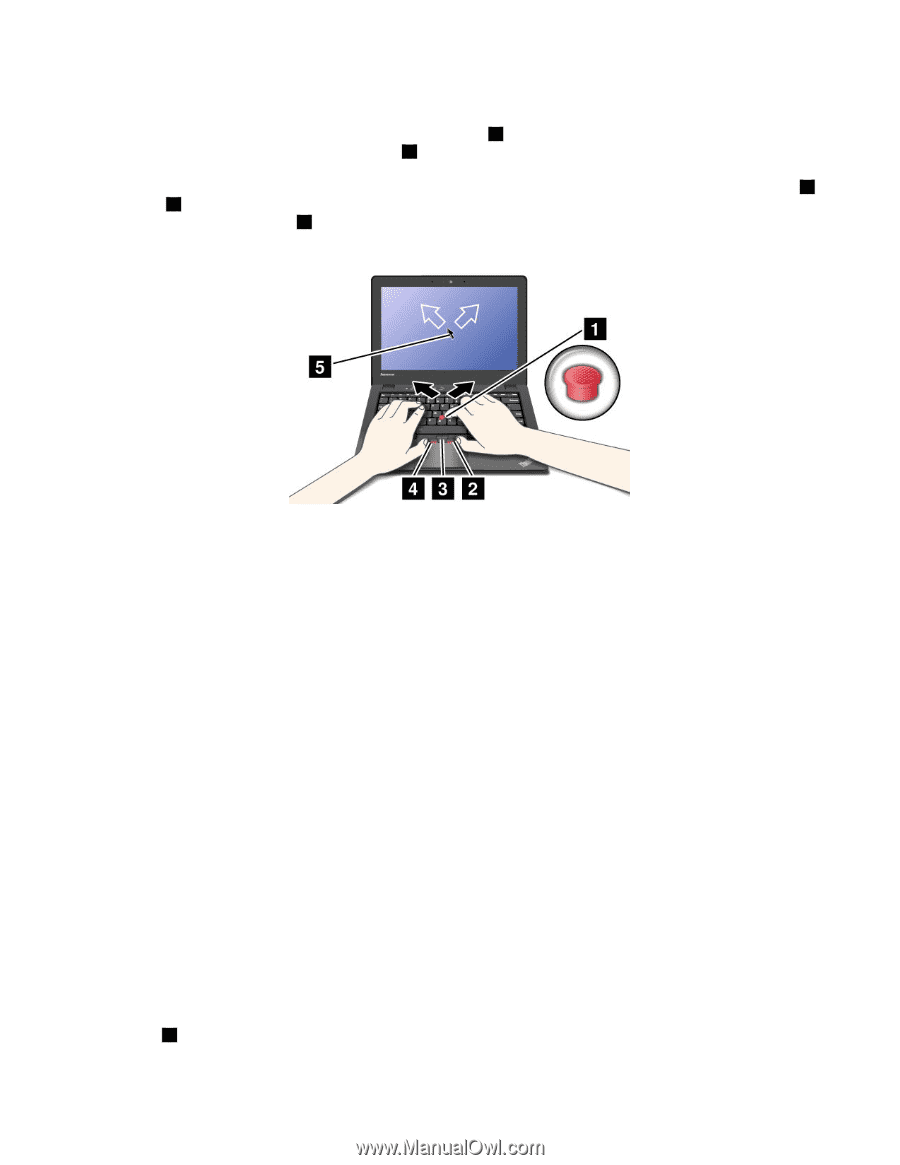
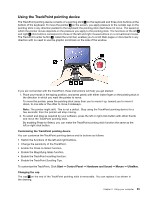
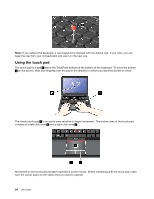
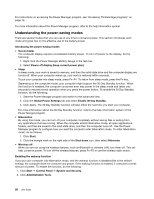
Using the TrackPoint pointing device The TrackPoint pointing device consists of a pointing stick 1 on the keyboard and three click buttons at the bottom of the keyboard. To move the pointer 5 on the screen, you apply pressure to the nonslip cap on the pointing stick in any direction parallel to the keyboard; the pointing stick itself does not move. The speed at which the pointer moves depends on the pressure you apply to the pointing stick. The functions of the left 4 and right 2 click buttons correspond to those of the left and right mouse buttons on a conventional mouse. The TrackPoint center button 3 , called the scroll bar, enables you to scroll Web pages or documents in any direction with no need to use the graphic scroll bars on the side of the window. If you are not familiar with the TrackPoint, these instructions will help you get started: 1. Place your hands in the typing position, and press gently with either index finger on the pointing stick in the direction in which you want the pointer to move. To move the pointer, press the pointing stick away from you to move it up, toward you to move it down, to one side or the other to move it sideways. Note: The pointer might drift. This is not a defect. Stop using the TrackPoint pointing device for a few seconds; then the pointer will stop moving. 2. To select and drag as required by your software, press the left or right click button with either thumb and move the TrackPoint pointing stick. By enabling Press-to-Select, you can make the TrackPoint pointing stick function the same as the left or right click button. Customizing the TrackPoint pointing device You can customize the TrackPoint pointing device and its buttons as follows: • Switch the functions of the left and right buttons. • Change the sensitivity of the TrackPoint. • Enable the Press-to-Select function. • Enable the Magnifying Glass function. • Enable the TrackPoint scrolling function. • Enable the TrackPoint Scrolling Tips. To customize the TrackPoint, Click Start ➙ Control Panel ➙ Hardware and Sound ➙ Mouse ➙ UltraNav. Changing the cap The cap 1 on the end of the TrackPoint pointing stick is removable. You can replace it as shown in the drawing. Chapter 2. Using your computer 23
-
 1
1 -
2
-
3
-
4
-
5
-
6
-
7
-
8
-
9
-
10
-
11
-
12
-
13
-
14
-
15
-
16
-
17
-
18
-
19
-
20
-
21
-
22
-
23
-
24
-
25
-
26
-
27
-
28
-
29
-
30
-
31
-
 32
32 -
 33
33 -
 34
34 -
 35
35 -
 36
36 -
 37
37 -
 38
38 -
 39
39 -
 40
40 -
 41
41 -
 42
42 -
43
-
44
-
45
-
46
-
47
-
48
-
49
-
50
-
51
-
52
-
53
-
54
-
55
-
56
-
57
-
58
-
59
-
60
-
61
-
62
-
63
-
64
-
65
-
66
-
67
-
68
-
69
-
70
-
71
-
72
-
73
-
74
-
75
-
76
-
77
-
78
-
79
-
80
-
81
-
82
-
83
-
84
-
85
-
86
-
87
-
88
-
89
-
90
-
91
-
92
-
93
-
94
-
95
-
96
-
97
-
98
-
99
-
100
-
101
-
102
-
103
-
104
-
105
-
106
-
107
-
108
-
109
-
110
-
111
-
112
-
113
-
114
-
115
-
116
-
117
-
118
-
119
-
120
-
121
-
122
-
123
-
124
-
125
-
126
-
127
-
128
-
129
-
130
-
131
-
132
-
133
-
134
 |
 |