Lenovo ThinkServer RD330 MegaRAID SAS Software User Guide - Page 368
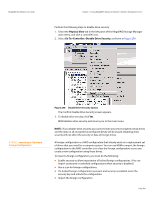
The Authenticate Drive Security Settings Screen appears. Authentification is
 |
View all Lenovo ThinkServer RD330 manuals
Add to My Manuals
Save this manual to your list of manuals |
Page 368 highlights
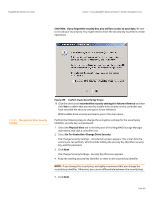
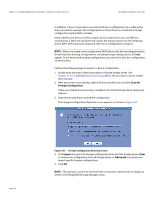
Chapter 11: Using MegaRAID® Advanced Software | SafeStore Encryption Services MegaRAID SAS Software User Guide 11.5.11 Disabling Drive Security The Change Security Settings - Security Key screen appears. 6. Click Use the existing drive security key to use the existing drive security key or enter a new security key and then enter the new security key again to confirm. CAUTION: If you forget the security key, you will lose access to your data. Be sure to record your security key information. You might need to enter the security key to perform certain operations. The security key is case-sensitive. It must be between 8 and 32 characters and contain at least one number, one lowercase letter, one uppercase letter, and one non-alphanumeric character (e.g. < > @ +). The space character is not permitted. NOTE: Non-US keyboard users must be careful not to enter DBCS characters in the security key field. Firmware works with the ASCII character set only. 7. Click Next. The Authenticate Drive Security Settings Screen appears. Authentification is required for the changes that you requested to the drive security settings. 8. Enter the current security key to authenticate the changes. The Change Security Settings - Password screen appears. 9. If you choose to, click the option to use a password in addition to the security key. 10. If you chose to use a password, either enter the existing password or enter a new password, and enter the password again to confirm. The text box for the passphrase can hold up to 32 characters. The key must be at least eight characters. The next screen that appears describes the changes you made and asks you whether you want to confirm these changes. 11. Click the check box to confirm that you have recorded the security settings for future reference and then click Yes to confirm that you want to change the drive security settings. MSM updates the existing configuration on the controller to use the new security settings and returns you to the main menu. NOTE: If you disable drive security, your existing data is not secure and you cannot create any new secure virtual drives. Disabling drive security does not affect the security of data on foreign drives. If you removed any drives that were previously secured, you still need to enter the password when you import them. Otherwise, you cannot access the data on those drives. NOTE: If there are any secure drive groups on the controller, you cannot disable drive security. A warning screen appears if you attempt to do so. To disable drive security, you must first delete the virtual drives on all of the secure drive groups. Page 368
-
 1
1 -
2
-
3
-
4
-
5
-
6
-
7
-
8
-
9
-
10
-
11
-
12
-
13
-
14
-
15
-
16
-
17
-
18
-
19
-
20
-
21
-
22
-
23
-
24
-
25
-
26
-
27
-
28
-
29
-
30
-
31
-
32
-
33
-
34
-
35
-
36
-
37
-
38
-
39
-
40
-
41
-
42
-
43
-
44
-
45
-
46
-
47
-
48
-
49
-
50
-
51
-
52
-
53
-
54
-
55
-
56
-
57
-
58
-
59
-
60
-
61
-
62
-
63
-
64
-
65
-
66
-
67
-
68
-
69
-
70
-
71
-
72
-
73
-
74
-
75
-
76
-
77
-
78
-
79
-
80
-
81
-
82
-
83
-
84
-
85
-
86
-
87
-
88
-
89
-
90
-
91
-
92
-
93
-
94
-
95
-
96
-
97
-
98
-
99
-
100
-
101
-
102
-
103
-
104
-
105
-
106
-
107
-
108
-
109
-
110
-
111
-
112
-
113
-
114
-
115
-
116
-
117
-
118
-
119
-
120
-
121
-
122
-
123
-
124
-
125
-
126
-
127
-
128
-
129
-
130
-
131
-
132
-
133
-
134
-
135
-
136
-
137
-
138
-
139
-
140
-
141
-
142
-
143
-
144
-
145
-
146
-
147
-
148
-
149
-
150
-
151
-
152
-
153
-
154
-
155
-
156
-
157
-
158
-
159
-
160
-
161
-
162
-
163
-
164
-
165
-
166
-
167
-
168
-
169
-
170
-
171
-
172
-
173
-
174
-
175
-
176
-
177
-
178
-
179
-
180
-
181
-
182
-
183
-
184
-
185
-
186
-
187
-
188
-
189
-
190
-
191
-
192
-
193
-
194
-
195
-
196
-
197
-
198
-
199
-
200
-
201
-
202
-
203
-
204
-
205
-
206
-
207
-
208
-
209
-
210
-
211
-
212
-
213
-
214
-
215
-
216
-
217
-
218
-
219
-
220
-
221
-
222
-
223
-
224
-
225
-
226
-
227
-
228
-
229
-
230
-
231
-
232
-
233
-
234
-
235
-
236
-
237
-
238
-
239
-
240
-
241
-
242
-
243
-
244
-
245
-
246
-
247
-
248
-
249
-
250
-
251
-
252
-
253
-
254
-
255
-
256
-
257
-
258
-
259
-
260
-
261
-
262
-
263
-
264
-
265
-
266
-
267
-
268
-
269
-
270
-
271
-
272
-
273
-
274
-
275
-
276
-
277
-
278
-
279
-
280
-
281
-
282
-
283
-
284
-
285
-
286
-
287
-
288
-
289
-
290
-
291
-
292
-
293
-
294
-
295
-
296
-
297
-
298
-
299
-
300
-
301
-
302
-
303
-
304
-
305
-
306
-
307
-
308
-
309
-
310
-
311
-
312
-
313
-
314
-
315
-
316
-
317
-
318
-
319
-
320
-
321
-
322
-
323
-
324
-
325
-
326
-
327
-
328
-
329
-
330
-
331
-
332
-
333
-
334
-
335
-
336
-
337
-
338
-
339
-
340
-
341
-
342
-
343
-
344
-
345
-
346
-
347
-
348
-
349
-
350
-
351
-
352
-
353
-
354
-
355
-
356
-
357
-
358
-
359
-
360
-
361
-
362
-
 363
363 -
 364
364 -
 365
365 -
 366
366 -
 367
367 -
 368
368 -
 369
369 -
 370
370 -
 371
371 -
 372
372 -
 373
373 -
374
-
375
-
376
-
377
-
378
-
379
-
380
-
381
-
382
-
383
-
384
-
385
-
386
-
387
-
388
-
389
-
390
-
391
-
392
-
393
-
394
-
395
-
396
-
397
-
398
-
399
-
400
-
401
 |
 |
