Lenovo ThinkServer RD330 MegaRAID SAS Software User Guide - Page 40
RAID Configuration, Strategies
 |
View all Lenovo ThinkServer RD330 manuals
Add to My Manuals
Save this manual to your list of manuals |
Page 40 highlights
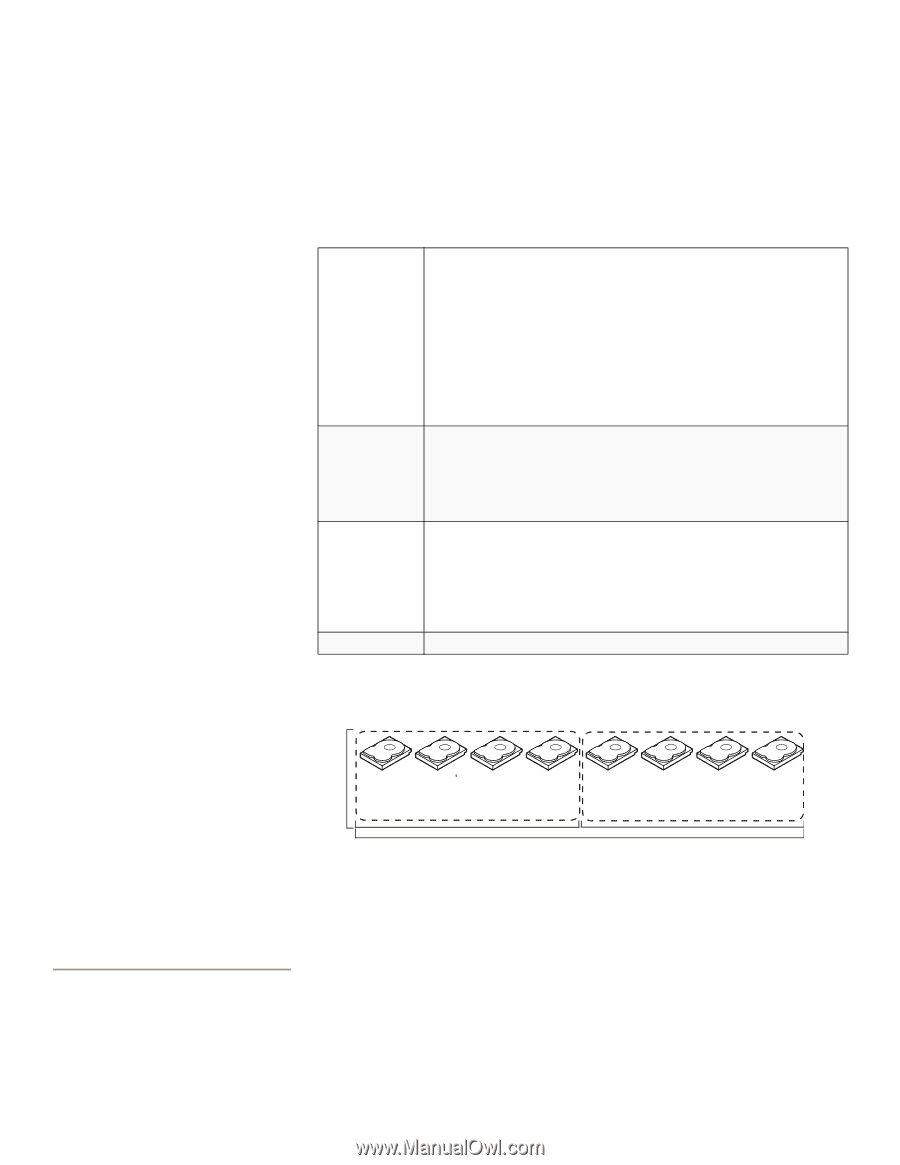
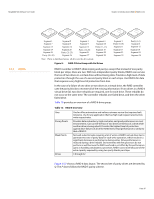
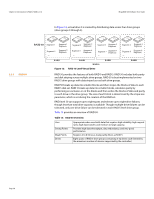
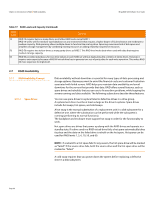
Chapter 2: Introduction to RAID | RAID Configuration Strategies MegaRAID SAS Software User Guide 2.6 RAID Configuration Strategies RAID 60 can support up to 8 spans and tolerate up to 16 drive failures, though less than total drive capacity is available. Two drive failures can be tolerated in each RAID 6 level drive group. Table 14: RAID 60 Overview Uses Strong Points Weak Points Drives Provides a high level of data protection through the use of a second parity block in each stripe. Use RAID 60 for data that requires a very high level of protection from loss. In the case of a failure of one drive or two drives in a RAID set in a virtual drive, the RAID controller uses the parity blocks to recreate all of the missing information. If two drives in a RAID 6 set in a RAID 60 virtual drive fail, two drive rebuilds are required, one for each drive. These rebuilds can occur at the same time. Use for office automation and online customer service that requires fault tolerance. Use for any application that has high read request rates but low write request rates. Provides data redundancy, high read rates, and good performance in most environments. Each RAID 6 set can survive the loss of two drives or the loss of a drive while another drive is being rebuilt. Provides the highest level of protection against drive failures of all of the RAID levels. Read performance is similar to that of RAID 50, though random reads in RAID 60 might be slightly faster because data is spread across at least one more disk in each RAID 6 set. Not well suited to tasks requiring lot of writes. A RAID 60 virtual drive has to generate two sets of parity data for each write operation, which results in a significant decrease in performance during writes. Drive performance is reduced during a drive rebuild. Environments with few processes do not perform as well because the RAID overhead is not offset by the performance gains in handling simultaneous processes. RAID 6 costs more because of the extra capacity required by using two parity blocks per stripe. A minimum of 8 Figure 14 shows a RAID 6 data layout. The second set of parity drives are denoted by Q. The P drives follow the RAID 5 parity scheme. RAID 60 Segment 1 Segment 8 Parity (Q11-Q12) Parity (P15-P16) Segment 2 Parity (Q3-Q4) Parity (P11-P12) Segment 15 Parity (Q1-Q2) Parity (P3-P4) Segment 11 Segment 16 Parity (P1-P2) Segment 7 Segment 12 Parity (Q15-Q16) Segment 3 Segment 6 Parity (Q9-Q10) Parity (P13-P14) Segment 4 Parity (Q5-Q6) Parity (P9-P10) Segment 13 Parity (Q3-Q4) Parity (P5-P6) Segment 9 Segment 14 Parity (P3-P4) Segment 5 Segment 10 Parity (Q13-Q14) RAID 6 RAID 0 Note: Parity is distribute d across all drives in the drive group. RAID 6 Figure 14: RAID 60 Level Virtual Drive The most important factors in RAID drive group configuration are: Virtual drive availability (fault tolerance) Virtual drive performance Virtual drive capacity Page 40
-
 1
1 -
2
-
3
-
4
-
5
-
6
-
7
-
8
-
9
-
10
-
11
-
12
-
13
-
14
-
15
-
16
-
17
-
18
-
19
-
20
-
21
-
22
-
23
-
24
-
25
-
26
-
27
-
28
-
29
-
30
-
31
-
32
-
33
-
34
-
 35
35 -
 36
36 -
 37
37 -
 38
38 -
 39
39 -
 40
40 -
 41
41 -
 42
42 -
 43
43 -
 44
44 -
 45
45 -
46
-
47
-
48
-
49
-
50
-
51
-
52
-
53
-
54
-
55
-
56
-
57
-
58
-
59
-
60
-
61
-
62
-
63
-
64
-
65
-
66
-
67
-
68
-
69
-
70
-
71
-
72
-
73
-
74
-
75
-
76
-
77
-
78
-
79
-
80
-
81
-
82
-
83
-
84
-
85
-
86
-
87
-
88
-
89
-
90
-
91
-
92
-
93
-
94
-
95
-
96
-
97
-
98
-
99
-
100
-
101
-
102
-
103
-
104
-
105
-
106
-
107
-
108
-
109
-
110
-
111
-
112
-
113
-
114
-
115
-
116
-
117
-
118
-
119
-
120
-
121
-
122
-
123
-
124
-
125
-
126
-
127
-
128
-
129
-
130
-
131
-
132
-
133
-
134
-
135
-
136
-
137
-
138
-
139
-
140
-
141
-
142
-
143
-
144
-
145
-
146
-
147
-
148
-
149
-
150
-
151
-
152
-
153
-
154
-
155
-
156
-
157
-
158
-
159
-
160
-
161
-
162
-
163
-
164
-
165
-
166
-
167
-
168
-
169
-
170
-
171
-
172
-
173
-
174
-
175
-
176
-
177
-
178
-
179
-
180
-
181
-
182
-
183
-
184
-
185
-
186
-
187
-
188
-
189
-
190
-
191
-
192
-
193
-
194
-
195
-
196
-
197
-
198
-
199
-
200
-
201
-
202
-
203
-
204
-
205
-
206
-
207
-
208
-
209
-
210
-
211
-
212
-
213
-
214
-
215
-
216
-
217
-
218
-
219
-
220
-
221
-
222
-
223
-
224
-
225
-
226
-
227
-
228
-
229
-
230
-
231
-
232
-
233
-
234
-
235
-
236
-
237
-
238
-
239
-
240
-
241
-
242
-
243
-
244
-
245
-
246
-
247
-
248
-
249
-
250
-
251
-
252
-
253
-
254
-
255
-
256
-
257
-
258
-
259
-
260
-
261
-
262
-
263
-
264
-
265
-
266
-
267
-
268
-
269
-
270
-
271
-
272
-
273
-
274
-
275
-
276
-
277
-
278
-
279
-
280
-
281
-
282
-
283
-
284
-
285
-
286
-
287
-
288
-
289
-
290
-
291
-
292
-
293
-
294
-
295
-
296
-
297
-
298
-
299
-
300
-
301
-
302
-
303
-
304
-
305
-
306
-
307
-
308
-
309
-
310
-
311
-
312
-
313
-
314
-
315
-
316
-
317
-
318
-
319
-
320
-
321
-
322
-
323
-
324
-
325
-
326
-
327
-
328
-
329
-
330
-
331
-
332
-
333
-
334
-
335
-
336
-
337
-
338
-
339
-
340
-
341
-
342
-
343
-
344
-
345
-
346
-
347
-
348
-
349
-
350
-
351
-
352
-
353
-
354
-
355
-
356
-
357
-
358
-
359
-
360
-
361
-
362
-
363
-
364
-
365
-
366
-
367
-
368
-
369
-
370
-
371
-
372
-
373
-
374
-
375
-
376
-
377
-
378
-
379
-
380
-
381
-
382
-
383
-
384
-
385
-
386
-
387
-
388
-
389
-
390
-
391
-
392
-
393
-
394
-
395
-
396
-
397
-
398
-
399
-
400
-
401
 |
 |