Lenovo V470c Lenovo V470c&V570c User Guide V1.0
Lenovo V470c Manual
 |
View all Lenovo V470c manuals
Add to My Manuals
Save this manual to your list of manuals |
Lenovo V470c manual content summary:
- Lenovo V470c | Lenovo V470c&V570c User Guide V1.0 - Page 1
Lenovo V470c/V570c User Guide V1.0 Read the safety notices and important tips in the included manuals before using your computer. - Lenovo V470c | Lenovo V470c&V570c User Guide V1.0 - Page 2
, be sure to read Lenovo Safety and General Information Guide first. • Some instructions in this guide may assume that you are lenovo.com, click Support, and then click User's guides and manuals. First Edition (May 2011) © Copyright Lenovo 2011. LENOVO products, data, computer software, and services - Lenovo V470c | Lenovo V470c&V570c User Guide V1.0 - Page 3
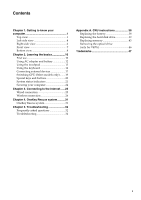
25 Wireless connection 26 Chapter 4. OneKey Rescue system ..........31 OneKey Rescue system 31 Chapter 5. Troubleshooting 32 Frequently asked questions 32 Troubleshooting 34 Appendix A. CRU instructions 38 Replacing the battery 38 Replacing the hard disk drive 39 Replacing memory 43 - Lenovo V470c | Lenovo V470c&V570c User Guide V1.0 - Page 4
- Lenovo V470c | Lenovo V470c&V570c User Guide V1.0 - Page 5
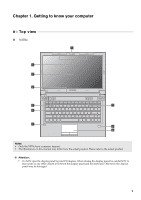
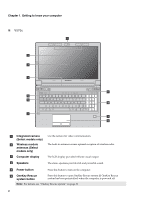
Chapter 1. Getting to know your computer Top view „ V470c a b c d V470c e k f g i h Notes: • Only the V570c have a numeric keypad. • The illustrations in this manual may differ from the actual product. Please refer to the actual product. Attention: • Do NOT open the display panel beyond 130 - Lenovo V470c | Lenovo V470c&V570c User Guide V1.0 - Page 6
Chapter 1. Getting to know your computer „ V570c a b c d V570c k e f j g i h a Integrated camera (Select models only) b Wireless module antennas (Select models only) c Computer display d Speakers Use the camera for video communication. The built-in antennas ensure optimal reception of wireless - Lenovo V470c | Lenovo V470c&V570c User Guide V1.0 - Page 7
Chapter 1. Getting to know your computer g Built-in microphone The built-in microphone (with noise reduction) can be used for video conferencing, voice narration, or simple audio recordings. h Touchpad The touchpad functions as a conventional mouse. Note: For details, see "Using the touchpad" - Lenovo V470c | Lenovo V470c&V570c User Guide V1.0 - Page 8
Chapter 1. Getting to know your computer Left-side view „ V470c ab c „ V570c d e f gh ab c d f gh a Kensington slot Attach a security lock (not supplied) here. Note: For details, see "Attaching a security lock (not supplied)" on page 24. b - Lenovo V470c | Lenovo V470c&V570c User Guide V1.0 - Page 9
Chapter 1. Getting to know your computer g USB port or eSATA/ USB combo port (Select models only) Connects to eSATA or USB devices. Note: For details, see "Connecting a universal serial bus (USB) device" on page 17. h USB port Connects to USB devices. Note: For details, see "Connecting a - Lenovo V470c | Lenovo V470c&V570c User Guide V1.0 - Page 10
Chapter 1. Getting to know your computer Right-side view „ V470c ab c „ V570c d c ab c d ce a Headphone jack Connects to external headphones. Attention: • Listening to music at high volume over extended periods of time may damage your - Lenovo V470c | Lenovo V470c&V570c User Guide V1.0 - Page 11
Chapter 1. Getting to know your computer Front view „ V470c ba „ V570c cd ab d c a System status indicators For details, see "System status indicators" on page 21. b GPU (Graphics Processing Unit) Slide and release this switch - Lenovo V470c | Lenovo V470c&V570c User Guide V1.0 - Page 12
Chapter 1. Getting to know your computer Bottom view „ V470c a b c d e 8 - Lenovo V470c | Lenovo V470c&V570c User Guide V1.0 - Page 13
„ V570c a Chapter 1. Getting to know your computer b c d e a Battery latch - manual The manual battery latch is used to keep the battery pack secured in place. b Battery pack For details, see "Using AC adapter and battery" on page 12. c - Lenovo V470c | Lenovo V470c&V570c User Guide V1.0 - Page 14
Chapter 2. Learning the basics First use „ Reading the manuals Read the supplied manuals before using your computer. „ Conncting to the power The supplied battery pack is not fully charged at purchase. To charge the battery and begin using - Lenovo V470c | Lenovo V470c&V570c User Guide V1.0 - Page 15
Chapter 2. Learning the basics To put the computer into sleep state, do one of the following. • Click and select Sleep from the Start menu. • Press Fn + F1. Note: Wait until the power indicator light starts blinking (indicating that the computer is in sleep state) before you move your computer. - Lenovo V470c | Lenovo V470c&V570c User Guide V1.0 - Page 16
extended period of time, or if you need to send your computer to Lenovo for service, etc. remove the battery pack from the computer. Before removing the the following points: • Replace only with a battery of the type recommended by Lenovo. • Keep the battery pack away from fire. • Do not expose the - Lenovo V470c | Lenovo V470c&V570c User Guide V1.0 - Page 17
Chapter 2. Learning the basics Using the touchpad V570c a bc a Touchpad b Left click button c Right click button To move the cursor on the screen, slide your fingertip over the pad in the direction in which you want the cursor to move. The function corresponds to that of the left mouse button - Lenovo V470c | Lenovo V470c&V570c User Guide V1.0 - Page 18
Chapter 2. Learning the basics Using the keyboard Your computer has a numeric keypad and function keys incorporated in its standard keyboard. „ Numeric keypad V470c The keyboard has keys that, when enabled, work as a 10-key numeric keypad. To enable or disable the numeric keypad, press Fn + F8. - Lenovo V470c | Lenovo V470c&V570c User Guide V1.0 - Page 19
Chapter 2. Learning the basics „ Function key combinations Through the use of the function keys, you can change operational features instantly. To use this function, press and hold Fn a ; then press one of the function keys b . b a b 15 - Lenovo V470c | Lenovo V470c&V570c User Guide V1.0 - Page 20
+ F3: Open the interface for the display device switch to select this notebook or an external display. Fn + F4: Open the interface for display F12: Skip to the next track. Fn + Insert (V570c): Fn + PgUp (V470c): Enable/Disable the scroll lock. Fn + PrtSc: Activate the system request. Fn + - Lenovo V470c | Lenovo V470c&V570c User Guide V1.0 - Page 21
Memory Stick PRO (MS PRO) • xD-Picture (xD) card Notes: • Insert ONLY one card in the slot at a time. • This card reader does not support SDIO devices (e.g., SDIO Bluetooth, etc.). Inserting a memory card 1 Push the dummy card until you hear a click. Gently pull the dummy card out of the memory - Lenovo V470c | Lenovo V470c&V570c User Guide V1.0 - Page 22
) If your computer has an integrated Bluetooth adapter card, it can connect to and transfer data wirelessly to other Bluetooth enabled devices, such as notebook computers, PDAs and cell phones. You can transfer data between these devices without cables and up to 10 meters range in open space. Note - Lenovo V470c | Lenovo V470c&V570c User Guide V1.0 - Page 23
Chapter 2. Learning the basics Switching GPU (Select models only Some IdeaPad models support Switchable Graphics. With this technology, you have the flexibility to switch between a dedicated Nvidia® GPU* (increased-performance GPU) and an integrated Intel GPU (power-saving - Lenovo V470c | Lenovo V470c&V570c User Guide V1.0 - Page 24
system button • When the computer is powered-off, press this button to enter the OneKey Rescue system if Lenovo OneKey Rescue system has been preinstalled. • In Windows operating system, press this button to start Lenovo OneKey Recovery. Note: For details, see "OneKey Rescue system" on page 31. 20 - Lenovo V470c | Lenovo V470c&V570c User Guide V1.0 - Page 25
Chapter 2. Learning the basics System status indicators These indicators inform you of the computer status. „ V470c a b c V470c d e f 21 - Lenovo V470c | Lenovo V470c&V570c User Guide V1.0 - Page 26
Chapter 2. Learning the basics „ V570c a bc V570c d e f 22 - Lenovo V470c | Lenovo V470c&V570c User Guide V1.0 - Page 27
a Caps lock indicator b Num lock indicator c Hard disk drive indicator d Power status indicator e Battery status indicator f Wireless communication indicator Chapter 2. Learning the basics 23 - Lenovo V470c | Lenovo V470c&V570c User Guide V1.0 - Page 28
. For details on installing the security lock, please refer to the instructions shipped with the security lock that you have purchased. Refer to the utility. Note: To enter BIOS setup utility, press F2 when the Lenovo logo appears on the screen while the computer is starting up. „ Fingerprint - Lenovo V470c | Lenovo V470c&V570c User Guide V1.0 - Page 29
: connect without wiring. Wired connection Wired connections are a reliable and safe way to connect the computer to the Internet. Cable Cable Internet services use a cable modem connected to the residential cable TV line. DSL DSL is a family of related technologies that bring high-speed - Lenovo V470c | Lenovo V470c&V570c User Guide V1.0 - Page 30
switch from to . 2 Press Fn + F5 to make configuration. Hardware connection Access point * V570c Wi-Fi/WiMAX network * Not supplied Software configuration Consult your Internet Service Provider (ISP) and search Windows Help and Support Center for details on how to configure your computer. 26 - Lenovo V470c | Lenovo V470c&V570c User Guide V1.0 - Page 31
Module (SIM) card after activation. For instructions on inserting the SIM card, refer to "Inserting the SIM card" on page 28. Notes: • Various standards are in use by mobile operators to provide Mobile Broadband services. The Lenovo Mobile Broadband module may support one or more of the following - Lenovo V470c | Lenovo V470c&V570c User Guide V1.0 - Page 32
shown by the SIM card mark next to the card slot. • Inserting the SIM card in the wrong direction may damage the SIM card slot. V470c Notched Corner 28 - Lenovo V470c | Lenovo V470c&V570c User Guide V1.0 - Page 33
V570c Chapter 3. Connecting to the Internet Notched Corner 5 Put the battery back in place. Turn the computer over and reconnect the cables. 29 - Lenovo V470c | Lenovo V470c&V570c User Guide V1.0 - Page 34
computer display and turn it over. 3 Remove the battery. 4 Push the SIM card in until you hear a click, and then pull the SIM card out. V470c V570c 5 Put the battery back in place. Turn the computer over and reconnect the cables. Note: Never insert or remove the SIM card while the - Lenovo V470c | Lenovo V470c&V570c User Guide V1.0 - Page 35
when required. You can run Lenovo OneKey Recovery under the Windows operating support the creation of recovery discs; however an appropriate external optical drive is needed to physically create the recovery discs. For more instructions, see the Help file of Lenovo OneKey Recovery. „ Using Lenovo - Lenovo V470c | Lenovo V470c&V570c User Guide V1.0 - Page 36
in the package with your computer, see Lenovo V470c/V570c Setup Poster. What safety precautions should I follow when using my computer? See "Chapter 1. Important safety information" of Lenovo Safety and General Information Guide. How can I prevent problems with my computer? See "Chapter 2. Use and - Lenovo V470c | Lenovo V470c&V570c User Guide V1.0 - Page 37
Chapter 5. Troubleshooting When do I need to restore the system to the factory status? You can use this feature when your system fails or you need to re- - Lenovo V470c | Lenovo V470c&V570c User Guide V1.0 - Page 38
Fn + F2 to confirm whether the LCD screen has been turned off. A Password problem I forgot my password. • If you forget your user password, you must take your computer to a Lenovo authorized servicer or a marketing representative to have the password changed. • If you forget your HDD password - Lenovo V470c | Lenovo V470c&V570c User Guide V1.0 - Page 39
Chapter 5. Troubleshooting Sleep or hibernation problems The critical low-battery error message appears, and care Information" of Lenovo Safety and General Information Guide. Note: If the battery is charged and the temperature is within range, have the computer serviced. The computer does not - Lenovo V470c | Lenovo V470c&V570c User Guide V1.0 - Page 40
Chapter 5. Troubleshooting Battery problems Your computer shuts down before the battery status indicator does not charge. • For details, see "Handling the battery" in Chapter 2. A hard disk drive problem The hard disk drive does not work. • In the Boot menu in BIOS setup utility, make sure - Lenovo V470c | Lenovo V470c&V570c User Guide V1.0 - Page 41
Chapter 5. Troubleshooting Other problems Your computer does not respond. • To turn off your computer, press and hold the power device may not be recognized, or system shut down may result. For more technical support, please visit consumer product website http://consumersupport.lenovo.com. 37 - Lenovo V470c | Lenovo V470c&V570c User Guide V1.0 - Page 42
instructions Notes: • The illustrations used in this chapter are of the Lenovo V570c, unless otherwise stated. • The following steps about upgrading and replacing devices are the same for the V470c and V570c. Replacing the battery Note: Use only the battery provided by Lenovo the manual battery - Lenovo V470c | Lenovo V470c&V570c User Guide V1.0 - Page 43
Appendix A. CRU instructions Replacing the hard disk drive You can increase the storage capacity of your computer by replacing the hard disk drive with one of greater capacity. You can purchase a new hard disk drive from your reseller or Lenovo marketing representative. Notes: • Replace the hard - Lenovo V470c | Lenovo V470c&V570c User Guide V1.0 - Page 44
Appendix A. CRU instructions To replace the hard disk drive, do the following: 1 Turn off the computer; then disconnect the AC adapter and all cables from the computer. 2 Close - Lenovo V470c | Lenovo V470c&V570c User Guide V1.0 - Page 45
5 Remove the frame fixing screw c . Appendix A. CRU instructions c 6 Pull the tab in the direction shown by arrow d . d 41 - Lenovo V470c | Lenovo V470c&V570c User Guide V1.0 - Page 46
Appendix A. CRU instructions 7 Take out the hard disk drive secured in a metal frame e . e 8 Remove the screws and detach the metal frame from the hard disk drive. 9 Attach the - Lenovo V470c | Lenovo V470c&V570c User Guide V1.0 - Page 47
Appendix A. CRU instructions Replacing memory You can increase the amount of memory in of your computer. DDR3 SDRAMs are available in various capacities. Note: Use only the memory types supported by your computer. If you incorrectly install optional memory, or install an unsupported memory type, a - Lenovo V470c | Lenovo V470c&V570c User Guide V1.0 - Page 48
Appendix A. CRU instructions 6 If two DDR3 SDRAMs are already installed in the memory slot, remove one of them to make room for the new one by pressing out - Lenovo V470c | Lenovo V470c&V570c User Guide V1.0 - Page 49
Appendix A. CRU instructions Note: If only one DDR3 SDRAM is used on the computer you are servicing, the card must be installed in SLOT-0 ( : lower slot), but not in SLOT-1 ( : upper slot). To make sure that the DDR3 SDRAM is installed correctly, - Lenovo V470c | Lenovo V470c&V570c User Guide V1.0 - Page 50
Appendix A. CRU instructions Removing the optical drive (only for V470c To remove the optical drive, do the following: 1 Remove find replacement instructions. AC adapter Power cord for AC adapter Battery Bottom access doors Hard disk drive Memory Optical drive Setup Poster O O O User Guide O O - Lenovo V470c | Lenovo V470c&V570c User Guide V1.0 - Page 51
or registered trademarks of Lenovo in the United States, other countries, or both. Lenovo OneKey Microsoft and Windows are trademarks of Microsoft Corporation in the United States, other countries, or both. Other company, products, or service names may be trademarks or service marks of others. 47 - Lenovo V470c | Lenovo V470c&V570c User Guide V1.0 - Page 52
THE STORE. For technical assistance, contact a Lenovo support specialist 24 hours a day by calling toll free 1-877-4 LENOVO (1-877-453-6686). Additionally, you can find support information and updates on the Lenovo Web site located at http://consumersupport.lenovo.com. * Only for the users from the - Lenovo V470c | Lenovo V470c&V570c User Guide V1.0 - Page 53
©Lenovo China 2011 New World. New Thinking.TM www.lenovo.com V1.0_en-US
-
 1
1 -
 2
2 -
 3
3 -
 4
4 -
 5
5 -
 6
6 -
 7
7 -
8
-
9
-
10
-
11
-
12
-
13
-
14
-
15
-
16
-
17
-
18
-
19
-
20
-
21
-
22
-
23
-
24
-
25
-
26
-
27
-
28
-
29
-
30
-
31
-
32
-
33
-
34
-
35
-
36
-
37
-
38
-
39
-
40
-
41
-
42
-
43
-
44
-
45
-
46
-
47
-
48
-
49
-
50
-
51
-
52
-
53
 |
 |

Read the safety notices and important tips in the
included manuals before using your computer.
Lenovo V470c/
V570c
User Guide
V1.0