Lexmark 13R0243 Network Guide
Lexmark 13R0243 - X4875 USB 2.0/PictBridge/ 802.11g All-in-One Color Printer Scanner Copier Photo Manual
 |
UPC - 734646316996
View all Lexmark 13R0243 manuals
Add to My Manuals
Save this manual to your list of manuals |
Lexmark 13R0243 manual content summary:
- Lexmark 13R0243 | Network Guide - Page 1
built in or installed in them. There are different ways a network can be set up. Five common examples appear below. Note: The printers in the following diagrams represent Lexmark printers with Lexmark internal print servers built in or installed in them so that they can communicate over a network - Lexmark 13R0243 | Network Guide - Page 2
network is connected to the Internet through a DSL or a cable modem. Internet Scenario 2: Computer, laptop, and printer connected wirelessly with Internet • A computer, a laptop, and a printer are connected wirelessly to a wireless router. • The network is connected to the Internet through a DSL or - Lexmark 13R0243 | Network Guide - Page 3
security keys or passwords used with the network security encryption type Note: You must know this information in order to properly set up the printer for use on the wireless network. To obtain these settings, see the documentation that came with your wireless router or consult the person who - Lexmark 13R0243 | Network Guide - Page 4
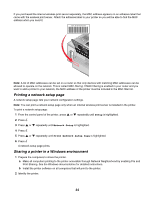
environment 1 Prepare the computers to share the printer. a Make all computers printing to the printer accessible through Network Neighborhood by enabling File and Print Sharing. See the Windows documentation for detailed instructions. b Install the printer software on all computers that will print - Lexmark 13R0243 | Network Guide - Page 5
not attached to the printer. Windows 2000 or Windows XP users only: a Click Start ΠSettings ΠPrinters and Faxes. b Right-click the Lexmark 4800 Series icon. c the printer and print server are located on another network (called a subnet), you must manually enter an IP address during printer software - Lexmark 13R0243 | Network Guide - Page 6
manually assigned IP addresses for the other network devices. • You want to assign a specific IP address. • You move the printer to a remote subnet. • The printer is listed as Unconfigured in the Configuration Utility. Contact your system support the printer on a network Follow the instructions for - Lexmark 13R0243 | Network Guide - Page 7
that may have direct network attached printers. If the software detects a direct network attached printer, you must first highlight the printer in the window, and then click Configure to manually assign an IP address to the printer. Contact your system support person for more information. Note: The - Lexmark 13R0243 | Network Guide - Page 8
networks Networks can operate in one of two modes: infrastructure or ad hoc. Lexmark recommends setting up a network in infrastructure mode using the installation CD that came with the printer. A wireless network where each device communicates with others through a wireless access point (wireless - Lexmark 13R0243 | Network Guide - Page 9
ad-hoc (computer-to-computer) network, and then click Next. 4 Follow the instructions in the "Set up a wireless ad hoc network" wizard. As part of the Create a network name or SSID for the network between the computer and your printer. b Write the name of your network in the space provided. Be sure - Lexmark 13R0243 | Network Guide - Page 10
screen. 24 Store your network name and security code in a safe place for future reference. Adding a printer to an existing ad hoc wireless network using Windows 1 Click Programs or All Programs ΠLexmark 4800 Series. 2 Click Wireless Setup. 3 Follow the instructions on the computer screen. 40 - Lexmark 13R0243 | Network Guide - Page 11
, and is lit. • The Wi-Fi indicator light is green. • The printer driver is installed on the computer from which you are performing a task. • The correct printer port is selected. Setup Troubleshooting Incorrect language appears on the display These are possible solutions. Try one of the following - Lexmark 13R0243 | Network Guide - Page 12
printer. 2 Plug the cord all the way into the power supply on the printer systems are supported: Windows Vista Service Pack 3 or later. Check your system requirements Check that your computer meets the minimum system requirements listed on the printer of the printer. 3 Firmly of the printer" on page - Lexmark 13R0243 | Network Guide - Page 13
again. Check power If the light is not on, make sure the printer is plugged into a properly grounded outlet. Make sure the power cord is properly connected to the printer. Reload paper Remove and then load paper. Check ink Check the ink levels, and install new print cartridges if necessary. 103 - Lexmark 13R0243 | Network Guide - Page 14
been removed. 1 2 3 Reinsert the cartridges. Check printer default and pause settings 1 Do one of the following: • In Windows Vista, click ŒControl Panel. • In Windows XP, click Start. 2 Click Printers Œ Printers and Faxes. 3 Double-click the printer queue device. 4 Click Printer. • Make sure no - Lexmark 13R0243 | Network Guide - Page 15
XP or earlier, click Start. 2 Click Programs or All Programs ΠLexmark 4800 Series. 3 Select Uninstall. 4 Follow the instructions on the computer screen to remove the printer software. 5 Restart the computer before reinstalling the printer software. 6 Click Cancel on all New Hardware Found screens - Lexmark 13R0243 | Network Guide - Page 16
printer communication problems The printer and the computer cannot exchange data. These are possible solutions. Try one or more of the following: Establish bidirectional communication between the printer wall outlet. 3 Press to turn the printer on. Wireless troubleshooting How do I find out what type - Lexmark 13R0243 | Network Guide - Page 17
during installation" in "Wireless troubleshooting." Check if printer driver is installed Make sure the printer driver is installed on the computer from instructions on the computer screen. Note: You must install the printer driver on each computer that uses the network printer. Check if printer - Lexmark 13R0243 | Network Guide - Page 18
information, see "Power button is not lit". Remove and reinstall the optional internal print server Note: This solution does not apply to printers that came with the internal wireless print server already installed. Reinstall the internal wireless print server. For more information, see "Installing - Lexmark 13R0243 | Network Guide - Page 19
information, see "Check your security keys" on page 106. Check MAC address If your network uses MAC address filtering, provide the MAC address for the printer to your network. If you need help finding the MAC address, see "Finding the MAC address" on page 33. Ping the wireless access point (wireless - Lexmark 13R0243 | Network Guide - Page 20
earlier: Start. 2 Click Programs or All Programs ΠLexmark 4800 Series. 3 Click Wireless Setup. Note: You may be prompted to connect the printer to the computer again using the installation cable as part of the setup process. 4 Follow the instructions on the computer screen. Wi-Fi indicator light is - Lexmark 13R0243 | Network Guide - Page 21
power • Make sure the printer power light is on. For more information, see "Power button is not lit" in the "Troubleshooting" chapter. • Make sure the angles for your printer and/or wireless access point (wireless router) antennas. Check network name The network name, or SSID (Service Set Identifer) - Lexmark 13R0243 | Network Guide - Page 22
" for Windows or Mac in the "Wireless troubleshooting" section. Run the wireless setup again If your wireless settings have changed, you will need to run the printer wireless setup again. Some reasons your settings may have changed include your having manually changed your WEP or WPA keys, channel - Lexmark 13R0243 | Network Guide - Page 23
earlier: Click Start. 2 Click Programs or All Programs ΠLexmark 4800 Series. 3 Click Wireless Setup. Note: You may be prompted to connect the printer to the computer again using the installation cable as part of the setup process. 4 Follow the instructions on the computer screen. Check whether the - Lexmark 13R0243 | Network Guide - Page 24
router) to issue a limited number of IP addresses, you must change this so that the printer can be added. Note: If you do not know how to make these changes, see the on the back of the printer. 4 Cancel the software installation. 5 Click Programs or All Programs ΠLexmark 4800 Series. 114 - Lexmark 13R0243 | Network Guide - Page 25
the computer network name, see the documentation that came with your computer. • To reset the printer name: 1 Click Programs or All Programs Œ Lexmark 4800 Series. 2 Click Wireless Setup Utility. 3 Follow the instructions on the computer screen, and enter the new network name when prompted. Ping the - Lexmark 13R0243 | Network Guide - Page 26
only) 1 Click Programs or All Programs ΠLexmark 4800 Series. 2 Click Wireless Setup Utility. Note: You may be prompted to connect the printer to the computer again using the installation cable as part of the setup process. 3 Follow the instructions on the computer screen. Changing wireless settings - Lexmark 13R0243 | Network Guide - Page 27
printer beside the serial number. 5 If USB is selected instead: a Select the port name from step 4. b Click Apply. c Close the window, and try printing again. Print troubleshooting x 15 cm) photo paper is loaded correctly in the paper support. • If your camera lets you change the print size setting, - Lexmark 13R0243 | Network Guide - Page 28
insert the other end into the PictBridge port on the front of the printer. 2 Turn the camera on, and choose your first photo using the for best results use Lexmark Photo Paper or Lexmark PerfectFinish Photo Paper. Do not use Lexmark Premium Photo Paper. Your print cartridges are not compatible with - Lexmark 13R0243 | Network Guide - Page 29
following: Check ink Check the ink levels, and install new print cartridges if necessary. Remove sheets as they are printed To avoid ink smudging when accepts ink differently and prints with color variations. If you are printing photos or other high-quality images, for best results use Lexmark photo - Lexmark 13R0243 | Network Guide - Page 30
Removing and reinstalling the software Software may not be installed correctly. Poor quality at the edges of the page These are possible solutions. Try one or more of the following: Check minimum print settings Unless you are using the borderless feature, use these minimum print margin settings: • - Lexmark 13R0243 | Network Guide - Page 31
. 4 From the Quality/Speed area, select a lower print quality. Remove and reinstall the software It is sometimes helpful to remove the existing printer software and reinstall it. Partial document or photo prints These are possible solutions. Try one or more of the following: Check document placement - Lexmark 13R0243 | Network Guide - Page 32
Programs or All Programs ΠLexmark 4800 Series. 3 Click Solution Center. 4 If an exclamation point (!) appears on a cartridge, the ink level is low. Install a new cartridge. For more information, see "Installing print cartridges" on page 94. For cartridge-ordering information, see "Ordering supplies - Lexmark 13R0243 | Network Guide - Page 33
other open files in the program you are using. The printer prints a blank page when too many files are open problem, test the solution by sending a document to print. Are the color and print speed settings correct? You may need to adjust the color and print speed. Are the print cartridges low on ink - Lexmark 13R0243 | Network Guide - Page 34
a new cartridge. Glossy photo paper or transparencies stick together Do photos or transparencies dry and stick together on the paper exit tray? Remove the photos or transparencies from the paper exit tray as they exit the printer. Allow them to dry before stacking. It takes longer for the ink to dry - Lexmark 13R0243 | Network Guide - Page 35
you need to align the print cartridges? The cartridges may be out of alignment. 1 Lexmark 4800 Series. 3 Click Solution Center. 4 If the Printer Status is: • Cannot Communicate, the problem could be hardware or printer software settings. • Ready or Busy Printing, the problem may be with the printer - Lexmark 13R0243 | Network Guide - Page 36
on the print catridges You may need to clean the print cartridge nozzles. Vertical straight lines are not smooth Adjust the Quality/Speed In Windows XP or 2000, click Start. 2 Click Programs or All Programs ΠLexmark 4800 Series. 3 Click Solution Center. 4 Click the Maintenance tab. 5 Click Align - Lexmark 13R0243 | Network Guide - Page 37
Checking printer readiness The printer may not be ready to print. Check the following. When you think you have solved the problem, test the solution by sending a document to print. Make sure the printer has paper and is properly loaded Make sure you have followed the correct loading instructions for - Lexmark 13R0243 | Network Guide - Page 38
Lexmark 4800 Series. 3 Click Solution Center. If an exclamation point (!) appears on either of the print cartridges, the ink level is low. Install a new cartridge. more square end of the USB cable is plugged into the back of the printer. 3 Check that the USB cable is not damaged and that the light - Lexmark 13R0243 | Network Guide - Page 39
breaks may change with the font. Use the program that created the document to fix these problems, and then save the changes for the next time you print. Printer is busy printing another job Wait until the printer has finished printing all other print jobs before sending this job to print. Ready or - Lexmark 13R0243 | Network Guide - Page 40
external device connected between the computer and the printer, make sure it supports bidirectional communication. Disconnect the printer from the external device, and connect it directly to the computer. If the printer works, there may be a problem with the print server. See the documentation that - Lexmark 13R0243 | Network Guide - Page 41
type Check the paper size and type to make sure the paper is supported by the printer. If you are using automatic duplexing, use only letter- or A4 unit" on page 139. Removing an external print server 1 Press to turn the printer off. 2 Make sure the power to the print server is off. 3 Remove the - Lexmark 13R0243 | Network Guide - Page 42
on the computer. To verify the USB port: 1 In Windows Vista, click Œ Control Panel Œ Printers (under Hardware and Sound). In Windows XP, click Start Œ Settings ŒPrinters and Faxes. 2 Right-click the Lexmark 4800 Series icon. 3 From the sidebar menu, select Properties. 4 Click the Ports tab. 5 Make - Lexmark 13R0243 | Network Guide - Page 43
folder (Windows Vista) on the host computer. Check the printer status Windows Vista users: 1 Click: • (default Start menu) • (Classic Start menu) Œ Settings Œ Printers. Œ Control Panel Œ Printers. 2 Right-click the Lexmark 4800 Series icon. 3 Click Sharing. 4 Click Change Sharing Options - Lexmark 13R0243 | Network Guide - Page 44
the host computer, but you still cannot print, try to locate the printer from the remote computer. Windows 2000, Windows XP, or Windows Vista users: 1 Open the Printers or Printers and Faxes folder. 2 Right-click the Lexmark 4800 Series icon. 3 Click Properties. 4 Click the Ports tab, and then click - Lexmark 13R0243 | Network Guide - Page 45
Problems when copying, scanning, or faxing Close other software Close all programs not Click Install. 4 When the Existing Printer Driver Found dialog box appears, select Update the existing driver software. Bidirectional communication is not established The printer and computer may not be able to - Lexmark 13R0243 | Network Guide - Page 46
printer is connected to the network. Experiencing poor quality or incorrect output See the topic that best describes the problem ΠPrinters or Printers and Faxes. 2 Right-click the Lexmark 4800 Series is not set as the port. Jams and misfeeds troubleshooting How to clear and avoid paper jams To clear - Lexmark 13R0243 | Network Guide - Page 47
manually 1 Press to turn off the printer. 2 Firmly grasp the paper, and gently pull it out. 3 Press to turn the printer back on. Paper jam in the paper support 1 Press to turn off the printer per paper type • Specific loading instructions for supported paper and specialty media Remove each page - Lexmark 13R0243 | Network Guide - Page 48
, making sure it does not buckle Printer does not feed paper, envelopes, or specialty media These are possible solutions. Try one or more of the following: Check for paper jams Check for and clear any paper jams. For more information, see "Jams and misfeeds troubleshooting" on page 136. Check media - Lexmark 13R0243 | Network Guide - Page 49
? Check the type of paper you are using. Some low-quality papers may be too thin or too slick to be fed correctly into the printer. For more information, see "Choosing compatible specialty paper types" on page 50. Are you loading the paper correctly? For more information, see "Loading paper" on - Lexmark 13R0243 | Network Guide - Page 50
the print job, and then try resending the print job again. Memory card troubleshooting Memory card cannot be inserted These are possible solutions. Try one or more of type of memory card you are using can be used in the printer. Check memory card placement Make sure you have inserted the memory card - Lexmark 13R0243 | Network Guide - Page 51
the printer. 4 From the control panel, press . 5 Press to choose Select Computer. 6 Press . 7 From the list shown, select the computer on your wireless network. 8 Follow the prompts on the computer screen. For more information, see the "Working with photos" chapter in the User's Guide: Comprehensive - Lexmark 13R0243 | Network Guide - Page 52
wireless network is connected and active. Note: If your wireless connection is down, use your configuration cable to connect your printer to your computer. Copy troubleshooting Copier does not respond These are possible solutions. Try one or more of the following: Check messages Resolve all error - Lexmark 13R0243 | Network Guide - Page 53
following: Check messages If an error message is displayed, see "Error messages on the computer screen" on page 153. Check ink Check the ink levels, and install a new print cartridge if necessary. Clean the scanner glass If the scanner glass is dirty, gently wipe it with a clean, lint-free cloth - Lexmark 13R0243 | Network Guide - Page 54
is Automatic or the size of the original document that you are copying. Scan troubleshooting Scanner does not respond These are possible solutions. Try one or more of the light is not on, make sure the printer is plugged into a properly grounded outlet. Make sure the power cord is properly connected - Lexmark 13R0243 | Network Guide - Page 55
USB cable connection 1 Check the USB cable for any obvious damage. 2 Firmly plug the square end of the USB cable into the back of the printer. 3 Firmly plug the rectangular end of the USB cable into the USB port of the computer. The USB port is marked with the USB symbol - Lexmark 13R0243 | Network Guide - Page 56
quality These are possible solutions. Try one or more of the following: Check messages If an error message is displayed, see "Error messages on the printer display" on page 147. Clean the scanner glass If the scanner glass is dirty, gently wipe it with a clean, lint-free cloth dampened with water - Lexmark 13R0243 | Network Guide - Page 57
button is not lit, press . 6 Reinsert the print cartridges and close the cartridge carrier lids. 7 Close the scanner unit. If the error does not reappear, the problem has been corrected. If the problem reappears, one of the cartridges is not working properly. Continue with the following procedure to - Lexmark 13R0243 | Network Guide - Page 58
1104 1 Remove the print cartridges. 2 Reinstall the black cartridge or the photo cartridge in the left carrier. 3 Reinstall the color cartridge in the right carrier. Invalid Device The device attached to the printer is not supported. Attach a supported device, or use other printer features. 148 - Lexmark 13R0243 | Network Guide - Page 59
the error: • Does not reappear, the problem has been corrected. • Reappears, replace the print cartridge with a new one, close the cartridge carrier lid, and close the scanner unit. Left Cartridge Missing / Right Cartridge Missing One or both print cartridges are missing or not installed properly - Lexmark 13R0243 | Network Guide - Page 60
see "Printing photos stored on a memory device using the proof sheet" on page 74. No valid photo image files detected No supported images have been found on the memory card or flash drive. The printer supports Baseline JPEG files (including Exif) ending with the extensions JPEG, JPE, and JPG. 150 - Lexmark 13R0243 | Network Guide - Page 61
2 Press to continue. Paper Mismatch The size of the paper loaded in the printer is not supported by the current mode. 1 Load the correct paper. 2 Press . Paper Jam For more information, see "Jams and misfeeds troubleshooting" on page 136. Paper Out 1 Load paper. 2 Press . Paper or Photo Size - Lexmark 13R0243 | Network Guide - Page 62
. Printer Carrier Stall 1 Check the printer carrier for any obstructions. 2 Press . For more information, see "Jams and misfeeds troubleshooting" photos stored on a memory device using the proof sheet" on page 74. Problems reading the memory card • See "Memory card cannot be inserted" on page 140 - Lexmark 13R0243 | Network Guide - Page 63
to choose Type. 4 Press or to choose the correct paper type. Note: The printer supports duplex printing only on plain paper. Error messages on the computer screen Clearing error messages the Canceling Printing dialog box appears. 2 Follow the instructions on the Canceling Printing dialog box. 153 - Lexmark 13R0243 | Network Guide - Page 64
established" on page 135. To find the problem without establishing bidirectional communication, see "Checking printer readiness" on page 127. Ink Low A print cartridge is almost out of ink. Install a new cartridge. For more information, see "Installing print cartridges" on page 94. To order a new - Lexmark 13R0243 | Network Guide - Page 65
. Fixing a printing failure Follow the instructions on the computer screen. If the printer still does not print: 1 Do one of the following: • In Windows Vista, click . • In Windows XP and earlier, click Start. 2 Click Programs or All Programs Œ Lexmark 4800 Series. 3 Click Solution Center, and - Lexmark 13R0243 | Network Guide - Page 66
received The name of a wireless network. When you connect a printer to a wireless network, the printer needs to use the same SSID as the network. Also referred to as network name or BSS (Basic Service Set). An IP address assigned manually by you A device similar to a network hub that can connect - Lexmark 13R0243 | Network Guide - Page 67
Fi WPA (Wi-Fi Protected Access) WPA2 An address assigned to a network printer or print server by the manufacturer. To find the UAA, print a network helps prevent unauthorized access to a wireless network. WPA is not supported on ad hoc wireless networks. Other possible security settings are WEP - Lexmark 13R0243 | Network Guide - Page 68
25 How To 25 Maintenance 25 Troubleshooting 25 using 25 C cable connections printer 99 cleaning print cartridge nozzles 97 collating copies 80 color effects applying 70 color ink low 148 colors on paper do not match colors on the screen 123 communication not available error 154 communication problems - Lexmark 13R0243 | Network Guide - Page 69
not detect a proof sheet 150 error 1104 148 error 1205 149 error 1206 149 general printing problem 154 ink low 154 Invalid Device 148 left cartridge error 149 left cartridge incorrect 149 left cartridge missing 149 memory full 150 no images have been selected 150 no photo/paper size selection has - Lexmark 13R0243 | Network Guide - Page 70
paper support 137 paper jam in the printer 137 paper or specialty media misfeeds 137 printer does not feed paper, envelopes, or specialty media 138 L labels, loading 42 language changing 101 last page first 47 left cartridge error 149 left cartridge incorrect 149 left cartridge missing 149 Lexmark - Lexmark 13R0243 | Network Guide - Page 71
parts control panel 16 duplex unit 17 memory card slots 16 paper exit tray 16 paper feed guard 16 paper guide 16 paper support 16 PictBridge port 16 power supply port 17 print cartridge carrier 17 scanner glass 16 scanner unit 17 top cover 16 USB port 17 Wi-Fi indicator 16 pausing - Lexmark 13R0243 | Network Guide - Page 72
48 print settings saving and deleting 55 print speed is slow 121 print troubleshooting cannot print from a flash drive 132 duplex unit does not operate correctly 131 improving print quality 118 ink levels seem incorrect 122 ink levels seem to go down quickly 122 partial 4x6in. (10x15cm) photo prints - Lexmark 13R0243 | Network Guide - Page 73
software does not install 102 software settings, printer resetting to factory defaults 56 Solution Center understanding 25 Solution Center buttons Advanced 25 How To 25 Maintenance 25 Troubleshooting 25 understanding 25 solving printer communication problems 106 speed settings, checking 129 T test - Lexmark 13R0243 | Network Guide - Page 74
areas 126 wrong printer attached 135 Troubleshooting button 25 troubleshooting, copy copier does not respond 142 partial document or photo copies 144 poor copy quality 143 scanner unit does not close 142 troubleshooting, error messages alignment error 147 black ink low 148 cartridge error 147 clear - Lexmark 13R0243 | Network Guide - Page 75
two-sided paper type error 153 two-sided printing automatic method 54 manual method 55 understanding 54 two-sided printing not supported on current paper size 153 two-sided printing not supported on current paper type 153 U updating printer software 135 USB port 17 enabling 105 using One-Click Auto - Lexmark 13R0243 | Network Guide - Page 76
Wi-Fi indicator light is blinking orange 108 Wi-Fi indicator light is orange 110 Wi-Fi indicator lights description 29 Work with Documents and Photos scanning a photo to 85 wrong printer attached 135 176
-
 1
1 -
 2
2 -
 3
3 -
 4
4 -
 5
5 -
 6
6 -
 7
7 -
8
-
9
-
10
-
11
-
12
-
13
-
14
-
15
-
16
-
17
-
18
-
19
-
20
-
21
-
22
-
23
-
24
-
25
-
26
-
27
-
28
-
29
-
30
-
31
-
32
-
33
-
34
-
35
-
36
-
37
-
38
-
39
-
40
-
41
-
42
-
43
-
44
-
45
-
46
-
47
-
48
-
49
-
50
-
51
-
52
-
53
-
54
-
55
-
56
-
57
-
58
-
59
-
60
-
61
-
62
-
63
-
64
-
65
-
66
-
67
-
68
-
69
-
70
-
71
-
72
-
73
-
74
-
75
-
76
 |
 |

Networking
General networking
Networking overview
A
network
is a collection of devices such as computers, printers, Ethernet hubs, wireless access points, and routers
connected together for communication through cables or through a wireless connection. A network can be either
wired, wireless, or designed to have both wired and wireless devices.
Devices on a wired network use cables to communicate with each other.
Devices on a wireless network use radio waves instead of cables to communicate with each other. For a device to
be able to communicate wirelessly, it must have a wireless print server attached or installed that enables it to receive
and transmit radio waves.
Common home network configurations
For desktop computers, laptops, and printers to communicate with each other over a network, they must be
connected by cables and/or have wireless network adapters built in or installed in them.
There are different ways a network can be set up. Five common examples appear below.
Note:
The printers in the following diagrams represent Lexmark printers with Lexmark internal print servers built in
or installed in them so that they can communicate over a network. Lexmark internal print servers are devices made
by Lexmark to enable Lexmark printers to be connected to wired or wireless networks.
Wired network example
•
A computer, a laptop, and a printer are connected by Ethernet cables to a hub, router, or switch.
•
The network is connected to the Internet through a DSL or a cable modem.
Internet
Wireless network examples
Four common wireless networks appear below:
•
Scenario 1: Laptop and printer connected wirelessly with Internet
•
Scenario 2: Computer, laptop, and printer connected wirelessly with Internet
•
Scenario 3: Computer, laptop, and printer connected wirelessly without Internet
•
Scenario 4: Laptop connected wirelessly to printer without Internet
31