Lexmark 16M1794 Maintenance Guide
Lexmark 16M1794 - X S654de MFP B/W Laser Manual
 |
UPC - 734646094030
View all Lexmark 16M1794 manuals
Add to My Manuals
Save this manual to your list of manuals |
Lexmark 16M1794 manual content summary:
- Lexmark 16M1794 | Maintenance Guide - Page 1
X651de, X652de, X654de, X656de, X656dte, X658d, X658de, X658dme, X658dfe, X658dte, X658dtme, X658dtfe Maintenance Guide July 2008 www.lexmark.com - Lexmark 16M1794 | Maintenance Guide - Page 2
Ordering a maintenance kit ...8 Ordering a fuser...9 Ordering an ADF maintenance kit...9 Ordering a transfer roller...9 Ordering charge rolls ...9 Ordering pick rollers ...9 Ordering ADF replacement parts...10 Ordering staple cartridges ...10 Recycling Lexmark products...10 Moving the printer...10 - Lexmark 16M1794 | Maintenance Guide - Page 3
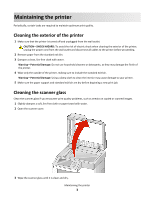
may cause damage to your printer. 5 Make sure the paper support and standard exit bin are dry before beginning a new print job. Cleaning the scanner glass Clean the scanner glass if you encounter print quality problems, such as streaks on copied or scanned images. 1 Slightly dampen a soft, lint - Lexmark 16M1794 | Maintenance Guide - Page 4
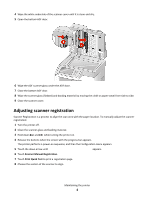
Scanner Registration is a process to align the scan area with the paper location. To manually adjust the scanner registration: 1 Turn the printer off. 2 Clean the scanner glass and backing material. 3 Hold down and while turning the printer on. 4 Release the buttons when the screen with the progress - Lexmark 16M1794 | Maintenance Guide - Page 5
, short edge first into the ADF. b Touch Copy Quick Test. The scanner prints a copy of the Quick Test page. c Touch ADF Front or ADF Back. d Use the copy of the Quick Test page to adjust the Horizontal Adjust and Top Margin settings. e Touch Submit. f Touch Copy Quick Test and compare the new - Lexmark 16M1794 | Maintenance Guide - Page 6
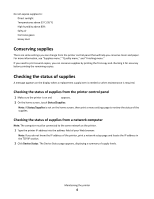
settings you can change from the printer control panel that will help you conserve toner and paper. For more information, see "Supplies menu," "Quality menu," and "Finishing menu." If you need to print several copies know the IP address of the printer, print a network setup page and locate the IP - Lexmark 16M1794 | Maintenance Guide - Page 7
faded, and then replace the cartridge. Recommended print cartridges and part numbers Part name Lexmark Return Program Cartridge For the US and Canada Print cartridge X651A11A High Yield Print Cartridge X651H11A Extra High Yield Print Cartridge X654X11A High Yield Return Program Print - Lexmark 16M1794 | Maintenance Guide - Page 8
• To check the fuser type (T1 or T2) installed in the printer, remove the print cartridge to view the label on the fuser. Part name Maintenance kit Part number 40X4723 (100 V T1 fuser) 40X4724 (110 V T1 fuser) 40X4765 (220 V T1 fuser) 40X4766 (100 V T2 fuser) 40X4767 (110 V T2 fuser) 40X4768 (220 - Lexmark 16M1794 | Maintenance Guide - Page 9
all the items necessary to replace the ADF pick mechanism and the ADF separator roller. See the following table for the maintenance kit part number for your specific printer. Part name ADF Maintenance kit Part number 40X4769 Ordering a transfer roller When toner smudges appear on the front or - Lexmark 16M1794 | Maintenance Guide - Page 10
roll Part number 3017345 3017348 Ordering staple cartridges When Staples Low or Staples Empty appears, order the specified staple cartridge. For more information, see the illustrations inside the stapler door. Part name Staple Cartridges-3 pack Part number 25A0013 Recycling Lexmark products - Lexmark 16M1794 | Maintenance Guide - Page 11
. • Disconnect all cords and cables from the printer before moving it. • Lift the printer off of the optional drawer and set it aside instead of trying to lift the drawer and printer at the same time. Notes: - Remove all printer options before moving the printer. - Use the handholds located on both - Lexmark 16M1794 | Maintenance Guide - Page 12
1 Right Side 20 cm (8 in.) 2 Left Side 31 cm (12 in.) 3 Front 51 cm (20 in.) 4 Rear 20 cm (8 in.) 5 Top 31 cm (12 in.) Shipping the printer When shipping the printer, use the original packaging or call the place of purchase for a relocation kit. Maintaining the printer 12
-
 1
1 -
 2
2 -
 3
3 -
 4
4 -
 5
5 -
 6
6 -
 7
7 -
8
-
9
-
10
-
11
-
12
 |
 |
X651de, X652de, X654de, X656de,
X656dte, X658d, X658de, X658dme,
X658dfe, X658dte, X658dtme,
X658dtfe
Maintenance Guide
July 2008
www.lexmark.com