Lexmark 2050 Color Jetprinter Setup Guide
Lexmark 2050 Color Jetprinter Manual
 |
View all Lexmark 2050 Color Jetprinter manuals
Add to My Manuals
Save this manual to your list of manuals |
Lexmark 2050 Color Jetprinter manual content summary:
- Lexmark 2050 Color Jetprinter | Setup Guide - Page 1
Unpack your printer 2 Attach paper exit tray 3 Attach paper support Paper support Power cord Print cartridges Paper exit tray Setup diskettes Print cartridge storage unit Remove all tape from the Lexmark 2050 Series Color Jetprinter™. Your printer may come with additional items (optional). Do - Lexmark 2050 Color Jetprinter | Setup Guide - Page 2
type in the Lexmark 2050 printer software. For more information, see "How to choose a media type" and "How to choose a paper size" in the Online Guide. Lexmark is a trademark of Lexmark International, Inc., registered in the United States and/or other countries. Color Jetprinter is a trademark of
-
 1
1 -
 2
2
 |
 |
Lexmark
2050 Series
Color Jetprinter
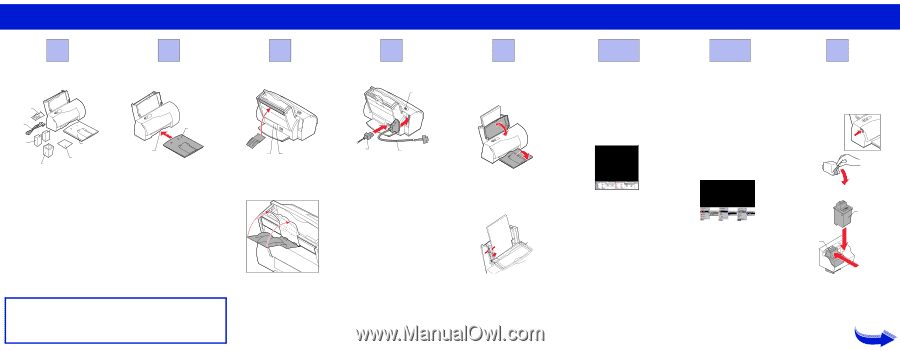
Unpack your printer
Remove all tape from the Lexmark 2050
Series Color Jetprinter™.
Your printer may come with additional items
(optional).
Do not install the print cartridges
until
step 7!
Attach paper exit tray
1
Make sure the printer is on a level surface.
2
Line up the paper exit tray with the tray
slot underneath the printer.
3
Hold the printer in place and slide the tray
firmly into the tray slot. The tray clicks
into place.
When the tray is properly installed, it slides
easily in the tray slot but cannot be pulled all
the way out of the printer.
Attach paper support
1
Turn the printer so the back faces you.
2
Hook the bottom of the paper support
under the lip on the back of the printer.
3
Push firmly until it
snaps
into place.
Connect your printer
1
Connect the parallel cable* to the com-
puter and printer. Fasten the metal clips on
the printer to the parallel cable.
2
Connect the power cord to the printer.
3
Plug the power cord into a properly
grounded electrical outlet.
4
Press the power button.
The green power light comes on.
* Use a parallel cable that supports bidirectional
communication (IEEE 1284-compatible), such as
Lexmark P/N 1329605.
1
Paper
support
Power
cord
Paper exit
tray
Print cartridge
storage unit
Print
cartridges
Setup diskettes
Lexmark Technical Support Center
See the printer registration card for the number appropriate
for your country.
P/N 13A1263
E.C. 3A0572
Please have the following information available so we may
serve you faster. (Located on the back of the printer)
Machine Type number ___________________________
Serial number __________________________________
Date purchased _________________________________
Store where purchased ___________________________
2
Paper exit tray
Tray slot
3
Serial number
Machine type
number
4
Power button
Power cord
Parallel cable
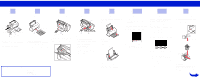
Load paper
The sheet feeder can hold approximately 150
sheets of paper.
1
Open the paper load door.
2
Extend the paper exit tray.
3
Insert paper.
4
For different size paper, squeeze the left
paper guide release lever and move to the
correct paper size.
5
Close the paper load door.
For information about loading other types of
paper into the sheet feeder, or using the
manual feeder, see the Online Guide.
Windows 3.1 or
Windows for Workgroups
1
Make sure the printer power is on.
2
Start Windows.
3
If you are using DOS/V, insert Disk 1 for
DOS/V into drive
x
(where x is the letter
of your floppy drive).
4
From the Windows Program Manager
menu bar, choose
File
, and choose
Run
.
5
In the command-line dialog box, type
x:setup
, and then click
OK
.
6
When prompted, continue with step 7,
“Install print cartridges”.
Windows 95
If Windows 95 prompted you to install the
printer software and you have already
installed it, continue with step 7.
1
Make sure the printer power is on.
2
Start Windows.
3
If you are using DOS/V, insert Disk 1 for
DOS/V into drive
x
(where x is the letter
of your floppy drive).
If you are using PC98, insert Disk 1 for
PC98 into drive
x
(where x is the letter of
your floppy drive).
4
From the Start menu choose
Settings
, then
choose
Printers
.
5
From the Printers folder, double-click
Add
Printer
.
6
Follow the instructions on the screen.
•
When you are prompted to select the
printer’s manufacturer and model, click
Have Disk
.
•
In the “Install From Disk” dialog box,
type
x:
, and then click
OK
.
7
When prompted by the printer software,
continue with step 7, “Install print
cartridges”.
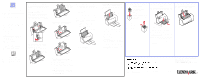
Install print cartridges
You can install two print cartridges at a time:
•
the black and the color cartridge,
or
•
a PHOTO cartridge (optional) and the
color cartridge
1
Open the printer
front cover.
2
Remove
the tape
from the
cartridges.
3
Insert the cartridges.
4
Push
back
on the cartridges until they
snap
into place.
5
When prompted by the printer software,
make sure you align the printheads.
6
When installation is complete, remove the
Setup diskette.
5
6.1
6.2
7
Do not touch
the copper area
!
Black
or
PHOTO
cartridge
Color
cartridge