Lexmark 21Z0300 Quick Reference
Lexmark 21Z0300 - Laser Printer Government Compliant Manual
 |
UPC - 734646048965
View all Lexmark 21Z0300 manuals
Add to My Manuals
Save this manual to your list of manuals |
Lexmark 21Z0300 manual content summary:
- Lexmark 21Z0300 | Quick Reference - Page 1
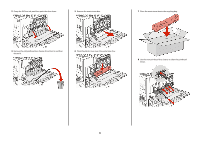
Lexmark™ C935 Quick Reference Loading paper and specialty media Loading the 520-sheet trays The printer has a standard 520-sheet tray (Tray 1), and it may have one or more optional 520-sheet trays. All 520-sheet trays support installed. 6 Make sure the paper guides are secure against the edges of the - Lexmark 21Z0300 | Quick Reference - Page 2
different in appearance, they support the same paper sizes and types and require the same process for loading paper. Use these instructions to load paper in loaded. 5 Make sure the paper guides are secure against the edges of the paper. 6 Insert the tray into the printer. 7 If a different type of - Lexmark 21Z0300 | Quick Reference - Page 3
B4, folio, legal, and statement paper with the recommended print side facedown and the short edge of the paper entering the printer first. Notes: - Adjust the additional paper guide to accommodate SRA3 and 12 x 19 paper sizes. - Do not exceed the maximum stack height by forcing paper under the stack - Lexmark 21Z0300 | Quick Reference - Page 4
approved for use with the printer. For more information, visit the Lexmark Web site at www.lexmark.com. Notes: • Hi-Speed USB devices must support the Full-speed standard. Devices only supporting USB Low-speed capabilities are not supported. • USB devices must support the FAT (File Allocation Tables - Lexmark 21Z0300 | Quick Reference - Page 5
USB flash memory device from the USB Direct interface until the document has finished printing. If you leave the USB flash memory device in the printer after leaving the initial USB menu screen, you can still print .pdf's from the USB flash memory device as held jobs. Canceling a print job from - Lexmark 21Z0300 | Quick Reference - Page 6
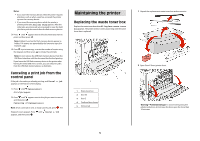
3 Grasp the E6 Door tab, and then push the door down. 5 Remove the waste toner box. 7 Place the waste toner box in the recycling bag. 4 Remove the old printhead lens cleaner from Door E, and then discard it. 6 Place the plastic cover over the waste toner box. 8 Use the new printhead lens - Lexmark 21Z0300 | Quick Reference - Page 7
press the bar down. 10 Place the new printhead lens cleaner in the notches of Door E. 13 Remove all paper from the printer paper path. Visit www.lexmark.com/recycling to learn how to recycle the waste toner box. Replacing a photoconductor Replace the black photoconductor when 84 Replace black pc - Lexmark 21Z0300 | Quick Reference - Page 8
the bar in position. Replacing a toner cartridge Replace the specified toner cartridge (cyan, magenta, yellow, or black) when 88 Replace toner appears. The printer will not continue printing until the specified cartridge is replaced. 1 Make sure the printer is on and Ready or 88 Replace - Lexmark 21Z0300 | Quick Reference - Page 9
. 4 Wipe only the outside of the printer, making sure to remove any ink residue that has accumulated on the paper exit tray. Warning-Potential Damage: Using a damp cloth to clean the interior may cause damage to your printer. 5 Make sure the paper support and paper exit tray are dry before beginning
-
 1
1 -
 2
2 -
 3
3 -
 4
4 -
 5
5 -
 6
6 -
 7
7 -
8
-
9
 |
 |

Lexmark™ C935
Quick Reference
Loading paper and
specialty media
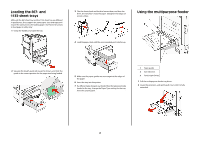
Loading the 520-sheet trays
The printer has a standard 520-sheet tray (Tray 1), and it may have
one or more optional 520-sheet trays. All 520-sheet trays support
the same paper sizes and types. Paper may be loaded in the trays
in either the long-edge or short-edge orientation.
1
Grasp the handle, and pull the tray out.
2
Squeeze the width guide tabs together as shown, and move
the width guide to the correct position for the paper size being
loaded.
3
Squeeze the length guide tab inward as shown, and slide the
guide to the correct position for the paper size being loaded.
Note:
Use the size indicators on the bottom of the tray to help
position the guides.
4
Flex the sheets back and forth to loosen them, and then fan
them. Do not fold or crease the paper. Straighten the edges on
a level surface.
5
Load the paper stack with the recommended print side faceup.
Load the paper in either the long-edge or short-edge
orientation as shown below:
Notes:
•
Load sizes larger than A4 in the short-edge orientation.
•
Paper must be loaded in the short-edge orientation to
create booklets if the optional booklet finisher is installed.
6
Make sure the paper guides are secure against the edges of
the paper.
7
Align the tray, and insert it.
8
If a different type of paper was loaded than the type previously
loaded in the tray, change the Paper Type setting for the tray
from the control panel.
1