Lexmark 26S0000 User's Guide
Lexmark 26S0000 - X 2670 Color Inkjet Manual
 |
UPC - 734646148948
View all Lexmark 26S0000 manuals
Add to My Manuals
Save this manual to your list of manuals |
Lexmark 26S0000 manual content summary:
- Lexmark 26S0000 | User's Guide - Page 1
2600 Series User's Guide January 2009 Machine type(s): 4433, 4445 Model(s): Various, xxx, where "x" is any alphanumeric character www.lexmark.com - Lexmark 26S0000 | User's Guide - Page 2
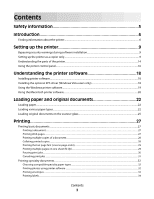
during software installation 9 Setting up the printer as a copier only...9 Understanding the parts of the printer...14 Using the printer control panel...16 Understanding the printer software 18 Installing printer software...18 Installing the optional XPS driver (Windows Vista users only 18 Using - Lexmark 26S0000 | User's Guide - Page 3
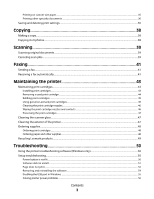
47 Cleaning the exterior of the printer...47 Ordering supplies...48 Ordering print cartridges ...48 Ordering paper and other supplies...48 Recycling Lexmark products...49 Troubleshooting 50 Using the printer troubleshooting software (Windows only 50 Setup troubleshooting...50 Power button is not - Lexmark 26S0000 | User's Guide - Page 4
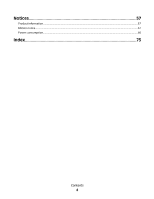
Notices 57 Product information...57 Edition notice...57 Power consumption...60 Index 73 Contents 4 - Lexmark 26S0000 | User's Guide - Page 5
cord or telephone, during a lightning storm. CAUTION-SHOCK HAZARD: To avoid the risk of electric shock when cleaning the exterior of the printer, unplug the power cord from the wall outlet and disconnect all cables from the printer before proceeding. SAVE THESE INSTRUCTIONS. Safety information 5 - Lexmark 26S0000 | User's Guide - Page 6
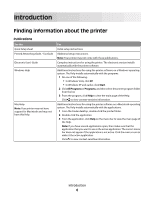
See the Quick Setup sheet Printed Networking Guide / Fax Guide Electronic User's Guide Windows Help Mac Help Note: Your printer may not have support for Macintosh and may not have this Help. For Initial setup instructions. Additional setup instructions. Note: Your printer may not come with these - Lexmark 26S0000 | User's Guide - Page 7
without notice. For the most recent telephone numbers available, see the printed warranty statement that came with your printer. E-mail support For e-mail support, visit our Web site: www.lexmark.com. E-mail support varies by country or region, and may not be available in some instances. 1 Click - Lexmark 26S0000 | User's Guide - Page 8
• Date purchased • Store where purchased Introduction 8 - Lexmark 26S0000 | User's Guide - Page 9
only Use the following instructions if you do not want to connect the printer to a computer. Note: If you want to connect the printer to a computer, use the setup documentation and the printer software CD that came with the printer. 1 Unpack the printer. 1 Print cartridges Note: Contents, such as - Lexmark 26S0000 | User's Guide - Page 10
2 Remove all tape and packing material from all areas of the printer. 3 Extend the paper exit tray, and then raise the paper support. 4 Extend the paper guides. 5 Connect the power cord, and then make sure the power is on. Setting up the printer 10 - Lexmark 26S0000 | User's Guide - Page 11
6 Open the printer, and then press down on the levers. 7 Remove the tape from the black cartridge, insert the cartridge in the left carrier, and then close the black cartridge carrier lid. Setting up the printer 11 - Lexmark 26S0000 | User's Guide - Page 12
8 Remove the tape from the color cartridge, insert the cartridge in the right carrier, and then close the color cartridge carrier lid. 9 Close the printer, and then load paper. 10 Press and hold the button for three seconds. Setting up the printer 12 - Lexmark 26S0000 | User's Guide - Page 13
An alignment page prints. 11 Place the printed page on the scanner glass. 12 Press the button. 13 Discard the alignment page. Setting up the printer 13 - Lexmark 26S0000 | User's Guide - Page 14
the one shown. • Streaks on the alignment page are normal, and do not indicate a problem. Understanding the parts of the printer Use the To 1 Paper support Load paper. 2 Printer control panel Operate the printer. 3 Paper exit tray Hold paper as it exits. 4 Top cover Access the scanner glass - Lexmark 26S0000 | User's Guide - Page 15
To 1 Scanner unit Access the print cartridges. 2 Scanner support Hold up the scanner unit. 3 Print cartridge carrier Install, replace, or remove a print cartridge. 4 Power supply with port Connect the printer to a power source. 5 USB port Connect the printer to a computer using a USB cable - Lexmark 26S0000 | User's Guide - Page 16
x 6-inch color photo copy. 4 Scan a document or photo to the computer. 5 Load or eject paper. 6 • Turn the printer on or off. • Cancel a print, copy, or scan job in progress. • Reset the printer. 7 Cancel a print, copy, or scan job in progress. 8 Set the number of copies. Setting up the - Lexmark 26S0000 | User's Guide - Page 17
number of copies to be printed. 2 The • Determine if the color print cartridge needs to be replaced. light • Determine if the color print cartridge is missing or invalid. 3 The • Determine if the black or photo print cartridge needs to be replaced. light • Determine if the black or photo print - Lexmark 26S0000 | User's Guide - Page 18
. Using the World Wide Web 1 Go to the Lexmark Web site at www.lexmark.com. 2 From the home page, navigate through the menu selection, and then click Drivers & Downloads. 3 Choose the printer and the printer driver for your operating system. 4 Follow the instructions on the screens to download the - Lexmark 26S0000 | User's Guide - Page 19
files are launched. Follow the instructions on the screen to finish installing the patch. To install the XPS driver: 1 Click Control Panel. 2 Under Hardware and Sound, click Printer, and then click Add a Printer. 3 From the Add Printer dialog, click Add a local printer. 4 From the "Use an existing - Lexmark 26S0000 | User's Guide - Page 20
settings of the printer. Using the Macintosh printer software Use the Print dialog Printer Services dialog To Adjust the print settings and schedule print jobs. • Access the printer utility. • Troubleshoot. • Order ink or supplies. • Contact Lexmark. • Check the printer software version installed - Lexmark 26S0000 | User's Guide - Page 21
page. • Print an alignment page. • Clean the print cartridge nozzles. • Order ink or supplies. • Register the printer. • Contact customer support. Lexmark Wireless Setup Assistant Set up the printer on a wireless network. Note: Your printer may not come with these applications, depending on the - Lexmark 26S0000 | User's Guide - Page 22
or damaged. • If you are using specialty paper, you follow the instructions that came with it. • You do not force paper into the printer. 2 Before loading paper the first time, slide the paper guides out toward the edges of the paper support. 3 Load the paper vertically in the center of the paper - Lexmark 26S0000 | User's Guide - Page 23
it to dry to avoid ink smudging. • The rough side of the transparencies faces you. • If the transparencies have a removable strip, each strip faces away from you and down toward the printer. • The transparencies are loaded in the center of the paper support. • The paper guides rest against the edges - Lexmark 26S0000 | User's Guide - Page 24
custom-size paper banner paper Make sure • You follow the loading instructions that came with the iron-on transfers. • The print side of the transfers faces you. • The transfers are loaded in the center of the paper support. • The paper guides rest against the edges of the transfers. Note: For best - Lexmark 26S0000 | User's Guide - Page 25
Loading original documents on the scanner glass You can scan and then print photos, text documents, magazine articles, newspapers, and other publications. You can scan a document for faxing. Note: The maximum scan area for the scanner glass is 216 x 297 mm (8.5 x 11.7 in.). 1 Open the top cover. 2 - Lexmark 26S0000 | User's Guide - Page 26
3 Close the top cover to avoid dark edges on the scanned image. Loading paper and original documents 26 - Lexmark 26S0000 | User's Guide - Page 27
. Printing Web pages If you chose to install the Lexmark Toolbar software for your Web browser, then you can use it to create a printer-friendly version of any Web page. Notes: • For Windows, the software supports Microsoft Internet Explorer 5.5 or later or a compatible version of Firefox. • For - Lexmark 26S0000 | User's Guide - Page 28
1 Load paper. 2 Open a Web page using a supported browser. 3 Select a print option to print the page. You want to print, and then select Collate Copies. 4 Click OK to close any printer software dialogs. 5 Click OK or Print. Note: The collate option is available only when you are printing - Lexmark 26S0000 | User's Guide - Page 29
that you want to print, and then select Collated. 3 Click Print. Note: To prevent smudging when printing photos, remove each photo as it exits the printer, and then let it dry before stacking. Printing the last page first (reverse page order) Using Windows 1 With a document open, click File Print - Lexmark 26S0000 | User's Guide - Page 30
want to print a border around each page image, then choose an option from the Border pop-up menu. 8 Click Print. Pausing print jobs Using the printer folder in Windows 1 Do one of the following: In Windows Vista a Click . b Click Control Panel. c Under Hardware and Sound, click - Lexmark 26S0000 | User's Guide - Page 31
or Stop Jobs, depending on the operating system version that you are using. Canceling print jobs Using the printer control panel Press . Using the printing status window of the printer The printing status window automatically opens at the bottom-right part of your screen when you send a print - Lexmark 26S0000 | User's Guide - Page 32
Lexmark inkjet printers, but compatible with all inkjet printers. It is used specifically for printing professional quality photos with a glossy finish. It is best when used with genuine Lexmark evercolor 2 ink side is the printable side, then see the instructions that came with the paper.) 2 Print - Lexmark 26S0000 | User's Guide - Page 33
c Select Lexmark Productivity Studio. Note: This program may not appear in your printer program folder, depending on whether you chose to install it with the printer software during installation. d Open the photo that you want to print. e Follow the instructions on the computer screen to edit and - Lexmark 26S0000 | User's Guide - Page 34
orientation. • Make sure the same orientation is also selected in the software application. Printing labels 1 Load the label sheets in the printer. 2 Send the print job: Using Windows a With a document open, click File Print. b Click Properties, Preferences, Options, or Setup. c From the Paper - Lexmark 26S0000 | User's Guide - Page 35
printer first. • Make sure the adhesive on the labels does not extend to within 1 mm of the edge of the label sheet. • Make sure the paper guide or paper guides to avoid ink smudging. Printing on custom-size paper Before beginning these instructions, load the custom-size paper in the printer. For - Lexmark 26S0000 | User's Guide - Page 36
Printing other specialty documents When you installed the printer driver, some printer software was installed that may help you print specialty the printer software was installed. b Choose Library Printers YYYY Lexmark, and then select your printer model. YYYY is the year that the printer was - Lexmark 26S0000 | User's Guide - Page 37
Notes: • To retrieve your print settings, click Profiles Restore a Profile, and then select the name of the profile that you want to use. • To delete a setting, click Profiles Delete Profiles. Select the setting that you want to delete, and then click Delete. Using Macintosh The Presets pop-up - Lexmark 26S0000 | User's Guide - Page 38
cm) photo card with the glossy or printable side facing you. (If you are not sure which side is the printable side, then see the instructions that came with the paper.) 2 Place a photo facedown on the scanner glass in the lower right corner. 3 If you want to print more than one - Lexmark 26S0000 | User's Guide - Page 39
control panel To cancel a job being scanned on the scanner glass, go to the printer control panel, and then press . Using Windows To cancel a scan job started in the Lexmark Productivity Studio or Lexmark FastPics, open the software, and then follow the instructions on the screen. Scanning 39 - Lexmark 26S0000 | User's Guide - Page 40
Using Macintosh 1 From the Finder desktop, double-click the printer folder. 2 Double-click the printer icon. 3 From the Progress dialog, click Cancel. Scanning 40 - Lexmark 26S0000 | User's Guide - Page 41
fax modem, the computer is configured to fax, a phone line is connected to the computer, and both the printer and computer are on. • The Lexmark Fax Solutions and Lexmark Productivity Studio software are installed on your computer. If you have not installed these additional programs during initial - Lexmark 26S0000 | User's Guide - Page 42
and off at scheduled times, select the settings that you want from the drop-down lists. 8 To set the number of telephone rings before the printer automatically receives faxes, select a setting from the "Pick-up on the" drop-down list in the "Answering on your phone line type" area. 9 Click OK - Lexmark 26S0000 | User's Guide - Page 43
Maintaining print cartridges Installing print cartridges 1 Open the printer, and then press down on the cartridge carrier levers. 2 Remove the used print cartridge or cartridges. 3 If you are installing new print cartridges, remove the tape from the back and bottom of the black cartridge, insert the - Lexmark 26S0000 | User's Guide - Page 44
: Do not touch the gold contact area on the back or the metal nozzles on the bottom of the cartridge. 5 Close the printer, making sure to keep your hands out from underneath the scanner unit. Removing a used print cartridge 1 Make sure the printer is on. 2 Lift the scanner unit. Maintaining the - Lexmark 26S0000 | User's Guide - Page 45
to the printer. For best results, use Lexmark supplies. Using genuine Lexmark print cartridges Lexmark printers, print cartridges, and photo paper are designed to perform together for superior print quality. If you receive an Out of Original Lexmark Ink message, the original Lexmark ink in the - Lexmark 26S0000 | User's Guide - Page 46
• If you are using the printer without a computer, press Cancel. Lexmark's warranty does not cover damage caused by non-Lexmark ink or print cartridges. Cleaning the print cartridge nozzles Using Windows 1 Load plain paper. 2 Do one of the following: • In Windows Vista, click . • In Windows XP and - Lexmark 26S0000 | User's Guide - Page 47
the printer except to replace, clean, or store it in an airtight container. The cartridges do not print correctly if left exposed for an extended period of time. Cleaning the scanner glass 1 Dampen a clean, lint-free cloth with water. 2 Gently wipe the scanner glass clean. Note: Make sure all ink or - Lexmark 26S0000 | User's Guide - Page 48
cause damage to your printer. 5 Make sure the paper support and paper exit tray are dry before beginning a new print job. Ordering supplies Ordering print cartridges Lexmark 2600 Series models Item Part number Average cartridge standard page yield 1 Black cartridge 14A Black cartridge2 14 - Lexmark 26S0000 | User's Guide - Page 49
Photo Paper • Letter • A4 • 4 x 6 in. • 10 x 15 cm •L USB cable Part number 1021294 Recycling Lexmark products To return Lexmark products to Lexmark for recycling: 1 Visit our Web site at www.lexmark.com/recycle. 2 Follow the instructions on the computer screen. Maintaining the printer 49 - Lexmark 26S0000 | User's Guide - Page 50
Using the printer troubleshooting software (Windows only) The Lexmark Service Center provides step-by-step troubleshooting help and contains links to printer maintenance tasks and customer support. To open the Lexmark Service Center, use one of these methods: Method 1 If it appears on - Lexmark 26S0000 | User's Guide - Page 51
The following operating systems are supported: Windows Vista, Windows XP, Windows 2000 with Service Pack 3 or later, and Mac OS X version 10.3 or later. CHECK THAT YOUR COMPUTER MEETS THE MINIMUM SYSTEM REQUIREMENTS LISTED ON THE PRINTER BOX CHECK THE USB CONNECTION 1 Check the USB cable - Lexmark 26S0000 | User's Guide - Page 52
the print cartridges. 2 Make sure the sticker and tape have been removed. 3 Reinsert the cartridges. CHECK PRINTER DEFAULT AND PAUSE SETTINGS Using Windows 1 Do one of the following: In Windows Vista a Click . b Click Control Panel. c Under Hardware and Sound, click Printer. Troubleshooting 52 - Lexmark 26S0000 | User's Guide - Page 53
. • If the printer is not in bold, then it is not the default printer. You must select the printer for each file that you want to print. If you want to set the printer as the default printer: a Go back to the Printer List dialog, and then select the printer. b Click Make Default. Troubleshooting 53 - Lexmark 26S0000 | User's Guide - Page 54
the power cord into the wall outlet. 6 Press to turn on the printer. REMOVE AND REINSTALL THE SOFTWARE If you encountered problems while installing, or if your printer does not appear in the printers folder or as a printer option when sending a print job, then try uninstalling and reinstalling the - Lexmark 26S0000 | User's Guide - Page 55
. 5 Restart the computer before reinstalling the printer software. 6 Insert the installation CD, and then follow the instructions on the computer screen to reinstall the software. If the software still does not install correctly, visit our Web site at www.lexmark.com to check for the latest software - Lexmark 26S0000 | User's Guide - Page 56
. 4 Reconnect the power supply to the printer. 5 Plug the power cord into the wall outlet. 6 Press to turn the printer on. MAKE SURE THE PRINTER IS NOT IN SLEEP MODE If the power light is blinking on and off slowly, then the printer is in sleep mode. Press to turn the printer on. Troubleshooting 56 - Lexmark 26S0000 | User's Guide - Page 57
in conjunction with other products, programs, or services, except those expressly designated by the manufacturer, are the user's responsibility. For Lexmark technical support, visit support.lexmark.com. For information on supplies and downloads, visit www.lexmark.com. If you don't have access to - Lexmark 26S0000 | User's Guide - Page 58
Lexmark and Lexmark with diamond design are trademarks of Lexmark the installation software CD. Directory \drivers\xps \Pubs \Install\Licenses File and used in accordance with the instructions, may cause harmful interference to radio service representative for additional suggestions. Notices 58 - Lexmark 26S0000 | User's Guide - Page 59
may result in a violation of FCC regulations. Any questions regarding this compliance information statement should be directed to: Director of Lexmark Technology & Services Lexmark International, Inc. 740 West New Circle Road Lexington, KY 40550 (859) 232-3000 Hinweis zum GS-Zeichen Modell - Lexmark 26S0000 | User's Guide - Page 60
of our products. If you have further questions about recycling options, visit the Lexmark Web site at www.lexmark.com for your local sales office phone number. Product disposal Do not dispose of the printer or supplies in the same manner as normal household waste. Consult your local authorities - Lexmark 26S0000 | User's Guide - Page 61
the product spends in each mode in order to calculate energy usage. The total product energy usage is the sum of each mode's energy usage. LEXMARK SOFTWARE LIMITED WARRANTY AND LICENSE AGREEMENTS PLEASE READ CAREFULLY BEFOREUSING THIS PRODUCT: BY USING THIS PRODUCT, YOU AGREE TO BE BOUND BY ALL THE - Lexmark 26S0000 | User's Guide - Page 62
licensed for, and designed to work with only genuine Lexmark ink cartridges for the life of the patented printer. I agree to: (1) use only genuine Lexmark ink cartridges with this printer (except I may use replacement cartridges made by Lexmark but sold without single use terms as described in the - Lexmark 26S0000 | User's Guide - Page 63
OR CONTRACT, TORT (INCLUDING NEGLIGENCE OR STRICT LIABILITY), AND EVEN IF LEXMARK, OR ITS SUPPLIERS, AFFILIATES, OR REMARKETERS HAVE BEEN ADVISED OF THE number of authorized users to the number specified in your agreement with Lexmark. You may not separate the components of the Software Program for - Lexmark 26S0000 | User's Guide - Page 64
, its affiliates, and agents may collect and use information you provide in relation to support services performed with respect to the Software Program and requested by you. Lexmark agrees not to use this information in a form that personally identifies you except to the extent necessary to provide - Lexmark 26S0000 | User's Guide - Page 65
any Lexmark policies or programs for support services conflict with the terms of this License Agreement, the terms of this License Agreement shall control. * Products within the XX90 Series (including but not limited to models Z2390, Z2490, X2690, X3690, and X4690) are not subject to the Cartridge - Lexmark 26S0000 | User's Guide - Page 66
service. If you experience trouble with this equipment, for repair or warranty information, contact Lexmark International, Inc. at www.lexmark.com or your Lexmark the problem is resolved. This equipment contains no user serviceable parts. For repair and warranty information, contact Lexmark - Lexmark 26S0000 | User's Guide - Page 67
, typically lightning transients, are very destructive to customer terminal equipment connected to AC power sources. This has been identified as a major nationwide problem. It is recommended that the customer install an appropriate AC surge arrestor in the AC outlet to which this device is connected - Lexmark 26S0000 | User's Guide - Page 68
the Facsimile User Instructions. The grant of services. This equipment shall not be set up to make automatic calls to the Telecom's 111 Emergency Service any 30 minute period for any single manual call initiation, and • The equipment facturation suisse (nº de référence Lexmark : 14B5109 ou 80D1877) - Lexmark 26S0000 | User's Guide - Page 69
the CE marking. A declaration of conformity with the requirements of the directives is available from the Director of Manufacturing and Technical Support, Lexmark International, S. A., Boigny, France. Refer to the table at the end of the Notices section for further compliance information. Regulatory - Lexmark 26S0000 | User's Guide - Page 70
the antenna provided. Use of any other antenna is strictly prohibited per regulations of Industry Canada. To prevent radio interference to the licensed service, this device is intended to be operated indoors and away from windows to provide maximum shielding. Equipment (or its transmit antenna) that - Lexmark 26S0000 | User's Guide - Page 71
use only. A declaration of conformity with the requirements of the directives is available from the Director of Manufacturing and Technical Support, Lexmark International, S. A., Boigny, France. Refer to the table at the end of the Notices section for further compliance information. Česky Dansk - Lexmark 26S0000 | User's Guide - Page 72
toestel dit product in overeenstemming is met de essentiële eisen en de andere relevante bepalingen van richtlijn 1999/5/EG. Norsk Polski Lexmark International, Inc. erklærer herved at dette produktet er i samsvar med de grunnleggende krav og øvrige relevante krav i direktiv 1999/5/EF. Niniejszym - Lexmark 26S0000 | User's Guide - Page 73
cleaning 46 installing 43 ordering 48 preserving 47 removing 44 using genuine Lexmark 45 wiping 46 cleaning exterior of the printer 47 cleaning print cartridge nozzles 46 copying 38 4 x 6 photos 38 custom-size paper and other supplies ordering 48 paper exit tray 14 paper guide 14 paper support 14 - Lexmark 26S0000 | User's Guide - Page 74
information 9 Service Center 50 setup troubleshooting page does not print 52 power button is not lit 50 software did not install 51 setup, printer 9 software removing and reinstalling 54 Service Center 50 XPS driver 18 software did not install 51 solving printer communication problems 56 specialty
-
 1
1 -
 2
2 -
 3
3 -
 4
4 -
 5
5 -
 6
6 -
 7
7 -
8
-
9
-
10
-
11
-
12
-
13
-
14
-
15
-
16
-
17
-
18
-
19
-
20
-
21
-
22
-
23
-
24
-
25
-
26
-
27
-
28
-
29
-
30
-
31
-
32
-
33
-
34
-
35
-
36
-
37
-
38
-
39
-
40
-
41
-
42
-
43
-
44
-
45
-
46
-
47
-
48
-
49
-
50
-
51
-
52
-
53
-
54
-
55
-
56
-
57
-
58
-
59
-
60
-
61
-
62
-
63
-
64
-
65
-
66
-
67
-
68
-
69
-
70
-
71
-
72
-
73
-
74
 |
 |

2600 Series User's Guide
January 2009
www.lexmark.com
Machine type(s):
4433, 4445
Model(s):
Various, xxx, where "x" is any alphanumeric character