Lexmark 3350 Setup Sheet
Lexmark 3350 - X Color Inkjet Manual
 |
View all Lexmark 3350 manuals
Add to My Manuals
Save this manual to your list of manuals |
Lexmark 3350 manual content summary:
- Lexmark 3350 | Setup Sheet - Page 1
troubleshooting guide on the reverse of this sheet. *23A0170* 3300 Series All-In-One Unpack your All-In-One. 1 Note: Contents may vary based on geography. Your All-In-One may include a photo cartridge instead of a black print cartridge. Connect the power cord to the power supply. 2 www.lexmark - Lexmark 3350 | Setup Sheet - Page 2
's Guide. • Visit our Web site: http://support.lexmark.com/. • Call us at 1-800-332-4120. Monday-Friday (9:00 AM-9:00 PM EST) Saturday (Noon-6:00 PM EST) Note: Phone number and support times may change without notice. Need more supplies? The following cartridge part numbers work with your printer
-
 1
1 -
 2
2
 |
 |
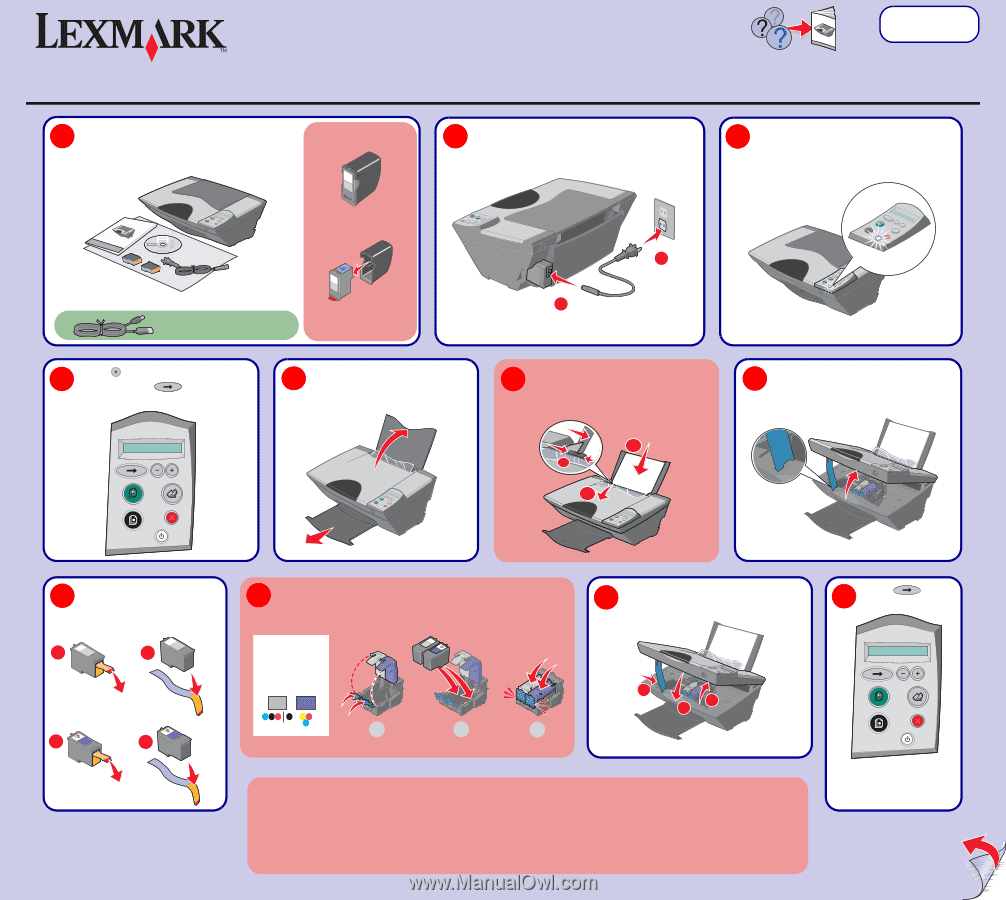
Remove the sticker and tape
from the print cartridges.
8
1
2
1
2
1
2
3
Unpack your All-In-One.
Note:
Contents may vary based on geography.
1
Note:
You may need to purchase a USB
cable separately.
www.lexmark.com
3300 Series All-In-One
Connect the power cord to the power supply.
2
2
1
Lift the paper support and extend
the paper exit tray.
5
6
2
1
3
See the troubleshooting guide on the reverse of this sheet.
Make sure the power light is on.
3
Lift the scanner unit.
7
Close the scanner unit.
10
1
2
3
Your All-In-One may include a
photo cartridge instead of a
black print cartridge.
Before you continue, remove the
photo cartridge from the print
cartridge storage unit.
Note:
Save the print cartridge
storage unit to protect any open
cartridges not in use.
Press
to scroll to your language
and then press
.
4
1
Pull back the transparent deflector.
2
Load the paper flat and to the right.
3
Squeeze the paper guide. Slide it
to the right until it is snug.
1
Open the cartridge lids by pressing the front tabs.
2
Insert the cartridges and push them down firmly.
3
Snap
the lids tight.
9
Press
to print
an alignment page.
You may discard the page
after it prints.
11
Left:
photo
or
black
Right:
color
only
Steps 12–15
Safety information
CAUTION:
Do not set up this product or make any electrical or cabling connections, such as the power supply cord or
telephone, during a lightning storm.
•
Use only the power supply provided with this product or the manufacturer's authorized replacement power supply.
•
Connect the power supply cord to an electrical outlet that is near the product and easily accessible.
•
Refer service or repairs, other than those described in the user documentation, to a professional service person.
*23A0170*