Lexmark 450dn User's Guide
Lexmark 450dn - E B/W Laser Printer Manual
 |
UPC - 734646013369
View all Lexmark 450dn manuals
Add to My Manuals
Save this manual to your list of manuals |
Lexmark 450dn manual content summary:
- Lexmark 450dn | User's Guide - Page 1
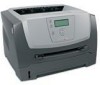
E450dn User's Guide June 2006 Lexmark and Lexmark with diamond design are trademarks of Lexmark International, Inc., registered in the United States and/or other countries. © 2006 Lexmark International, Inc. All rights reserved. 740 West New Circle Road Lexington, Kentucky 40550 www.lexmark.com - Lexmark 450dn | User's Guide - Page 2
or repairs, other than those described in the operating instructions, to a professional service person. • This product is designed, tested, and approved to meet strict global safety standards with the use of specific Lexmark components. The safety features of some parts may not always be obvious - Lexmark 450dn | User's Guide - Page 3
Learning about the printer 5 Printer overview ...5 3: Printing ...19 Loading the 250-sheet tray ...19 Loading the manual feeder ...23 Linking trays ...25 Sending a job to print ...25 Recognizing installed options ...35 Chapter 5: Maintaining the printer 36 Determining the status of supplies ...36 - Lexmark 450dn | User's Guide - Page 4
Chapter 7: Troubleshooting 51 Online customer support ...51 Calling for service ...51 Checking an unresponsive printer ...51 Printing multiple-language PDFs ...52 Solving printing problems ...52 Turning on Reduced Curl mode ...54 Solving option problems ...54 Solving paper feed problems ...55 - Lexmark 450dn | User's Guide - Page 5
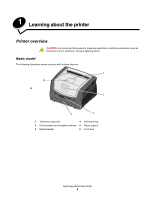
as the power cord or telephone, during a lightning storm. Basic model The following illustration shows a printer with its base features. 1 5 6 2 4 3 1 150-sheet output bin 4 250-sheet tray 2 Control panel and navigation buttons 5 Paper support 3 Manual feeder 6 Front door Learning about the - Lexmark 450dn | User's Guide - Page 6
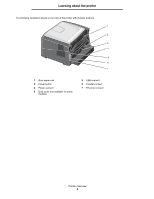
Learning about the printer The following illustration shows a rear view of the printer with its base features. 1 2 3 4 5 6 7 1 Rear paper exit 2 Power button 3 Power connect 4 Dust cover (not available for some models) 5 USB connect 6 Parallel connect 7 Ethernet connect Printer overview 6 - Lexmark 450dn | User's Guide - Page 7
the printer Configured model The following illustration shows a fully configured printer. Items denoted with an asterisk (*) are options. 1 2 3 5* 4 1 150-sheet output bin 4 250-sheet tray 2 Control panel and navigation buttons 5 550-sheet drawer (optional) 3 Manual feeder Printer overview - Lexmark 450dn | User's Guide - Page 8
are available to make it easy for you to change printer settings. The diagram shows the menu index on the control USB Parallel AppleTalk Security Job Expiration Help Printing Guide Supplies Guide Media Guide Print Defects Menu Map Information Guide Connection Guide Moving Guide Printer overview 8 - Lexmark 450dn | User's Guide - Page 9
Note: A label located on the inside front door shows the control panel buttons in your language. An additional translated label is included in the printer box. Back Voltar Zpět Tilbage Terug Takaisin Retour Zurück Vissza Indietro Tilbake Wróć Haзaд Atrás Bakåt Geri Menu Menu Nabídka Menu Menu - Lexmark 450dn | User's Guide - Page 10
. A two-toned LED is used on the control panel, one color being green and the other being red. The lights indicate whether the printer power is on, the printer is busy, idle, processing a job, or requires operator intervention. Status Off Solid green Flashing green Solid red Indicates Power is off - Lexmark 450dn | User's Guide - Page 11
when you want to start or cancel a job. 7 Display The display shows messages and graphics describing the current state of the printer and indicating possible printer problems you must resolve. The top line of the display is the header line. If applicable, it will contain the graphic indicating the - Lexmark 450dn | User's Guide - Page 12
and specialty media your printer supports, see the Card Stock & Label Guide available on our Lexmark Web site at www.lexmark.com. We recommend that is recommended. Use rear exit for best results. ‡ Universal size ranges: - Manual feeder: 76-216 x 127-356 mm (3.0-8.5 x 5.0-14.0 in.) (includes 3 - Lexmark 450dn | User's Guide - Page 13
paper or other print media reduces printing problems. For best print quality, try a be used for duplex printing. The printer does not support duplex printing on any other type of & Label Guide available on the Lexmark Web site at www.lexmark.com/ publications. Weight The printer can automatically - Lexmark 450dn | User's Guide - Page 14
same environment as the printer for 24 to 48 hours problems and better print quality. Paper containing fibers such as cotton possess characteristics that can result in degraded paper handling. Recycled paper Lexmark supports loading helps prevent jams and ensures trouble-free printing. To help avoid - Lexmark 450dn | User's Guide - Page 15
Paper Menu" in the Menus and Messages Guide located on the Software and Documentation CD inks designed for use in xerographic copiers. The ink printer first. The top edge of the sheet with the logo enters the printer first. Transparencies Feed transparencies from the 250-sheet tray or the manual - Lexmark 450dn | User's Guide - Page 16
Guide, which is available on the Lexmark Web site at www.lexmark.com/publications. Transparencies can be fed automatically from the paper trays or manually from the manual using with the printer before buying large quantities. See Loading the manual feeder on page 23 for instructions on loading - Lexmark 450dn | User's Guide - Page 17
, see the Card Stock & Label Guide available on the Lexmark Web site at www.lexmark.com/publications. When printing on labels: • Set the Paper Type menu item to Labels in the Paper menu. Set the Paper Type from the printer control panel, the printer driver, or from MarkVision Professional. • Do - Lexmark 450dn | User's Guide - Page 18
considering using with the printer before purchasing large quantities. By selecting the appropriate print media and loading it properly, you can avoid most jams. For detailed tray loading instructions, see the following: • Loading the 250-sheet tray on page 19 • Loading the manual feeder on page 23 - Lexmark 450dn | User's Guide - Page 19
, see Avoiding jams on page 18 or Storing print media on page 18. Loading the 250-sheet tray Your printer has a 250-sheet tray. You may have also purchased an optional 550-sheet drawer. Print media is loaded Extending the tray for legal or folio size paper on page 22 for instructions. Printing 19 - Lexmark 450dn | User's Guide - Page 20
the outside of the tray. 3 Squeeze the rear guide tab, and slide the guide to the correct position for the size media you are loading. 4 Flex the sheets back . Make sure the print media is below the paper fill indicator on the side guides. Overloading may cause jams. Loading the 250-sheet tray 20 - Lexmark 450dn | User's Guide - Page 21
Printing 6 Pinch the side guide tab, and slide the guide until it lightly rests against the edge of the media. 7 Insert the tray. 8 Extend the paper support on the output bin. Loading the 250-sheet tray 21 - Lexmark 450dn | User's Guide - Page 22
legal or folio size paper, extend the paper tray. You may also attach a dust cover (not available for all models) on the back of the printer to protect the tray while it is extended. 1 Press down on the latch at the back of the tray. 2 Expand the tray until the extender - Lexmark 450dn | User's Guide - Page 23
. To load print media: Note: Do not add or remove print media when the printer is printing from the manual feeder or when the control panel indicator light is blinking. Doing so may cause a jam. 1 Slide the width guides to the outside of the feeder. 2 Place a sheet of the selected print media, print - Lexmark 450dn | User's Guide - Page 24
Printing 3 Slide the width guides until they lightly rest against the edge of the media. 4 Hold both sides of the print media close to the manual feeder, and push it into the printer until it automatically engages. There is a brief pause between the time the printer engages the print media and when - Lexmark 450dn | User's Guide - Page 25
online Help for more information. To support all the printer features, use the Lexmark custom printer drivers supplied with your printer. Updated drivers, as well as a complete description of the driver packages and Lexmark driver support, are available from the Lexmark Web site. You can also use - Lexmark 450dn | User's Guide - Page 26
computer - Canceling a job from a Macintosh computer running Mac OS 9.x - Canceling a job from a Macintosh computer running Mac OS X Canceling a job from the printer control panel Note: For more information about the control panel, see Understanding the control panel on page 9. If the job you want - Lexmark 450dn | User's Guide - Page 27
is "Connected." If Status is "Not Connected" the LAN drop may not be active, or the network cable may be malfunctioning. Consult a system support person for a solution, and print another network setup page to verify that the printer is connected to the network. Printing the menu settings page 27 - Lexmark 450dn | User's Guide - Page 28
Hold Æ Held Jobs, click Help, and see the topic Held Jobs or Print and Hold, then follow the driver instructions. 4 Select the type of held job you want, and then send your job to the printer. Go to the printer when you are ready to retrieve your print job, and follow the At the - Lexmark 450dn | User's Guide - Page 29
held job you want, enter a user name, and then send your job to the printer. Go to the printer when you are ready to retrieve your print job, and follow the At the printer steps on page 29. At the printer 1 Press 2 Press 3 Press until Held jobs appears, and then press . until the appears - Lexmark 450dn | User's Guide - Page 30
4 Installing options Accessing the system board CAUTION: To install memory, you must access the printer system board. Turn the printer off, and unplug the power cord from the wall outlet before continuing. 1 Remove the paper tray. Installing options 30 - Lexmark 450dn | User's Guide - Page 31
Installing options 2 Press button on the left side of the printer to release and lower the front door. 3 Open the rear exit. Accessing the system board 31 - Lexmark 450dn | User's Guide - Page 32
Installing options 4 Press both buttons on the front right side of the machine to release the side access door. 5 Loosen the four screws of the cover to gain access to the system board. Accessing the system board 32 - Lexmark 450dn | User's Guide - Page 33
off, and unplug the power cord from the wall outlet before continuing. Note: Flash memory card options designed for other Lexmark printers may not work with your printer. 1 Access the system board (see Accessing the system board on page 30). 2 Unpack the flash memory card. Warning: Flash memory - Lexmark 450dn | User's Guide - Page 34
. 5 Close the side access door. 6 Close the rear exit door. 7 Close the front door. 8 Plug the power cord into the wall outlet and turn the printer on to continue print functions. Adding a flash memory card 34 - Lexmark 450dn | User's Guide - Page 35
drawer. Recognizing installed options The printer driver should automatically recognize the newly-installed option when the printer is turned on. If it does not, you can add the appropriate option manually. 1 Click Start Æ Settings Æ Printers. 2 Select the printer icon. 3 Click File Æ Properties - Lexmark 450dn | User's Guide - Page 36
printer. Refer printing problems and maintenance tasks to this key operator. In the U.S., contact Lexmark at 1-800-539-6275 for information about Lexmark of your toner cartridge. Photoconductor kit end-of-life To ensure print quality and to avoid damage to the printer, the printer stops operating - Lexmark 450dn | User's Guide - Page 37
Use your software application or printer driver to send a Verify Print Lexmark at 1-800-539-6275 for information about Lexmark Authorized Supplies Dealers in your area. In other countries or regions, visit the Lexmark Web site at www.lexmark.com, or contact the place where you bought your printer - Lexmark 450dn | User's Guide - Page 38
Maintaining the printer Ordering a toner cartridge Part number Description Average cartridge yield World Wide E250X22G Photoconductor kit Up to 30,000 standard pages1 For the USA and Canada3 E450A21A Toner Cartridge 6,000 standard pages2 E450H21A High Yield Toner Cartridge 11,000 - Lexmark 450dn | User's Guide - Page 39
Maintaining the printer Changing a toner cartridge 1 Turn the printer off. 2 Press the button on the left side of the printer to release and lower the front door. 3 Remove the toner cartridge. a Press the release button on the base of the print cartridge assembly. b Grasp the handle, pulling up and - Lexmark 450dn | User's Guide - Page 40
Maintaining the printer 4 Unpack the new toner cartridge. Note: You can use the packing material from the new toner cartridge to ship the old toner cartridge back to Lexmark for recycling. For more information, see Recycling Lexmark products on page 44. 5 Firmly shake the toner cartridge in all - Lexmark 450dn | User's Guide - Page 41
kit exposed to direct light for an extended period of time. Extended light exposure can cause print quality problems. 1 Turn the printer offc 2 Remove the print cartridge assembly. a Press the button on the left side of the printer to release the front door. b Lower the front door. c Grasp the toner - Lexmark 450dn | User's Guide - Page 42
Maintaining the printer 3 Remove the toner cartridge: a Press the button on the base of the print cartridge assembly. b Grasp the toner cartridge handle, and pull up and out. 1 2 4 Unpack the new photoconductor kit. 5 Install the toner cartridge into the new print cartridge assembly by aligning the - Lexmark 450dn | User's Guide - Page 43
arrows on the guides of the print cartridge assembly with the green arrows on the tracks in the printer and pushing the print cartridge assembly in as far as it will go. 7 Close the front door. 8 Turn the printer back on. 9 Reset the photoconductor counter (see the instruction sheet that shipped - Lexmark 450dn | User's Guide - Page 44
Maintaining the printer Recycling Lexmark products To return Lexmark products to Lexmark for recycling: 1 Visit our Web site: www.lexmark.com/recycle Follow the instructions on the computer screen. Recycling Lexmark products 44 - Lexmark 450dn | User's Guide - Page 45
. The printer prints a printer jams, the appropriate jam message appears on the printer Remove Cartridge 201 Paper Jam - Remove Cartridge 202 cartridge, and remove the jammed print media. Open the rear printer exit, and remove the jammed print media. Open the rear printer printer exit, and remove - Lexmark 450dn | User's Guide - Page 46
Clearing jams Clearing printer jams Clearing a jam We recommend clearing the entire paper path when a paper jam occurs. To clear the jam: 1 Open the paper tray. If necessary, remove the tray from the printer. 2 Remove the jammed media. Clearing printer jams 46 - Lexmark 450dn | User's Guide - Page 47
Clearing jams 3 Press down on the green duplex flap to release jammed pages from the duplex area. 4 Remove any crumpled paper from the tray. CAUTION: Fuser or fuser area may be hot. 5 Open the front door, and remove the print cartridge assembly. Clearing printer jams 47 - Lexmark 450dn | User's Guide - Page 48
pages. 8 After you have cleared the jams, reinstall the print cartridge assembly, and make sure all printer doors and trays are closed. 9 Press . Note: Jam after the page is printed but before it has successfully exited the printer if that memory is needed for another use. Therefore, a jammed - Lexmark 450dn | User's Guide - Page 49
Clearing jams Clearing a jam in the manual feeder 1 Remove the paper from the manual feeder. 2 Open the front door, and remove the print cartridge assembly. Clearing printer jams 49 - Lexmark 450dn | User's Guide - Page 50
. 5 After you have cleared the jams, reinstall the print cartridge assembly, and make sure all printer doors and trays are closed. 6 Press . Note: Jam depending on the overall memory usage in the printer. 7 Load one sheet of the print media. 8 Slide the side guide toward the inside of the tray until - Lexmark 450dn | User's Guide - Page 51
Online customer support Customer support is available on our Lexmark Web site at www.lexmark.com. Calling for service When you call for printer service, describe the problem you are experiencing, the message on the display, and the troubleshooting steps you have already taken to find a solution - Lexmark 450dn | User's Guide - Page 52
printer off, wait about 10 seconds, and turn the printer back on. If the Performing Self Test and Ready messages do not appear, turn the printer off and call for service you have properly configured the printer for network printing. See the drivers CD or the Lexmark Web site for information. You - Lexmark 450dn | User's Guide - Page 53
Troubleshooting printer driver Lexmark part number 1021231 for the standard parallel port. The printer the printer printer driver. Note: Setting Collation to Off in the driver overrides the setting in the Finishing Menu. For more information, see the Menus and Messages Guide for laser printers. • If - Lexmark 450dn | User's Guide - Page 54
Curl mode If the print media is curled once it exits the printer, Reduced Curl mode can be turned on to help reduce the problem. However, before turning this mode on, you should try the possible solutions offered in Troubleshooting. For more information, see The paper is curled once it exits the - Lexmark 450dn | User's Guide - Page 55
Troubleshooting Problem Service messages Solution A service message indicates printer failure that may require service. Turn the printer off, wait about 10 seconds, and then turn the printer on. If the error recurs, write down the error number, the problem, and a detailed description. Call for - Lexmark 450dn | User's Guide - Page 56
in the Paper menu. • Verify the print media is within the printer specifications. See Understanding print media guidelines on page 12 for more details. If the problem continues, contact the Lexmark Customer Support Center at http://support.lexmark.com. Toner appears on the back of Toner is on the - Lexmark 450dn | User's Guide - Page 57
Troubleshooting Problem Entire page is white. Action • Make sure the packaging material is removed from the photoconductor kit. • Check the photoconductor kit and toner cartridge , verify the fonts are supported by the printer, the host computer, and the software application. Solving print quality - Lexmark 450dn | User's Guide - Page 58
Troubleshooting Problem the photoconductor kit. Some of the print is cut off on Move the guides in the tray to the proper positions for the size loaded. the sides print quality is • Use only transparencies recommended by the printer manufacturer. poor. • Make sure the Paper Type setting - Lexmark 450dn | User's Guide - Page 59
can be enabled to improve print quality. These settings are available on the driver and on the printer Embedded Web Server (EWS) interface. For more information about these options, see the driver Help. Driver option Purpose Values† Enhance Fine Lines A selection to enable a print mode On - Lexmark 450dn | User's Guide - Page 60
the Utilities menu. For more information, see the Menus and Messages Guide. The LCD Brightness and LCD Contrast settings are adjusted separately. To change the LCD Brightness or LCD Contrast settings: 1 Make sure your printer is on. 2 Press on the control panel. 3 Press until Settings appears - Lexmark 450dn | User's Guide - Page 61
Administrative support Enabling control panel menus 1 Turn the printer off. 2 Press and hold and while turning the printer on. 3 Release both buttons when Performing Self Test appears on the display. The printer performs its power-on sequence, and then Config Menu appears on the first line of the - Lexmark 450dn | User's Guide - Page 62
Administrative support Adjusting Power Saver To adjust the Power Saver setting: 1 Make sure the printer is on and Ready appears on by issuing a Printer Job Language (PJL) command. For more information, see the Technical Reference available on our Lexmark Web site at www.lexmark.com. Disabling Power - Lexmark 450dn | User's Guide - Page 63
Administrative support Selecting printer operating mode You can select the printer operating mode that best suits your needs. For more information, see the Menus and Messages guide on the Software and Documentation CD Note: Quiet Mode and Eco-Mode can be on at the same time. Operating mode Normal - Lexmark 450dn | User's Guide - Page 64
, enter the IP address of the printer you want to configure using the format: http://ip_address/. 2 Click Configuration. 3 Under Other Settings, click Network/Ports. 4 Click SNMP. SNMPv3 authentication and encryption has three levels of support: • No authentication and no encryption • Authentication - Lexmark 450dn | User's Guide - Page 65
, if not installed and used in accordance with the instruction manual, may cause harmful interference to radio communications. Operation of directives has been signed by the Director of Manufacturing and Technical Support, Lexmark International, S.A., Boigny, France. This product satisfies the Class - Lexmark 450dn | User's Guide - Page 66
is 30 minutes. For more information, see the Menu's and Messages guide on theSoftware and Documentation CD . ENERGY STAR Noise emission levels The following at www.lexmark.com for your local sales office phone number. Laser advisory label A laser notice label may be affixed to this printer. LUOKAN 1 - Lexmark 450dn | User's Guide - Page 67
attachments • Accidents, misuse, abuse or use inconsistent with Lexmark user's guides, manuals, instructions or guidance • Unsuitable physical or operating environment • Maintenance by anyone other than Lexmark or a Lexmark authorized servicer • Operation of a product beyond the limit of its - Lexmark 450dn | User's Guide - Page 68
or a Remarketer for this product under this limited warranty, you may recover actual damages up to the limit set forth in the following paragraph. Lexmark's liability for actual damages from any cause whatsoever will be limited to the amount you paid for the product that caused the damages. This - Lexmark 450dn | User's Guide - Page 69
memory 33 G guide tab 20 guidelines labels 17 paper unacceptable 14 printing letterhead 15 I Identifying printers 5 Indicator light 10 printer 36 ordering a toner cartridge 38 maximum fill line 20 media guidelines letterhead 15 letterhead, printing 15 letterhead guidelines 15 loading instructions - Lexmark 450dn | User's Guide - Page 70
cartridge See toner cartridge Print media guidelines 13 print media jams avoiding 18 print media specifications characteristics 13 Printing 19 problems seems long 53 unexpected page breaks 53 publications Card Stock & Label Guide 12 R recycling supplies 44 repeat print 28 reserve print 28 restoring
-
 1
1 -
 2
2 -
 3
3 -
 4
4 -
 5
5 -
 6
6 -
 7
7 -
8
-
9
-
10
-
11
-
12
-
13
-
14
-
15
-
16
-
17
-
18
-
19
-
20
-
21
-
22
-
23
-
24
-
25
-
26
-
27
-
28
-
29
-
30
-
31
-
32
-
33
-
34
-
35
-
36
-
37
-
38
-
39
-
40
-
41
-
42
-
43
-
44
-
45
-
46
-
47
-
48
-
49
-
50
-
51
-
52
-
53
-
54
-
55
-
56
-
57
-
58
-
59
-
60
-
61
-
62
-
63
-
64
-
65
-
66
-
67
-
68
-
69
-
70
 |
 |
www.lexmark.com
E450dn
User’s Guide
June 2006
Lexmark and Lexmark with diamond design are trademarks of Lexmark International, Inc.,
registered in the United States and/or other countries.
© 2006 Lexmark International, Inc.
All rights reserved.
740 West New Circle Road
Lexington, Kentucky 40550