Lexmark 4600 Lexmark X4600 Quick Reference
Lexmark 4600 Manual
 |
View all Lexmark 4600 manuals
Add to My Manuals
Save this manual to your list of manuals |
Lexmark 4600 manual content summary:
- Lexmark 4600 | Lexmark X4600 Quick Reference - Page 1
: Do not spray the cleaner directly on the glass or use alcohol. 3 Wipe the scanner glass, ADF scanner glass, and backing material Backing material Scanner glass ADF scanner glass 4 Close the scanner cover. Cleaning the printer control panel 1 Dampen a clean, lint-free cloth or paper towel with an - Lexmark 4600 | Lexmark X4600 Quick Reference - Page 2
Cleaning or replacing the pick roller Clean the pick roller on a regular basis to ensure that the ADF feeds paper properly. Replace the pick roller when needed. 1 Open the ADF cover. 2 Press down on the pick roller release lever. 6 Insert the cleaned or replacement pick roller, and then push up on - Lexmark 4600 | Lexmark X4600 Quick Reference - Page 3
1 Open the ADF cover. Note: Make sure that the scanner cover is opened completely. Warning: Do not fold or crease the ADF tabs. Doing so may cause jams documents back into the ADF. 3 If the paper cannot be removed from the ADF cover, then open the scanner cover, and gently remove the jammed paper.
-
 1
1 -
 2
2 -
 3
3
 |
 |
Quick Reference
Lexmark™ X4600
Avoiding jams in the ADF
To avoid jams in the Automatic Document Feeder
(ADF), make sure that the leading edge of the
original document has no damage. Use the scanner
glass instead of the ADF to scan damaged paper or
the following paper types. These paper types cannot
be properly fed by the ADF:
•
Paper with clip or staple attached
•
Paper with ink not totally dry
•
Paper with inconsistent thickness, such as
envelopes
•
Paper with wrinkles, curls, folds, or tears
•
Tracing paper, coated paper, or carbonless
paper
•
Paper that is too large or too small
•
Items other than papers, such as cloth, metal,
or OHP film
•
Notched paper
•
Paper with an odd (non-rectangular) shape
•
Photographic paper
•
Paper with perforations on its side
•
Very thin paper
Avoiding misfeeds in the ADF
•
Make sure the original document has been
inserted all the way into the ADF.
•
Clean or replace the pick pad and pick rollers
regularly. For more information, see “Cleaning
or replacing the pick roller” on page 2 or
“Cleaning or replacing the pick pad” on page 2.
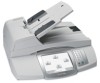
Loading original documents in the
ADF
1
Load an original document faceup in the ADF.
2
Adjust the paper guides on the ADF to rest
lightly against the edges of the paper.
Note:
Adjusting the paper guides
incorrectly may cause the paper to
jam or skew.
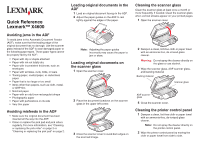
Loading original documents on
the scanner glass
1
Open the scanner cover.
2
Place the document facedown on the scanner
glass in the upper left corner.
3
Close the scanner cover to avoid dark edges on
the scanned image.
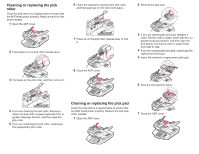
Cleaning the scanner glass
Clean the scanner glass at least once a month or
more frequently, if needed. Clean the scanner glass
when vertical streaks appear on your printed pages.
1
Open the scanner cover.
2
Dampen a clean, lint-free cloth or paper towel
with an ammonia-free, de-ionized glass
cleaner.
Warning:
Do not spray the cleaner directly on
the glass or use alcohol.
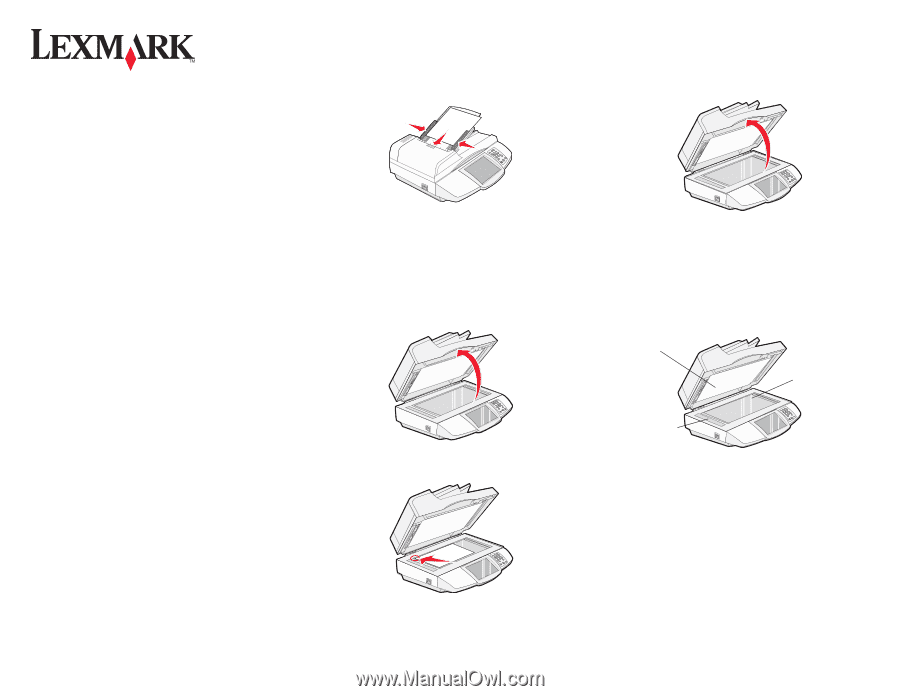
3
Wipe the scanner glass, ADF scanner glass,
and backing material
4
Close the scanner cover.
Cleaning the printer control panel
1
Dampen a clean, lint-free cloth or paper towel
with an ammonia-free, de-ionized glass
cleaner.
Note:
Do not spray the cleaner directly on
the printer control panel.
2
Wipe the printer control panel by moving the
cloth or paper towel from side to side.
Backing material
Scanner glass
ADF scanner
glass