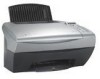
Lexmark 5150 X5150 All-In-One Series User's Guide
Lexmark 5150 - X All-In-One Color Inkjet Manual
 |
UPC - 734646570008
View all Lexmark 5150 manuals
Add to My Manuals
Save this manual to your list of manuals |
Lexmark 5150 manual content summary:
- Lexmark 5150 | X5150 All-In-One Series User's Guide - Page 1
Lexmark X5100 All-In-One Series User's Guide - Lexmark 5150 | X5150 All-In-One Series User's Guide - Page 2
740 West New Circle Road, Lexington, Kentucky 40550, U.S.A. In the United Kingdom and Eire, send to Lexmark International Ltd., Marketing and Services Department, Westhorpe House, Westhorpe, Marlow Bucks SL7 3RQ. Lexmark may use or distribute any of the information you supply in any way it believes - Lexmark 5150 | X5150 All-In-One Series User's Guide - Page 3
Contents This book is for Windows users. Macintosh users can click the Help button on any screen to access the Macintosh User's Guide and Help. You can do this after installing your All-In-One and removing the installation CD from the computer. Learning about your All-In- - Lexmark 5150 | X5150 All-In-One Series User's Guide - Page 4
Replacing the print cartridges 38 Aligning the print cartridges 42 Cleaning the print cartridge nozzles 42 Wiping the print cartridge nozzles and contacts 44 Preserving the print cartridges 45 Ordering supplies 45 Troubleshooting 46 Setup troubleshooting 46 General troubleshooting 46 Other - Lexmark 5150 | X5150 All-In-One Series User's Guide - Page 5
Learning about your All-In-One You can use the Lexmark X5100 Series to do a variety of things. A couple of important projects. Setting up your All-In-One Follow the instructions on your All-In-One setup documentation to install the hardware and software. For setup troubleshooting, see page 46. 1 - Lexmark 5150 | X5150 All-In-One Series User's Guide - Page 6
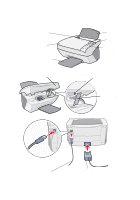
Understanding the All-In-One parts The table on page 3 describes each part. Paper guide Top cover Paper exit tray Paper support Display Operator panel (see page 3) Scanner unit Scanner lock (underneath scanner unit) Scanner support USB cable Power supply 2 - Lexmark 5150 | X5150 All-In-One Series User's Guide - Page 7
Operator panel Paper exit tray Paper guide Paper support Power supply Scanner lock Scanner support Scanner unit Top cover USB All-In-One. Keep the scanner unit open to change cartridges, unlock the scanner, or lock the scanner. • Change cartridges. • Unlock the scanner. • Lock the scanner. Note: - Lexmark 5150 | X5150 All-In-One Series User's Guide - Page 8
Options Left arrow (-) Right arrow (+) Select Color Copy Photo Options E-mail, File, Software Stop/Clear Number of Copies Reduce/ Enlarge Copy Quality Black Copy Photo Copy Start Scan Start Fax Power light Power 4 - Lexmark 5150 | X5150 All-In-One Series User's Guide - Page 9
Press: Black Copy Color Copy Copy Quality E-mail, File, Software Left arrow When you want to: Make a black and white copy using the current copy settings. For help, see page 20. Make a color copy of a color image using the current copy settings. For help, see page 20. Select a copy quality: Quick, - Lexmark 5150 | X5150 All-In-One Series User's Guide - Page 10
COLLATE-BLACK You can: Lighten or darken the copied image. Specify the size of the paper loaded in the paper support. Specify the type of the paper loaded in the paper support. Note: If you leave this on Auto Detect, the default, the paper type sensor (see page 13) optimizes the setting - Lexmark 5150 | X5150 All-In-One Series User's Guide - Page 11
mirror image of the scanned image. Select: • Ink Levels to display the print cartridge ink levels. • Change to see instructions on how to change the print cartridges. • Align to automatically align the print cartridges. • Clean to clean the print cartridges. • Self Test to print a test page. Select - Lexmark 5150 | X5150 All-In-One Series User's Guide - Page 12
printing settings. Note: Available from almost every application that prints. • Lexmark X5100 Series Photo Editor - helps you edit your photos. • Lexmark X5100 Series Solution Center - provides maintenance and troubleshooting help. Using the Lexmark X5100 Series All-In-One Center You can access the - Lexmark 5150 | X5150 All-In-One Series User's Guide - Page 13
You can use the Lexmark All-In-One Center to: • Select a scan destination. • Select a copy quantity and color. • Scan, copy, print, and do creative tasks. • Access troubleshooting and maintenance information. • Preview images you want to print. • Manage photos (copy them to folders, print them, do - Lexmark 5150 | X5150 All-In-One Series User's Guide - Page 14
Layout) along the left side of the Print Properties dialog box lets you select your All-In-One settings. Using the Lexmark X5100 Series Photo Editor The Lexmark X5100 Series Photo Editor lets you adjust photo attributes (brightness, contrast, and orientation) of scanned images. There are three ways - Lexmark 5150 | X5150 All-In-One Series User's Guide - Page 15
Editor appears: Using the Lexmark X5100 Series Solution Center The Lexmark X5100 Series Solution Center (LSC) is a guide you can refer to for All-In-One help and to check the current All-In-One status. To open the LSC, click Start Programs Lexmark X5100 Series Lexmark X5100 Series Solution Center - Lexmark 5150 | X5150 All-In-One Series User's Guide - Page 16
Search for more specific troubleshooting topics. • Visit the support area online. • Print a test page. • Visit the supplies area online. • View information about how to purchase new cartridges. • Clean the print cartridge nozzles. • Align the cartridges. • Solve other problems. Note: Some links will - Lexmark 5150 | X5150 All-In-One Series User's Guide - Page 17
Understanding the paper type sensor Your All-In-One has a paper type sensor that detects these paper types: • Plain paper • Coated paper • Glossy/photo paper • Transparencies If you load one of these paper types, the All-In-One detects the paper type and automatically adjusts the paper type settings - Lexmark 5150 | X5150 All-In-One Series User's Guide - Page 18
it. 6 Click OK. To permanently turn it off: 1 Click Start Settings Printers and Faxes or Printers. 2 Right-click the printer icon. 3 Click Printing Preferences or Properties. 4 Click Options (Windows 2000) or the Printer Settings tab and then change (Windows 9x). 5 Click PTS Options. 6 Click - Lexmark 5150 | X5150 All-In-One Series User's Guide - Page 19
8 Click OK. Note: To temporarily override the paper type sensor for a particular print job, specify a paper type in the GUI (graphical user interface) under Specialty paper. 15 - Lexmark 5150 | X5150 All-In-One Series User's Guide - Page 20
Using your All-In-One Placing your document on the scanner glass 1 Open the top cover. 2 Place the item you want to copy face down on the scanner glass. Make sure the upper left corner of the front of the item aligns with the arrow. 16 - Lexmark 5150 | X5150 All-In-One Series User's Guide - Page 21
• The envelopes are loaded vertically against the right side of the paper support. • The stamp location is in the upper left corner. • The envelopes are designed for use with inkjet printers. • You squeeze and slide the paper guide to the left edge of the envelope (as shown). 25 sheets of - Lexmark 5150 | X5150 All-In-One Series User's Guide - Page 22
follow the loading instructions on the iron-on packaging. • The blank side faces you. The banner paper is designed for use with inkjet printers. To load most paper support with the print side facing you and the top of the paper feeding into the paper support. 2 Squeeze and slide the paper guide to - Lexmark 5150 | X5150 All-In-One Series User's Guide - Page 23
10 sheets of labels 10 envelopes 10 cards 1 transparency Note: To avoid smearing ink, remove each transparency from the paper exit tray before the next one exits the copy, scan, print, and fax. The following instructions explain how to complete these tasks. To find out how to create specific projects, - Lexmark 5150 | X5150 All-In-One Series User's Guide - Page 24
Copying using the operator panel 1 Make sure your All-In-One is on. 2 Open the top cover. 3 Place the item you want to copy face down on the scanner glass. Make sure the upper left corner of the front of the item aligns with the arrow at the bottom right of the scanner. 4 Close the top cover. 5 If - Lexmark 5150 | X5150 All-In-One Series User's Guide - Page 25
6 Press Number of Copies repeatedly until the number (any number 1-99) of copies you want to make appears. Note: You can also use the right and left arrows to move through the number list. 7 Press Color Copy to create a color copy of your document or press Black Copy to create a black and white copy - Lexmark 5150 | X5150 All-In-One Series User's Guide - Page 26
front of the item aligns with the arrow at the bottom right of the scanner. 4 Close the top cover. 5 From your desktop, double-click the Lexmark X5100 Series All-In-One Center icon. The All-In-One Main Page appears. 6 Click Preview Now to see your scanned image. 7 Select a quantity and - Lexmark 5150 | X5150 All-In-One Series User's Guide - Page 27
2 Open the top cover. 3 Place the item you want to scan face down on the scanner glass. Make sure the upper left corner of the front of the item aligns with the arrow at the bottom right of the scanner. 4 Close the top cover. 5 Press E-mail, File, Software. The scan destination that you last - Lexmark 5150 | X5150 All-In-One Series User's Guide - Page 28
Scanning using the All-In-One software You can use your All-In-One software to scan in many ways. You can: • Repeat images (scan to print). For help, see page 34. • Autofit (scan to print). • Multi-up - An All-In-One software option that lets you print multiple pages of a document on a single sheet - Lexmark 5150 | X5150 All-In-One Series User's Guide - Page 29
front of the item aligns with the arrow at the bottom right of the scanner. 4 Close the top cover. 5 From your desktop, double-click the Lexmark X5100 Series All-In-One Center icon. The All-In-One Main Page appears. 6 Click Preview Now to see your scanned image. 7 Adjust the dotted - Lexmark 5150 | X5150 All-In-One Series User's Guide - Page 30
Printing 1 With your document open, click File Print. 2 To change the All-In-One settings, click Properties, Options, Setup or Preferences (depending on the program or operating system). 3 On the three tabs along the left side (Quality/Copies, Paper Setup, and Print Layout) of the Print Properties - Lexmark 5150 | X5150 All-In-One Series User's Guide - Page 31
digital subscriber line) and cable modems are not supported by the fax software. 2 Put your 3 From your desktop, double-click the Lexmark X5100 Series All-In-One Center icon. The click Fax using your computer's modem. 5 Follow the instructions on the screen to complete the task. Creating projects - Lexmark 5150 | X5150 All-In-One Series User's Guide - Page 32
help, see page 17. Print a banner 1 Place the stack of banner paper on the top cover, and feed in the first sheet. 2 Click Start Programs Lexmark X5100 Series Lexmark X5100 Series Solution Center. 3 Click the How To tab. 4 Under Projects, choose Banners. 5 Click View and follow the - Lexmark 5150 | X5150 All-In-One Series User's Guide - Page 33
Note: Once the All-In-One begins printing, wait until you can see the leading edge of the banner exiting the All-In-One, and then carefully unfold the paper down to the floor in front of the All-In-One. Make color copies You can make color copies of a child's artwork, a magazine article, birth - Lexmark 5150 | X5150 All-In-One Series User's Guide - Page 34
the scanner. 3 Close the top cover. 4 From your desktop, double-click the Lexmark X5100 Series All-In-One Center icon. The All-In-One Main Page appears. What is being scanned? menu, select Photo. 7 Follow the instructions on the screen to prepare the photo for e-mail. 8 Click Attach Now. The New - Lexmark 5150 | X5150 All-In-One Series User's Guide - Page 35
10 Write a note to accompany the attached photograph. 11 Click Send. Enlarge or reduce needlepoint or woodworking patterns You can enlarge or reduce patterns or photos using the operator panel or the All-In-One Center on your computer. Using the operator panel 1 Open the top cover. 2 Place the - Lexmark 5150 | X5150 All-In-One Series User's Guide - Page 36
you want to print. 8 Follow the instructions on the screen to select the size of your new image. 9 Click Printer Settings to select your paper size. 10 scanner. 3 Close the top cover. 4 From your desktop, double-click the Lexmark X5100 Series All-In-One Center icon. The All-In-One Main Page appears. - Lexmark 5150 | X5150 All-In-One Series User's Guide - Page 37
Note: You are prompted to put the next item on the scanner glass after the first one scans. Print a poster You can print a poster of an image that you want to enlarge and extend over multiple pages. Using the operator panel 1 Load A4 or letter size paper and select the size: a On the operator panel, - Lexmark 5150 | X5150 All-In-One Series User's Guide - Page 38
at the bottom right of the scanner. 3 From your desktop, double-click the Lexmark X5100 Series All-In-One Center icon. The All-In-One Main Page appears. 4 Click Print an image as a multi-page poster. 5 Follow the instructions on your screen. 6 Click Preview Now to see your scanned image. 7 Adjust - Lexmark 5150 | X5150 All-In-One Series User's Guide - Page 39
the item aligns with the arrow. 3 From your desktop, double-click the Lexmark X5100 Series All-In-One Center icon. The All-In-One Main Page Creative Tasks, click Repeat an image several times on one page. 5 Follow the instructions on your screen. 6 Click Preview Now to see your scanned image. 7 - Lexmark 5150 | X5150 All-In-One Series User's Guide - Page 40
application to create your picture document. 2 Click Start Programs Lexmark X5100 Series Lexmark X5100 Series Solution Center. 3 Click the How To tab. 4 From the Projects drop-down menu, select Iron-on transfers. 5 Click View. 6 Follow the instructions on your screen to create an iron-on transfer - Lexmark 5150 | X5150 All-In-One Series User's Guide - Page 41
bottom right of the scanner. 3 From your desktop, double-click the Lexmark X5100 Series All-In-One Center icon. The All-In-One Main Page and then click Edit text found in a scanned document (OCR). 5 Follow the instructions on your computer screen. Networking Here is a quick look at some things you - Lexmark 5150 | X5150 All-In-One Series User's Guide - Page 42
the print cartridges The Lexmark X5100 Series uses the following cartridges: Item: Black cartridge Color cartridge Part number: 82 83 or 88 Note: For information about ordering supplies, see page 45. 1 Make sure the All-In-One is on. 2 Lift the scanner unit until the scanner support keeps it - Lexmark 5150 | X5150 All-In-One Series User's Guide - Page 43
3 Squeeze the tabs on the cartridge lids, and then lift the lids. 4 Remove the old cartridges. Store them in an air-tight container or dispose of them. 5 If you are installing new cartridges, remove the foam, stickers, and transparent tape from the bottom of the cartridges. Warning: Do NOT touch the - Lexmark 5150 | X5150 All-In-One Series User's Guide - Page 44
6 Insert the new cartridges, and then snap the lids closed. 7 Lift the scanner unit and push the scanner support back while lowering the scanner unit until it is completely closed. 40 - Lexmark 5150 | X5150 All-In-One Series User's Guide - Page 45
8 Load paper into the paper support. 9 Questions appear on the display. Use the buttons on the operator panel to answer the questions: a If the color cartridge you installed is New (never been used), press Select. If it is old, press the right arrow button once, and then press Select. b If the - Lexmark 5150 | X5150 All-In-One Series User's Guide - Page 46
, a message appears on the operator panel. 1 Make sure plain paper is loaded in the paper support. 2 Press Select to print an alignment page. To improve print quality You may want to align your cartridges periodically to improve print quality. 1 On the operator panel, press Options repeatedly until - Lexmark 5150 | X5150 All-In-One Series User's Guide - Page 47
Cartridges appears on the display. 3 Press the right arrow until Clean appears on the display. 4 Press Select. A nozzle page prints forcing ink quality has not improved, try cleaning the print cartridge nozzles up to two more times. Using the Lexmark X5100 Series Solution Center 1 Load plain paper - Lexmark 5150 | X5150 All-In-One Series User's Guide - Page 48
and contacts If the print quality does not improve after cleaning the print cartridge nozzles, dried ink may be on the nozzles or contacts. To wipe the print cartridge nozzles and contacts: 1 Remove the print cartridges. For help, see page 38. 2 Dampen a clean, lint-free cloth with water. 3 Hold - Lexmark 5150 | X5150 All-In-One Series User's Guide - Page 49
exposed for an extended period of time because the ink will dry out. Lexmark's All-In-One warranty does not cover repair of failures or damage caused by a refilled cartridge. Lexmark does not recommend use of refilled cartridges. Refilling cartridges can affect print quality and cause damage to the - Lexmark 5150 | X5150 All-In-One Series User's Guide - Page 50
Help button on any screen to access the User's Guide and Help. You can do this after installing your All-In-One and removing the installation CD from the computer. General troubleshooting When your All-In-One has a problem, before contacting Lexmark Customer Support, check the following items. 46 - Lexmark 5150 | X5150 All-In-One Series User's Guide - Page 51
All-In-One are on. • The Lexmark X5100 Series is set as your default printer. Anytime your All-In-One has a problem, make sure: • Your All-In-One is on. • The scanner is unlocked. • You removed the stickers, transparent tape, and foam from the bottom of the print cartridges. For help, see page 39 - Lexmark 5150 | X5150 All-In-One Series User's Guide - Page 52
paper recommended for inkjet printers. • You do guide rests against the left edge of the paper and does not cause the paper to bow in the paper support. • You select the correct paper type and size in Print Properties, Preferences, or in the All-In-One Center. Fax problems If you are having trouble - Lexmark 5150 | X5150 All-In-One Series User's Guide - Page 53
you want to use is the default fax driver in the All-In-One Center. Note: DSL (digital subscriber line) and cable modems are not supported. Transparencies or glossy photo papers stick together • Remove each page as it exits the printer and let it dry completely before stacking. • Use a transparency - Lexmark 5150 | X5150 All-In-One Series User's Guide - Page 54
If your documents have any of the following problems, see the following instructions to solve the problem. Vertical, straight lines are not smooth To or from the All-In-One Center: 1 From your desktop, double-click the Lexmark X5100 Series All-In-One Center icon. 2 From the Copy...area, click See - Lexmark 5150 | X5150 All-In-One Series User's Guide - Page 55
cartridge alignment. For help, see page 42. • Clean the nozzles. For help, see page 42. Characters are missing or unexpected Make sure the scanner glass is clean: 1 Dampen a clean, lint-free cloth. 2 Gently wipe the scanner glass. Note: Make sure all ink You let the ink dry completely before - Lexmark 5150 | X5150 All-In-One Series User's Guide - Page 56
one of the arrow buttons: - To check the ink level in the black cartridge choose Black Ink. - To check the ink level in the color cartridge choose Color Ink. 5 Press Stop/Clear to return to Normal quality. To check the ink levels from the Lexmark Solution Center, see page 11. Display language is - Lexmark 5150 | X5150 All-In-One Series User's Guide - Page 57
). Turn the power on. • Restart your computer. If problems persist, see page 64, Uninstalling and reinstalling the software. black and white and want to improve the quality: 1 From your desktop, double-click the Lexmark X5100 Series All-In-One Center icon. The All-In-One Main Page appears. 2 In - Lexmark 5150 | X5150 All-In-One Series User's Guide - Page 58
See More Scan Settings. 3 From the What is being scanned? menu, select Magazine/ Newspaper. 4 Click Scan Now. For copying: 1 From your desktop, double-click the Lexmark X5100 Series All-In-One Center icon. The All-In-One Main Page appears on your computer screen. 2 Under Copy... click See More Copy - Lexmark 5150 | X5150 All-In-One Series User's Guide - Page 59
free cloth. 2 Gently wipe the scanner glass. Note: Make sure all ink or corrective fluid on the document is dry before placing the document on turn the feature off for your next scan: 1 From your desktop, double-click the Lexmark X5100 Series All-In-One Center icon. The All-In-One Main Page appears. - Lexmark 5150 | X5150 All-In-One Series User's Guide - Page 60
item. 6 Slide the bar to the left to crop less or to the right to crop more. 7 Click OK. To adjust cropping manually: 1 From your desktop, double-click the Lexmark X5100 Series All-In-One Center icon. The All-In-One Main Page appears. 2 Click Preview Now to see your scanned image - Lexmark 5150 | X5150 All-In-One Series User's Guide - Page 61
The scanner unit will not close To close the scanner unit after installing cartridges, unlocking the scanner bed, or removing a paper jam, follow these steps both hands, lift the scanner unit. 2 Push and hold the scanner support back. 3 Carefully lower the scanner unit until it is completely closed. - Lexmark 5150 | X5150 All-In-One Series User's Guide - Page 62
To fix this: 1 From your desktop, double-click the Lexmark X5100 Series All-In-One Center icon. 2 From the Copy... area, select Color Document or Black and White Document (these settings have auto crop turned - Lexmark 5150 | X5150 All-In-One Series User's Guide - Page 63
software error messages on your computer screen and messages on the display of your All-In-One. Message: Paper Jam Cover Open Ink Low Paper Out Unlock Scanner Cartridge Error Other messages Go to: page 59 page 60 page 61 page 61 page 62 page 62 page 64 Paper Jam message Your - Lexmark 5150 | X5150 All-In-One Series User's Guide - Page 64
2 Lower the scanner unit to close it. 3 Press Power to turn the All-In-One on, and then send your document to print. Cover Open message The Cover open message appears when the scanner unit is open. Note: The operator panel buttons do not function while the scanner unit is open. Lower the scanner - Lexmark 5150 | X5150 All-In-One Series User's Guide - Page 65
screen: An Ink Low message appears when one of your cartridges is 25% full or less. When one of these messages appears, you can: • Click OK. • Click the ? to get information about ordering supplies. • Order a new cartridge or locate a dealer near you from the Lexmark Web site at www.lexmark.com. For - Lexmark 5150 | X5150 All-In-One Series User's Guide - Page 66
you to unlock the scanner. 4 Using both hands, lift the scanner unit. 5 Push and hold the scanner support back. 6 Lower the scanner unit until it is completely closed. 7 Press Power to turn the All-In-One back on. Cartridge Error messages When you get these messages you might need to: • Install - Lexmark 5150 | X5150 All-In-One Series User's Guide - Page 67
below for specific instructions: Message: Black cartridge missing Color cartridge missing Cartridge Error Problem: Do this: The black cartridge is not Install a black installed. cartridge (part number 82). The color cartridge is not Install a color installed. cartridge (part number 83 - Lexmark 5150 | X5150 All-In-One Series User's Guide - Page 68
. 8 Lower the scanner unit until it is completely closed. If you get the error message again, while both cartridges are installed, replace both of the cartridges. Other error messages 1 Turn the All-In-One off. 2 Wait a few seconds, and then turn the All-In-One back on. 3 Send your document - Lexmark 5150 | X5150 All-In-One Series User's Guide - Page 69
the problem with your All-In-One: • Refer to the Lexmark Solution Center software for more troubleshooting information: 1 Click Start Programs Lexmark X5100 Series Lexmark X5100 Series Solution Center. 2 Click the Troubleshooting tab on the left side of the screen. • Go to http://support.lexmark.com - Lexmark 5150 | X5150 All-In-One Series User's Guide - Page 70
installed and used in accordance with the instructions, may cause harmful interference to radio be directed to: Director of Lexmark Technology & Services Lexmark International, Inc. 740 West by the Director of Manufacturing and Technical Support, Lexmark International, S.A., Boigny, France. This - Lexmark 5150 | X5150 All-In-One Series User's Guide - Page 71
by up to 50 percent. Lexmark is proud to be a participant in this program. As an ENERGY STAR Partner, Lexmark International, Inc. has determined that you harm. Warning: A warning identifies something that could damage your printer hardware or software. A note provides information you may find useful - Lexmark 5150 | X5150 All-In-One Series User's Guide - Page 72
). For further explanation of your warranty alternatives and the nearest Lexmark authorized servicer in your area, contact Lexmark at (407) 563-4600, or on the World Wide Web at www.lexmark.com. Remote technical support is provided for this product throughout its warranty period. For products no - Lexmark 5150 | X5150 All-In-One Series User's Guide - Page 73
WILL APPLY AFTER THIS PERIOD. ALL INFORMATION, SPECIFICATIONS, PRICES, AND SERVICES ARE SUBJECT TO CHANGE AT ANY TIME WITHOUT NOTICE. Limitation of actual damages up to the limit set forth in the following paragraph. Lexmark's liability for actual damages from any cause whatsoever will be limited to - Lexmark 5150 | X5150 All-In-One Series User's Guide - Page 74
34 scan a photograph to e-mail 30 custom size paper loading 17 D display 3 E edit document text (OCR) 37 envelopes loading 17 error messages Cartridge Error 62 Cover Open 60 Ink Low 61 other 64 Paper Jam 59 Paper Out 61 Unlock Scanner 62 F faxing 26 G glossy paper loading 17 greeting cards loading - Lexmark 5150 | X5150 All-In-One Series User's Guide - Page 75
loading 17 Ink Low 61 installing print cartridges 38 iron-on transfers loading 18 L left arrow 5 Lexmark All-In-One Center 8 Lexmark Solution Center tabs Advanced 12 Contact Information 12 How To 12 Maintenance 12 Troubleshooting 12 using 12 Lexmark X5100 Series Photo Editor 10 Lexmark X5100 Series - Lexmark 5150 | X5150 All-In-One Series User's Guide - Page 76
/Clear 5 supplies, ordering 45 T top cover 3 transparencies loading 17 troubleshooting 46 auto-cropping 54 cartridge carrier stalled 61 Cartridge Error 62 general 46 out of paper 61 Paper Jam 59 print quality 53 setup 46 U uninstalling printer software 64 Unlock Scanner 62 USB cable part number 45 - Lexmark 5150 | X5150 All-In-One Series User's Guide - Page 77
Lexmark and Lexmark with diamond design are trademarks of Lexmark International, Inc., registered in the United States and/or other countries. © 2002 Lexmark International, Inc. 740 West New Circle Road Lexington, Kentucky 40550 www.lexmark.com
-
 1
1 -
 2
2 -
 3
3 -
 4
4 -
 5
5 -
 6
6 -
 7
7 -
8
-
9
-
10
-
11
-
12
-
13
-
14
-
15
-
16
-
17
-
18
-
19
-
20
-
21
-
22
-
23
-
24
-
25
-
26
-
27
-
28
-
29
-
30
-
31
-
32
-
33
-
34
-
35
-
36
-
37
-
38
-
39
-
40
-
41
-
42
-
43
-
44
-
45
-
46
-
47
-
48
-
49
-
50
-
51
-
52
-
53
-
54
-
55
-
56
-
57
-
58
-
59
-
60
-
61
-
62
-
63
-
64
-
65
-
66
-
67
-
68
-
69
-
70
-
71
-
72
-
73
-
74
-
75
-
76
-
77
 |
 |

Lexmark X5100 All-In-One
Series User’s Guide