Lexmark 5470 User's Guide - Page 105
Sending a broadcast fax at a scheduled time, Receiving a fax, Receiving a fax manually
 |
UPC - 734646010801
View all Lexmark 5470 manuals
Add to My Manuals
Save this manual to your list of manuals |
Page 105 highlights
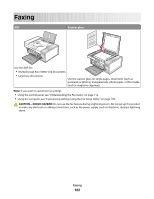
Sending a broadcast fax at a scheduled time You can send a fax to a combination of up to 30 people or groups at a time you choose. 1 Load an original document facedown into the ADF or on the scanner glass. Note: Do not load postcards, photos, small items, transparencies, photo paper, or thin media (such as magazine clippings) into the ADF. Place these items on the scanner glass. 2 From the control panel, press Fax Mode. 3 Press . 4 Press or repeatedly until Delay Fax appears. 5 Press . 6 Press or repeatedly until Delay Until appears. 7 Press . 8 Enter the time you want to send the fax. 9 Press . 10 If the printer is not set to the 24 hour mode, press or repeatedly to select AM or PM. 11 Press to save your settings. 12 Enter a fax number, or press Phone Book to select a number from the Speed Dial or Group Dial list. For more information, see "Entering a fax number" on page 103. 13 If needed, repeat step 12 and press until a maximum of 30 fax numbers have been entered. 14 Press Start Color or Start Black. Note: At the designated time, the fax numbers are dialed and the fax is sent to all of the designated fax numbers. If the fax transmission is unsuccessful to any of the numbers on the broadcast list, the unsuccessful numbers will be dialed again. Receiving a fax Receiving a fax manually 1 Make sure the Auto Answer light is off. 2 To receive the fax if you have not set up a manual answer code: • Press Start Color or Start Black. or • Press * 9 * on the telephone after you answer it and hear fax tones. 3 To receive a fax if you have set up a manual answer code, enter the code on the telephone after you answer it and hear fax tones. Note: For information on how to set up a manual answer code, see the related topic, "Setting a fax manual answer code." 4 Hang up the telephone. The printer receives the fax. Faxing 105
-
 1
1 -
2
-
3
-
4
-
5
-
6
-
7
-
8
-
9
-
10
-
11
-
12
-
13
-
14
-
15
-
16
-
17
-
18
-
19
-
20
-
21
-
22
-
23
-
24
-
25
-
26
-
27
-
28
-
29
-
30
-
31
-
32
-
33
-
34
-
35
-
36
-
37
-
38
-
39
-
40
-
41
-
42
-
43
-
44
-
45
-
46
-
47
-
48
-
49
-
50
-
51
-
52
-
53
-
54
-
55
-
56
-
57
-
58
-
59
-
60
-
61
-
62
-
63
-
64
-
65
-
66
-
67
-
68
-
69
-
70
-
71
-
72
-
73
-
74
-
75
-
76
-
77
-
78
-
79
-
80
-
81
-
82
-
83
-
84
-
85
-
86
-
87
-
88
-
89
-
90
-
91
-
92
-
93
-
94
-
95
-
96
-
97
-
98
-
99
-
 100
100 -
 101
101 -
 102
102 -
 103
103 -
 104
104 -
 105
105 -
 106
106 -
 107
107 -
 108
108 -
 109
109 -
 110
110 -
111
-
112
-
113
-
114
-
115
-
116
-
117
-
118
-
119
-
120
-
121
-
122
-
123
-
124
-
125
-
126
-
127
-
128
-
129
-
130
-
131
-
132
-
133
-
134
-
135
-
136
-
137
-
138
-
139
-
140
-
141
-
142
-
143
-
144
-
145
-
146
-
147
-
148
-
149
-
150
-
151
-
152
-
153
-
154
-
155
-
156
-
157
-
158
-
159
-
160
-
161
-
162
-
163
-
164
-
165
-
166
-
167
-
168
-
169
-
170
-
171
-
172
-
173
-
174
-
175
-
176
-
177
-
178
-
179
-
180
-
181
-
182
-
183
-
184
-
185
-
186
-
187
-
188
-
189
-
190
-
191
-
192
-
193
-
194
-
195
-
196
-
197
-
198
-
199
-
200
-
201
-
202
 |
 |