Lexmark 5470 User's Guide - Page 175
No images have been selected, No photo/paper size selection has been made
 |
UPC - 734646010801
View all Lexmark 5470 manuals
Add to My Manuals
Save this manual to your list of manuals |
Page 175 highlights
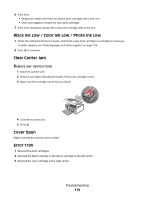
SELECT THE AFTER DIAL SETTING 1 From the desktop, double-click the Productivity Studio icon. 2 From the left pane of the Welcome screen, click Setup and manage faxes. 3 Click Adjust speed dial list and other fax settings. 4 Click the Dialing and Sending tab. 5 From the "Sending options" area, select After Dial from the "When to scan document" section. 6 Click OK. 7 Resend the fax. No images have been selected You have not selected any of the options on step 1 of the photo proof sheet you printed and scanned. 1 Make sure you completely fill in your selected circle or circles. 2 Press to continue. No photo/paper size selection has been made You have not selected any of the options on step 2 of the photo proof sheet you printed and scanned. 1 Make sure you completely fill in your selected circle or circles. 2 Press to continue. Could not detect a proof sheet The document placed on the scanner glass is not a valid proof sheet. For more information, see "Printing photos stored on the memory device using the proof sheet" on page 81. No proof sheet information The photo proof sheet you printed and scanned is no longer valid. You may have removed the memory card or flash drive from the printer, or turned off the printer, before scanning the photo proof sheet. For more information, see "Printing photos stored on the memory device using the proof sheet" on page 81. No valid photo image files detected No supported images have been found on the memory card or flash drive. The printer will read photos created using the JPEG format. For more information, see the documentation that came with the digital camera. Troubleshooting 175
-
 1
1 -
2
-
3
-
4
-
5
-
6
-
7
-
8
-
9
-
10
-
11
-
12
-
13
-
14
-
15
-
16
-
17
-
18
-
19
-
20
-
21
-
22
-
23
-
24
-
25
-
26
-
27
-
28
-
29
-
30
-
31
-
32
-
33
-
34
-
35
-
36
-
37
-
38
-
39
-
40
-
41
-
42
-
43
-
44
-
45
-
46
-
47
-
48
-
49
-
50
-
51
-
52
-
53
-
54
-
55
-
56
-
57
-
58
-
59
-
60
-
61
-
62
-
63
-
64
-
65
-
66
-
67
-
68
-
69
-
70
-
71
-
72
-
73
-
74
-
75
-
76
-
77
-
78
-
79
-
80
-
81
-
82
-
83
-
84
-
85
-
86
-
87
-
88
-
89
-
90
-
91
-
92
-
93
-
94
-
95
-
96
-
97
-
98
-
99
-
100
-
101
-
102
-
103
-
104
-
105
-
106
-
107
-
108
-
109
-
110
-
111
-
112
-
113
-
114
-
115
-
116
-
117
-
118
-
119
-
120
-
121
-
122
-
123
-
124
-
125
-
126
-
127
-
128
-
129
-
130
-
131
-
132
-
133
-
134
-
135
-
136
-
137
-
138
-
139
-
140
-
141
-
142
-
143
-
144
-
145
-
146
-
147
-
148
-
149
-
150
-
151
-
152
-
153
-
154
-
155
-
156
-
157
-
158
-
159
-
160
-
161
-
162
-
163
-
164
-
165
-
166
-
167
-
168
-
169
-
 170
170 -
 171
171 -
 172
172 -
 173
173 -
 174
174 -
 175
175 -
 176
176 -
 177
177 -
 178
178 -
 179
179 -
 180
180 -
181
-
182
-
183
-
184
-
185
-
186
-
187
-
188
-
189
-
190
-
191
-
192
-
193
-
194
-
195
-
196
-
197
-
198
-
199
-
200
-
201
-
202
 |
 |
