Lexmark 5470 User's Guide - Page 49
Con network printers, Connect to network printer, Windows XP or 2000 users only, Con - windows 8
 |
UPC - 734646010801
View all Lexmark 5470 manuals
Add to My Manuals
Save this manual to your list of manuals |
Page 49 highlights
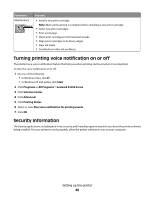
Windows XP or 2000 users only 1 Click Start Œ Settings Œ Printers or Printers and Faxes. 2 Right-click the Lexmark X5400 Series icon. 3 From the sidebar menu, select Properties. 4 Click the Ports tab. 5 Make sure: • The port is set to a USB port. • File is not set as the port. Configure network printers Configure To configure a network printer, select a printer from the list in the window. Click Configure to assign the printer an Internet Protocol (IP) address. Contact your system support person for more information. Add printers Specify remote subnets that may have direct network attached printers. If the software detects a direct network attached printer, you must first highlight the printer in the window, and then click Configure to manually assign an IP address to the printer. Contact your system support person for more information. Note: The software does not automatically configure printers found on remote subnets. Refresh Click Refresh to have the Configuration Utility automatically search to find and configure newly added printers. Connect to network printer You can send scanned images from a network attached printer to your computer. Also, your jobs will open with software that is already installed on your computer. To enable this feature, create and enter a name for your computer. When you scan an item, a list of names will appear on the Control Panel of your networked printer. You can send the scanned image to your computer by selecting your computer name. If you want to prevent other people from sending scanned images to your computer, you can enter a Personal Identification Number (PIN). 1 Select the check box beside I wish to require a PIN to scan to my computer. 2 Create and enter a 4-digit number. Note: Every time you send a scanned image from the networked printer to your computer, you must enter this number on the keypad of the printer. General networking 49
-
 1
1 -
2
-
3
-
4
-
5
-
6
-
7
-
8
-
9
-
10
-
11
-
12
-
13
-
14
-
15
-
16
-
17
-
18
-
19
-
20
-
21
-
22
-
23
-
24
-
25
-
26
-
27
-
28
-
29
-
30
-
31
-
32
-
33
-
34
-
35
-
36
-
37
-
38
-
39
-
40
-
41
-
42
-
43
-
 44
44 -
 45
45 -
 46
46 -
 47
47 -
 48
48 -
 49
49 -
 50
50 -
 51
51 -
 52
52 -
 53
53 -
 54
54 -
55
-
56
-
57
-
58
-
59
-
60
-
61
-
62
-
63
-
64
-
65
-
66
-
67
-
68
-
69
-
70
-
71
-
72
-
73
-
74
-
75
-
76
-
77
-
78
-
79
-
80
-
81
-
82
-
83
-
84
-
85
-
86
-
87
-
88
-
89
-
90
-
91
-
92
-
93
-
94
-
95
-
96
-
97
-
98
-
99
-
100
-
101
-
102
-
103
-
104
-
105
-
106
-
107
-
108
-
109
-
110
-
111
-
112
-
113
-
114
-
115
-
116
-
117
-
118
-
119
-
120
-
121
-
122
-
123
-
124
-
125
-
126
-
127
-
128
-
129
-
130
-
131
-
132
-
133
-
134
-
135
-
136
-
137
-
138
-
139
-
140
-
141
-
142
-
143
-
144
-
145
-
146
-
147
-
148
-
149
-
150
-
151
-
152
-
153
-
154
-
155
-
156
-
157
-
158
-
159
-
160
-
161
-
162
-
163
-
164
-
165
-
166
-
167
-
168
-
169
-
170
-
171
-
172
-
173
-
174
-
175
-
176
-
177
-
178
-
179
-
180
-
181
-
182
-
183
-
184
-
185
-
186
-
187
-
188
-
189
-
190
-
191
-
192
-
193
-
194
-
195
-
196
-
197
-
198
-
199
-
200
-
201
-
202
 |
 |
